aleju/cat-generator

aleju/cat-generator is one of the AI-powered repositories TopGit tracks, currently at 375 stars, written primarily in Lua. Generate cat images with neural networks
Snapshot summary built from the project's own GitHub metadata — there's no written TopGit review yet. The page will update automatically when a full review is published.
TopGit writes full reviews for the most-starred, most-requested repositories. This page is a snapshot until then — see the READ ME tab for the original README in full.
Snapshot
Top contributors
Show top contributors
About
This script generates new images of cats using the technique of generative adversarial networks (GAN), as described in the paper by Goodfellow et al. The images are enhanced with the laplacian pyramid technique from Denton and Soumith Chintala et. al., implemented as a single G (generator) as described in the blog post by Anders Boesen Lindbo Larsen and Søren Kaae Sønderby. Most of the code is based on facebook's eyescream project. The script also uses code from other repositories for spatial transformers, weight initialization and LeakyReLUs.
Images
The following images were generated by networks trained with:
- Model G32up, color:
th train.lua --D_iterations=2. This model is currently not the default for G, i.e. must be manually activated inmodels.lua. - Model G32up, grayscale:
th train.lua --colorSpace="y". See above. - Model G32up-c, color:
th train.lua. This model is currently the default model/architecture for G.
The difference between model G32up and G32up-c is simply that G32up-c is about one layer deeper and has more convolution kernels.
Model G32up-c (currently default)
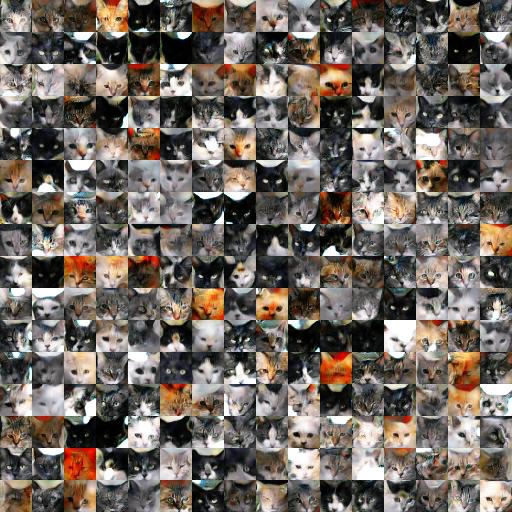
256 randomly generated 32x32 cat images. (Model G32up-c)
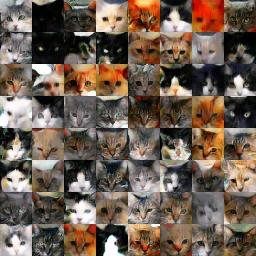
64 generated 32x32 cat images, rated by D as the best images among 1024 randomly generated ones. (Model G32up-c)

16 generated images (each pair left) and their nearest neighbours from the training set (each pair right). Distance was measured by 2-Norm (torch.dist()). The 16 selected images were the "best" ones among 1024 images according to the rating by D, hence some similarity with the training set is expected. (Model G32up-c)
Training progress of the network while learning to generate color images. Epoch 1 to 750 as a youtube video. (Model G32up-c)
Model G32up
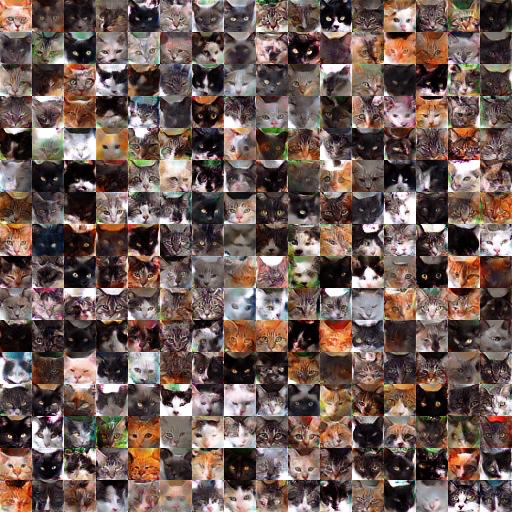
256 randomly generated 32x32 cat images. (Model G32up)
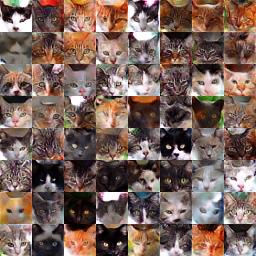
64 generated 32x32 cat images, rated by D as the best images among 1024 randomly generated ones. (Model G32up)
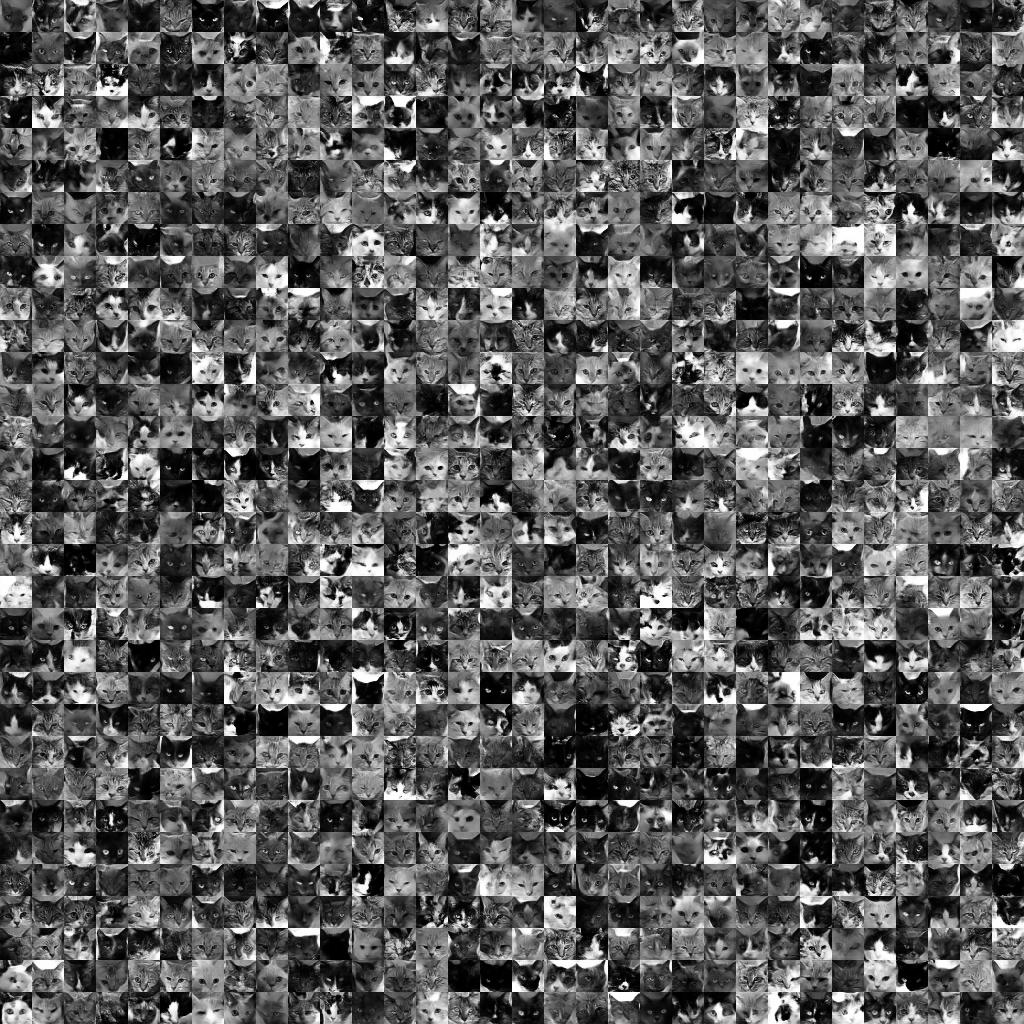
1024 randomly generated 32x32 grayscale cat images. (Model G32up)
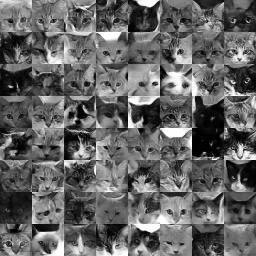
64 generated 32x32 grayscale cat images, rated by D as the best images among 1024 randomly generated ones. (Model G32up)

16 generated images (each pair left) and their nearest neighbours from the training set (each pair right). Distance was measured by 2-Norm (torch.dist()). The 16 selected images were the "best" ones among 1024 images according to the rating by D, hence some similarity with the training set is expected. (Model G32up)
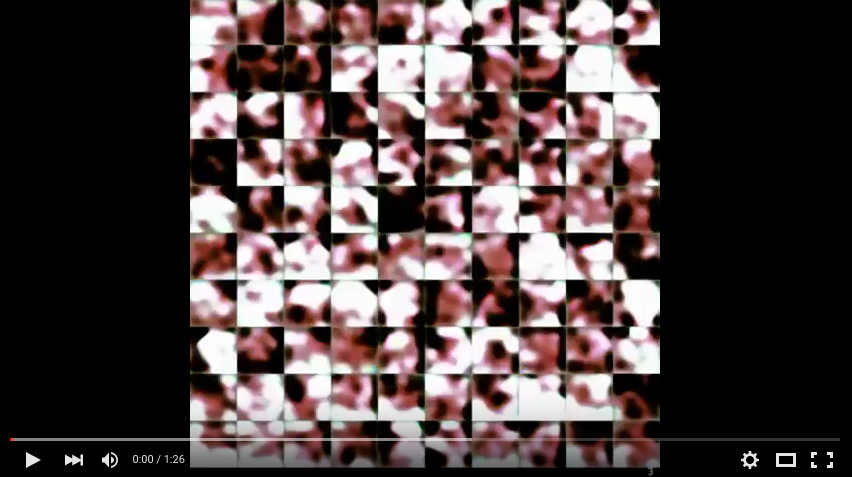
Training progress of the network while learning to generate color images. Epoch 1 to 690 as a youtube video. (Model G32up)
Background Knowledge
The basic principle of GANs is to train two networks in a kind of forger-police-relationship. The forger is called G (generator) and the police D (discriminator). It is D's job to take a look at an image and estimate whether it is a fake or a real image (where "real" is synonymous with "from the training set"). Naturally it's G's job to generate images that trick D into believing that they are from the training set. With a large enough training set and some regularization strategies, D cannot just memorize the training set. As a result, D must learn the general rules that govern the look of images from the training set (i.e. a generalizing function). Similarly, G must learn how to "paint" new images that look like the ones from the training set, otherwise it would not be able to trick D.
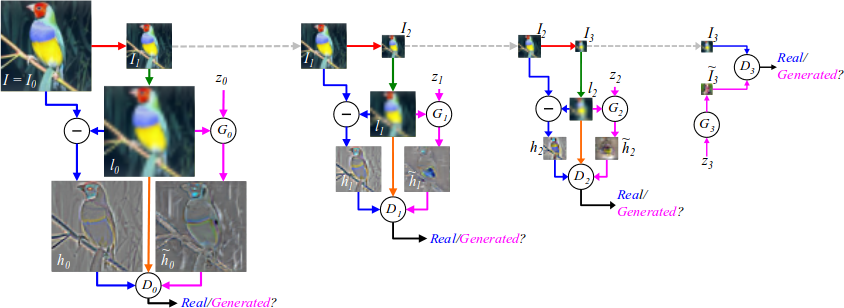
The previously mentioned laplacian pyramid technique for GANs is pretty straight-forward: Instead of training G and D on full-sized images (e.g. 64x64 pixels) you train them on smaller ones (e.g. 8x8 pixels). Afterwards you increase the size of the generated images in multiple steps to the final size, e.g. from 8x8 to 16x16 to 32x32 to 64x64. For each of these steps you train another pair of G and D*, but in case of these upscaling steps they are trained to learn good refinements of the upscaled (and hence blurry) images. That means that D gets fed refined/sharpened images and must tell, whether these were real images (i.e. blurry images from the training set with optimal refinements) or fake images from G (i.e. blurry images from the training set, but the refinement was done by G). Again, G must learn to generate good refinements and D must learn what good refined images look like. The image below (taken from the paper) shows the process (they start with the full sized images, the one on the far right could be generated by a GAN). Note that this training methodology is similar to how one would naturally paint images: You start with a rough sketch (low resolution image) and then progressively add more and more details (increases in resolution).
*) This project actually uses a technique that merges the laplacian pyramid into one pair of G and D. The basic principle however stays the same.
Requirements
- Torch with the following libraries (most of them are probably already installed by default):
nn(luarocks install nn)pl(luarocks install pl)paths(luarocks install paths)image(luarocks install image)optim(luarocks install optim)cutorch(luarocks install cutorch)cunn(luarocks install cunn)cudnn(luarocks install cudnn)dpnn(luarocks install dpnn)stn(see here)- display
- Python 2.7 (only tested with that version)
- scipy
- numpy
- scikit-image
- 10k cats dataset
- CUDA capable GPU (4GB memory or more) with cudnn3
Usage
Preperation steps:
- Install all requirements as listed above.
- Download and extract the 10k cats dataset into a directory, e.g.
/foo/bar. That folder should then contain the subfoldersCAT_00toCAT_06. - Clone the repository.
- Switch to the repository's subdirectory
datasetviacd datasetand convert your downloaded cat images into a normalized and augmented set of ~100k cat faces withpython generate_dataset.py --path="/foo/bar". This may take a good two hours or so to run through, as it performs lots of augmentations.
Training and Sampling:
- Start display with
th -ldisplay.start - Open
http://localhost:8000/in your browser (plotting interface by display). - Train V for a few epochs with
th train_v.lua. (Wait for asaving network to <path>message, then stop manually.) - Pretrain G for a few epochs with
th pretrain_g.lua. (Wait for asaving network to <path>message, then stop manually.) (This step can be skipped.) - Train a network with
th train.luafor 200 epochs or more. You might have to add--D_iterations=2to get good results. - Sample images (random, best, worst images) to directory
samples/withth sample.lua. Add--neighboursif you also want to sample nearest neighbours (from the training set) of generated images (takes a long time). Add e.g.--run=10to sample 10 groups of images.
Add --colorSpace="y" to each script to work with grayscale images.
Note: During training images are saved in logs/images, logs/images_good and logs/images_bad. They will not get deleted automatically and can accumulate over time.
V
V (the Validator) is intended to be a half-decent replacement of validation scores, which you don't have in GANs. V's architecture is - similarly to D - a convolutional neural network. Just like D, V creates fake/real judgements for images, i. e. it rates how fake images look. V gets fed images generated by G and rates them. The mean of that rating can be used as the mentioned validation score replacement. V is trained once before the generator network. During its training, V sees real images from the dataset as well as synthetically generated fake images. The methods to generate the synthetic images are roughly:
- Random mixing of two images.
- Random warping of an image (i. e. move parts of the image around, causing distortions).
- Random stamping of an image (i. e. replace parts of the image by parts from somewhere else in the image).
- Randomly throw random pixel values together (with some gaussian blurring technique, so that its not just gaussian noise).
These techniques are then sometimes combined with each other, e. g. one image is modified by warping, another by stamping and then both are mixed into one final synthetic image.
V seems to be capable of often spotting really bad images. It is however rather bad at distinguishing the quality of good images. So long as the image looks roughly like a cat, V will tend to produce a good rating. The images start to look good after epoch 50 or so, which is when V's rating isn't helpful anymore.
Architectures
All networks are optimized for 32x32 images. They should work with 16x16 images too. Anything else will likely result in errors. Most of the activations were PReLUs, because they perform better than ReLUs in my experience. Networks with LeakyReLUs seemed to blow up more frequently, so I didn't use them very much.
G
The architecture of G (version G32up-c) is mostly copied from the blog post by Anders Boesen Lindbo Larsen and Søren Kaae Sønderby. It is basically a full laplacian pyramid in one network. The network starts with a small linear layer, which roughly generates 4x4 images. That is followed by upsampling layers, which increase the image size to 8x8 then 16x16 and then 32x32 pixels.
local model = nn.Sequential()
-- 4x4
model:add(nn.Linear(noiseDim, 512*4*4))
model:add(nn.PReLU(nil, nil, true))
model:add(nn.View(512, 4, 4))

-- 4x4 -> 8x8
model:add(nn.SpatialUpSamplingNearest(2))
model:add(cudnn.SpatialConvolution(512, 512, 3, 3, 1, 1, (3-1)/2, (3-1)/2))
model:add(nn.SpatialBatchNormalization(512))
model:add(nn.PReLU(nil, nil, true))

-- 8x8 -> 16x16
model:add(nn.SpatialUpSamplingNearest(2))
model:add(cudnn.SpatialConvolution(512, 256, 3, 3, 1, 1, (3-1)/2, (3-1)/2))
model:add(nn.SpatialBatchNormalization(256))
model:add(nn.PReLU(nil, nil, true))

-- 16x16 -> 32x32
model:add(nn.SpatialUpSamplingNearest(2))
model:add(cudnn.SpatialConvolution(256, 128, 5, 5, 1, 1, (5-1)/2, (5-1)/2))
model:add(nn.SpatialBatchNormalization(128))
model:add(nn.PReLU(nil, nil, true))

model:add(cudnn.SpatialConvolution(128, dimensions[1], 3, 3, 1, 1, (3-1)/2, (3-1)/2))
model:add(nn.Sigmoid())
where dimensions[1] is 3 for color and 1 for grayscale mode. noiseDim is a vector of size 100 with values sampled from a uniform distribution between -1 and +1.
A different version of G is G32up, which is shown in some of the images at the top. It is mostly identical to G32up-c, just a bit smaller:
local model = nn.Sequential()
model:add(nn.Linear(noiseDim, 128*8*8))
model:add(nn.View(128, 8, 8))
model:add(nn.PReLU(nil, nil, true))

model:add(nn.SpatialUpSamplingNearest(2))
model:add(cudnn.SpatialConvolution(128, 256, 5, 5, 1, 1, (5-1)/2, (5-1)/2))
model:add(nn.SpatialBatchNormalization(256))
model:add(nn.PReLU(nil, nil, true))

model:add(nn.SpatialUpSamplingNearest(2))
model:add(cudnn.SpatialConvolution(256, 128, 5, 5, 1, 1, (5-1)/2, (5-1)/2))
model:add(nn.SpatialBatchNormalization(128))
model:add(nn.PReLU(nil, nil, true))

model:add(cudnn.SpatialConvolution(128, dimensions[1], 3, 3, 1, 1, (3-1)/2, (3-1)/2))
model:add(nn.Sigmoid())
D
D is a convolutional network with multiple branches. It uses a spatial transformer at the start to remove rotations. Three of the four branches also have spatial transformers (for rotation, translation and scaling). As such they can learn to focus on specific areas of the image. (I don't know if they really did learn that.) The fourth branch is intended to analyze the whole image.
I reused this architecture from a previous project where it seemed to improve performance slightly. I did not test a "normal" convnet architecture for this project, though such a structure performed well when I used it to generate skies, so it might work here too.
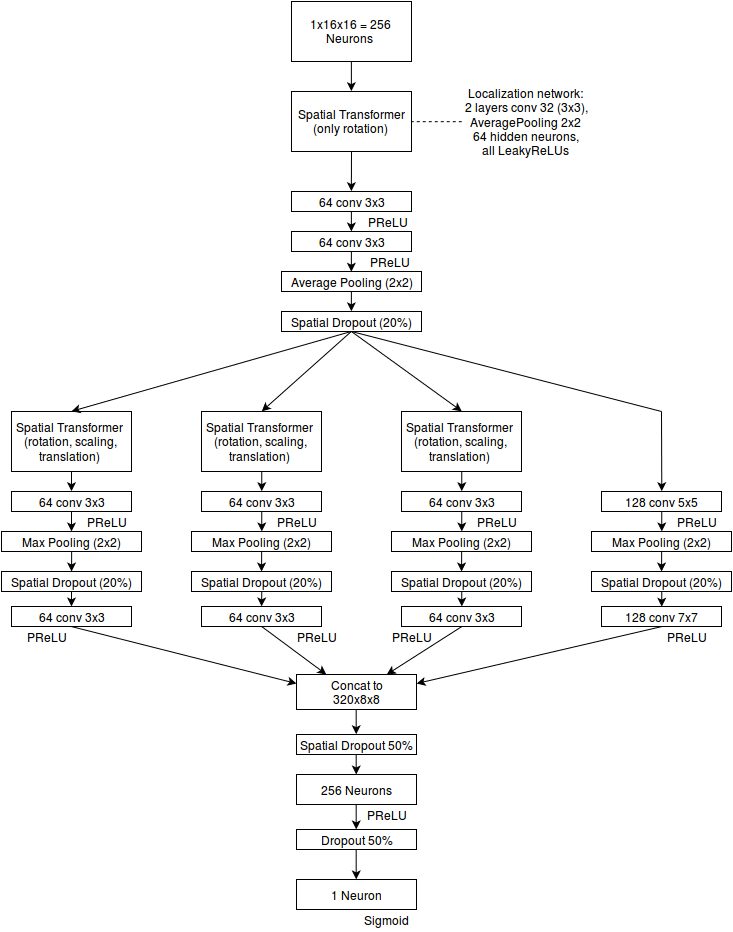
All convolutions were size-preserving. All localization networks of the spatial transformers used the same architecture. The last hidden layer ended up a bit small to counteract the large concat. Might be worthwhile to test an architecture with a pooling layer in front of it and then 1024 neurons.
V
The validator is a standard convolutional network.
local model = nn.Sequential()
local activation = nn.LeakyReLU

model:add(nn.SpatialConvolution(dimensions[1], 128, 3, 3, 1, 1, (3-1)/2))
model:add(activation())
model:add(nn.SpatialMaxPooling(2, 2))
model:add(nn.SpatialConvolution(128, 128, 3, 3, 1, 1, (3-1)/2))
model:add(nn.SpatialBatchNormalization(128))
model:add(activation())
model:add(nn.SpatialMaxPooling(2, 2))
model:add(nn.Dropout())

model:add(nn.SpatialConvolution(128, 256, 3, 3, 1, 1, (3-1)/2))
model:add(activation())
model:add(nn.SpatialConvolution(256, 256, 3, 3, 1, 1, (3-1)/2))
model:add(nn.SpatialBatchNormalization(256))
model:add(activation())
model:add(nn.SpatialMaxPooling(2, 2))
model:add(nn.SpatialDropout())
local imgSize = 0.25 * 0.25 * 0.25 * dimensions[2] * dimensions[3]
model:add(nn.View(256 * imgSize))

model:add(nn.Linear(256 * imgSize, 1024))
model:add(nn.BatchNormalization(1024))
model:add(activation())
model:add(nn.Dropout())

model:add(nn.Linear(1024, 1024))
model:add(nn.BatchNormalization(1024))
model:add(activation())
model:add(nn.Dropout())

model:add(nn.Linear(1024, 2))
model:add(nn.SoftMax())
where dimensions[1] is 3 (color) or 1 (grayscale). dimensions[2] and dimensions[3] are both 32.
(A 1-neuron sigmoid output would have probably been more logical.)
Dataset preprocessing
As a preprocessing step, all faces must be extracted from the 10k cats dataset. The dataset contains facial keypoints for each image (ears, eyes, nose), so extracting the faces isn't too hard. Each of the faces gets rotated so that the eyeline is parallel to the x axis (i.e. rotations are removed). That was necessary as many cat images tend to be heavily rotated, making the learning task significantly harder (though that might work now with the addition of Spatial Transformers in D). After that normalization step, the images are augmented by introducing (now small) rotations, translations, scalings, brightness changes, by flipping them horizontally and by adding minor gaussian noise. The data set size is increased by that to roughly 100k images (however these images are often only marginally different, so it's not 100k images worth of information).
Other
- Adam was used as the optimizer.
- Batch size was 32, i.e. D would get 16 fake and 16 real images, while G would get 32 attempts to mess with D.
Related repositories
TensorFlow is Google's open-source, end-to-end platform for machine learning, hosted at tensorflow/tensorflow under the Apache-2.0 license. It was originally built within Google Brain's Machine Intelligence team for ML and neural network research, and today it ships stable Python and C++ APIs alongside GPU, CPU-only, and Docker install paths. The README positions it as covering both research work and shipping ML-powered applications.
Hugging Face Transformers (huggingface/transformers) is a Python library that centralizes model definitions for text, computer vision, audio, video, and multimodal machine learning, covering both inference and training. The README describes it as a pivot point compatible with training frameworks such as Axolotl, DeepSpeed, and PyTorch-Lightning, and inference engines such as vLLM, SGLang, and TGI, with more than 1M+ model checkpoints listed on the Hugging Face Hub.
LLMs-from-scratch is Sebastian Raschka's GitHub companion to the Manning book Build a Large Language Model (From Scratch), ISBN 9781633437166. It walks through building, pretraining, and finetuning a GPT-style model in PyTorch across seven chapters and five appendices, plus a growing set of bonus notebooks covering newer open architectures.
PyTorch is an open-source Python package hosted at pytorch/pytorch on GitHub, built around two core capabilities: NumPy-like Tensor computation with GPU acceleration, and deep neural networks built through a tape-based autograd system. Its components include torch.nn for network layers, torch.jit for compiling models into TorchScript, and torch.multiprocessing for sharing Tensors across processes, with build support for CUDA, AMD ROCm, and Intel GPU backends documented in the README.
Quick answers
How does aleju/cat-generator compare to other AI Tools projects?
aleju/cat-generator is tracked by TopGit in the AI Tools category, with 375 GitHub stars and written in Lua. Browse the AI Tools topic page on TopGit to compare it against similar projects by stars and activity.
Is aleju/cat-generator open source?
Yes — aleju/cat-generator ships under the MIT license, which makes its source code freely readable (and, depending on license terms, forkable and reusable). Source: github.com/aleju/cat-generator.
What else is in the AI Tools space?
aleju/cat-generator is tracked by TopGit under the AI Tools category, alongside 7 GitHub-tagged topics. Trending and Topics pages list peer repositories of comparable stars and language.
What is aleju/cat-generator?
aleju/cat-generator (aleju/cat-generator) is a Lua project on GitHub. From the project's own README: Generate cat images with neural networks
Where do I read more about aleju/cat-generator?
This TopGit page is a snapshot — the READ ME tab shows the project's own README content (links stripped, images preserved). The GitHub repository at github.com/aleju/cat-generator is the definitive source.
Why is aleju/cat-generator categorized under AI Tools?
TopGit places aleju/cat-generator in the AI Tools category based on its GitHub topics and description (tagged: "cat", "cats", "dcgan"). Categories are assigned from real repository metadata, not editorial guesswork.
Read full README in the tab above.
Want a second opinion on cat-generator?
Ask an AI that can read this page — one click and you get its take on cat-generator.