aquasecurity/kube-hunter is an open-source project on GitHub with 5.1k stars, written primarily in Python. Hunt for security weaknesses in Kubernetes clusters
Snapshot summary built from the project's own GitHub metadata — there's no written TopGit review yet. The page will update automatically when a full review is published.
WHY NO REVIEW YET
TopGit writes full reviews for the most-starred, most-requested repositories. This page is a snapshot until then — see the READ ME tab for the original README in full.
kube-hunter is not under active development anymore. If you're interested in scanning Kubernetes clusters for known vulnerabilities, we recommend using Trivy. Specifically, Trivy's Kubernetes misconfiguration scanning and KBOM vulnerability scanning. Learn more in the Trivy Docs.
kube-hunter hunts for security weaknesses in Kubernetes clusters. The tool was developed to increase awareness and visibility for security issues in Kubernetes environments. You should NOT run kube-hunter on a Kubernetes cluster that you don't own!
Run kube-hunter: kube-hunter is available as a container (aquasec/kube-hunter), and we also offer a web site at kube-hunter.aquasec.com where you can register online to receive a token allowing you to see and share the results online. You can also run the Python code yourself as described below.
Explore vulnerabilities: The kube-hunter knowledge base includes articles about discoverable vulnerabilities and issues. When kube-hunter reports an issue, it will show its VID (Vulnerability ID) so you can look it up in the KB at https://aquasecurity.github.io/kube-hunter/ If you're interested in kube-hunter's integration with the Kubernetes ATT&CK Matrix Continue Reading
kube-hunter demo video
Table of Contents
Table of Contents
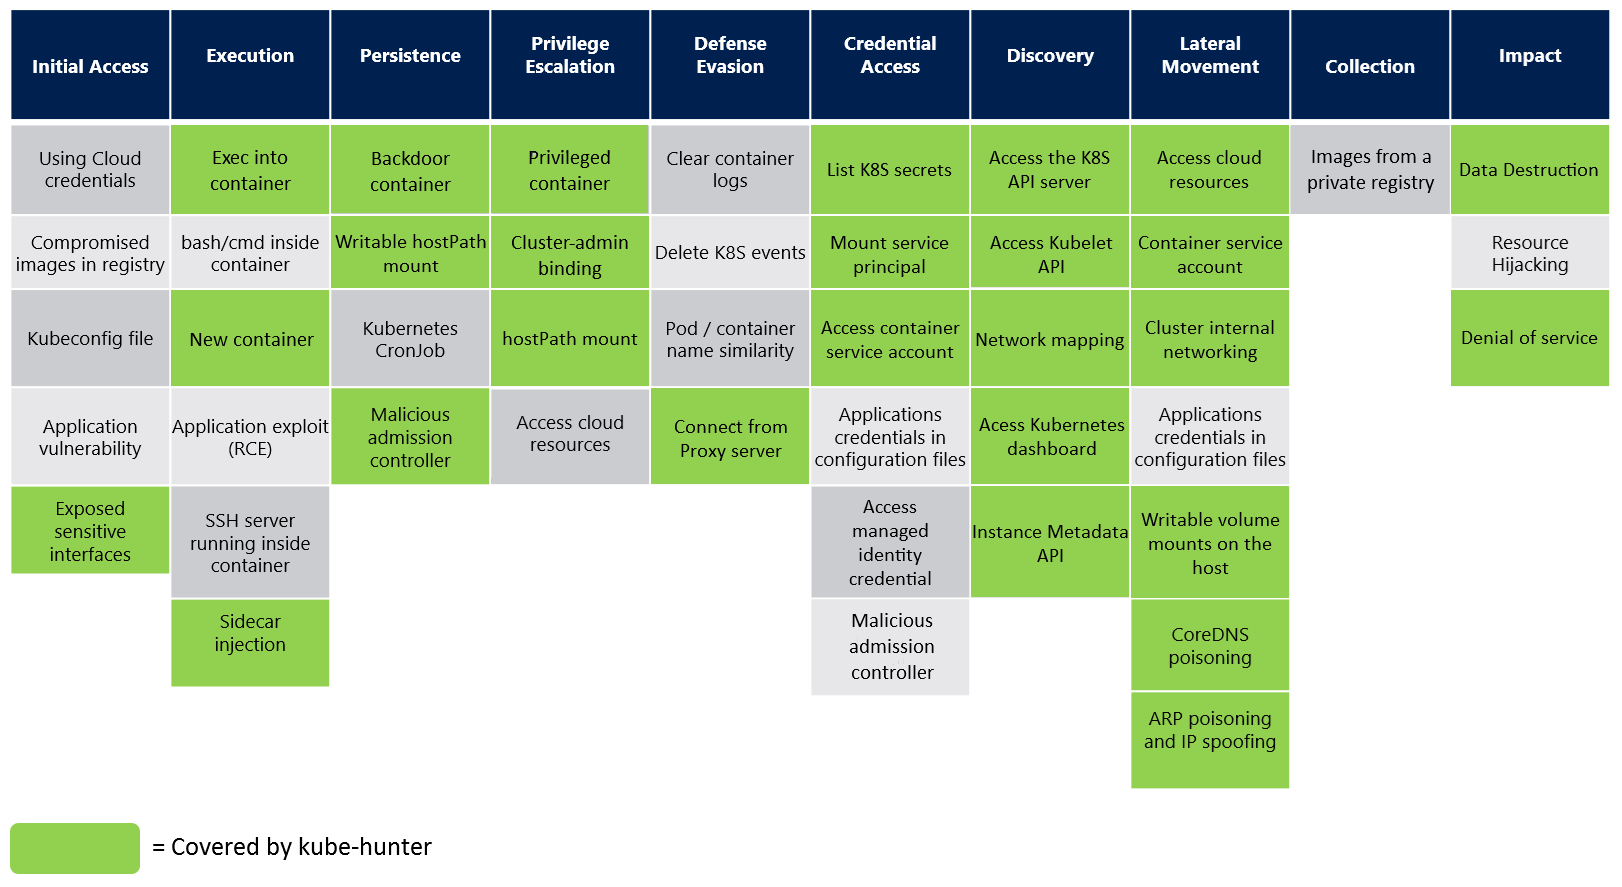
Kubernetes ATT&CK Matrix
Hunting
Where should I run kube-hunter?
Scanning options
Authentication
Active Hunting
List of tests
Nodes Mapping
Output
Dispatching
Advanced Usage
Azure Quick Scanning
Custom Hunting
Deployment
On Machine
Prerequisites
Install with pip
Run from source
Container
Pod
Contribution
License
Kubernetes ATT&CK Matrix
kube-hunter now supports the new format of the Kubernetes ATT&CK matrix.
While kube-hunter's vulnerabilities are a collection of creative techniques designed to mimic an attacker in the cluster (or outside it)
The Mitre's ATT&CK defines a more general standardised categories of techniques to do so.
You can think of kube-hunter vulnerabilities as small steps for an attacker, which follows the track of a more general technique he would aim for.
Most of kube-hunter's hunters and vulnerabilities can closly fall under those techniques, That's why we moved to follow the Matrix standard.
Some kube-hunter vulnerabities which we could not map to Mitre technique, are prefixed with the General keyword
Hunting
Where should I run kube-hunter?
There are three different ways to run kube-hunter, each providing a different approach to detecting weaknesses in your cluster:
Run kube-hunter on any machine (including your laptop), select Remote scanning and give the IP address or domain name of your Kubernetes cluster. This will give you an attackers-eye-view of your Kubernetes setup.
You can run kube-hunter directly on a machine in the cluster, and select the option to probe all the local network interfaces.
You can also run kube-hunter in a pod within the cluster. This indicates how exposed your cluster would be if one of your application pods is compromised (through a software vulnerability, for example). (--pod flag)
Scanning options
First check for these pre-requisites.
By default, kube-hunter will open an interactive session, in which you will be able to select one of the following scan options. You can also specify the scan option manually from the command line. These are your options:
Remote scanning
To specify remote machines for hunting, select option 1 or use the --remote option. Example:
kube-hunter --remote some.node.com
Interface scanning
To specify interface scanning, you can use the --interface option (this will scan all of the machine's network interfaces). Example:
kube-hunter --interface
Network scanning
To specify a specific CIDR to scan, use the --cidr option. Example:
kube-hunter --cidr 192.168.0.0/24
Kubernetes node auto-discovery
Set --k8s-auto-discover-nodes flag to query Kubernetes for all nodes in the cluster, and then attempt to scan them all. By default, it will use in-cluster config to connect to the Kubernetes API. If you'd like to use an explicit kubeconfig file, set --kubeconfig /location/of/kubeconfig/file.
Also note, that this is always done when using --pod mode.
Authentication
In order to mimic an attacker in it's early stages, kube-hunter requires no authentication for the hunt.
Impersonate - You can provide kube-hunter with a specific service account token to use when hunting by manually passing the JWT Bearer token of the service-account secret with the --service-account-token flag.
When runing with --pod flag, kube-hunter uses the service account token mounted inside the pod to authenticate to services it finds during the hunt.
if specified, --service-account-token flag takes priority when running as a pod
Active Hunting
Active hunting is an option in which kube-hunter will exploit vulnerabilities it finds, to explore for further vulnerabilities.
The main difference between normal and active hunting is that a normal hunt will never change the state of the cluster, while active hunting can potentially do state-changing operations on the cluster, which could be harmful.
By default, kube-hunter does not do active hunting. To active hunt a cluster, use the --active flag. Example:
kube-hunter --remote some.domain.com --active
List of tests
You can see the list of tests with the --list option: Example:
kube-hunter --list
To see active hunting tests as well as passive:
kube-hunter --list --active
Nodes Mapping
To see only a mapping of your nodes network, run with --mapping option. Example:
kube-hunter --cidr 192.168.0.0/24 --mapping
This will output all the Kubernetes nodes kube-hunter has found.
Output
To control logging, you can specify a log level, using the --log option. Example:
kube-hunter --active --log WARNING
Available log levels are:
DEBUG
INFO (default)
WARNING
Dispatching
By default, the report will be dispatched to stdout, but you can specify different methods by using the --dispatch option. Example:
kube-hunter --report json --dispatch http
Available dispatch methods are:
stdout (default)
http (to configure, set the following environment variables:)
KUBEHUNTER_HTTP_DISPATCH_URL (defaults to: https://localhost)
KUBEHUNTER_HTTP_DISPATCH_METHOD (defaults to: POST)
Advanced Usage
Azure Quick Scanning
When running as a Pod in an Azure or AWS environment, kube-hunter will fetch subnets from the Instance Metadata Service. Naturally this makes the discovery process take longer.
To hardlimit subnet scanning to a /24 CIDR, use the --quick option.
Custom Hunting
Custom hunting enables advanced users to have control over what hunters gets registered at the start of a hunt.
If you know what you are doing, this can help if you want to adjust kube-hunter's hunting and discovery process for your needs.
Example:
kube-hunter --custom <HunterName1> <HunterName2>
Enabling Custom hunting removes all hunters from the hunting process, except the given whitelisted hunters.
The --custom flag reads a list of hunters class names, in order to view all of kube-hunter's class names, you can combine the flag --raw-hunter-names with the --list flag.
Example:
kube-hunter --active --list --raw-hunter-names
Notice: Due to kube-huner's architectural design, the following "Core Hunters/Classes" will always register (even when using custom hunting):
HostDiscovery
Generates ip addresses for the hunt by given configurations
Automatically discovers subnets using cloud Metadata APIs
FromPodHostDiscovery
Auto discover attack surface ip addresses for the hunt by using Pod based environment techniques
Automatically discovers subnets using cloud Metadata APIs
PortDiscovery
Port scanning given ip addresses for known kubernetes services ports
Collector
Collects discovered vulnerabilities and open services for future report
StartedInfo
Prints the start message
SendFullReport
Dispatching the report based on given configurations
Deployment
There are three methods for deploying kube-hunter:
Install module dependencies. (You may prefer to do this within a Virtual Environment)
cd ./kube-hunter
pip install -r requirements.txt
Run:
python3 kube_hunter
If you want to use pyinstaller/py2exe you need to first run the install_imports.py script.
Container
Aqua Security maintains a containerized version of kube-hunter at aquasec/kube-hunter:aqua. This container includes this source code, plus an additional (closed source) reporting plugin for uploading results into a report that can be viewed at kube-hunter.aquasec.com. Please note, that running the aquasec/kube-hunter container and uploading reports data are subject to additional terms and conditions.
The Dockerfile in this repository allows you to build a containerized version without the reporting plugin.
If you run kube-hunter container with the host network, it will be able to probe all the interfaces on the host:
docker run -it --rm --network host aquasec/kube-hunter
Note for Docker for Mac/Windows: Be aware that the "host" for Docker for Mac or Windows is the VM that Docker runs containers within. Therefore specifying --network host allows kube-hunter access to the network interfaces of that VM, rather than those of your machine.
By default, kube-hunter runs in interactive mode. You can also specify the scanning option with the parameters described above e.g.
docker run --rm aquasec/kube-hunter --cidr 192.168.0.0/24
Pod
This option lets you discover what running a malicious container can do/discover on your cluster. This gives a perspective on what an attacker could do if they were able to compromise a pod, perhaps through a software vulnerability. This may reveal significantly more vulnerabilities.
The example job.yaml file defines a Job that will run kube-hunter in a pod, using default Kubernetes pod access settings. (You may wish to modify this definition, for example to run as a non-root user, or to run in a different namespace.)
Run the job with kubectl create -f ./job.yaml
Find the pod name with kubectl describe job kube-hunter
View the test results with kubectl logs <pod name>
Contribution
To read the contribution guidelines, Click here
License
This repository is available under the Apache License 2.0.
How active is development on aquasecurity/kube-hunter?
The most recent commit recorded on aquasecurity/kube-hunter was 2.4 years ago, based on the GitHub push timestamp. The repository has 611 forks — one of the better signals of community interest.
How many stars does aquasecurity/kube-hunter have?
aquasecurity/kube-hunter has 5.1k GitHub stars — refresh the page for the live number, or check github.com/aquasecurity/kube-hunter. TopGit mirrors GitHub's count but does not claim minute-by-minute accuracy.
What language is aquasecurity/kube-hunter written in?
aquasecurity/kube-hunter is written primarily in Python. GitHub's language field is based on the largest share of bytes in the default branch.
What topics is aquasecurity/kube-hunter associated with?
GitHub's repository topics for aquasecurity/kube-hunter: "hacktoberfest", "kubernetes-clusters", "vulnerabilities". TopGit's editorial category is open-source.
Where do I read more about aquasecurity/kube-hunter?
This TopGit page is a snapshot — the READ ME tab shows the project's own README content (links stripped, images preserved). The GitHub repository at github.com/aquasecurity/kube-hunter is the definitive source.
Read full README in the tab above.
Curious whether kube-hunter is right for you?
Let ChatGPT, Claude, or Perplexity look into it — click below and see what AI actually says about kube-hunter.
 /kube-hunter