cvg/GeoCalib

A look at cvg/GeoCalib: 891 stars on GitHub, written primarily in Python, tracked under the AI Tools category. GeoCalib: Learning Single-image Calibration with Geometric Optimization (ECCV 2024)
Snapshot summary built from the project's own GitHub metadata — there's no written TopGit review yet. The page will update automatically when a full review is published.
TopGit writes full reviews for the most-starred, most-requested repositories. This page is a snapshot until then — see the READ ME tab for the original README in full.
Snapshot
Top contributors
Show top contributors
GeoCalib 📸
Single-image Calibration with Geometric Optimization
Alexander Veicht · Paul-Edouard Sarlin · Philipp Lindenberger · Marc Pollefeys
ECCV 2024
Paper | Demo 🤗 | Colab | Video
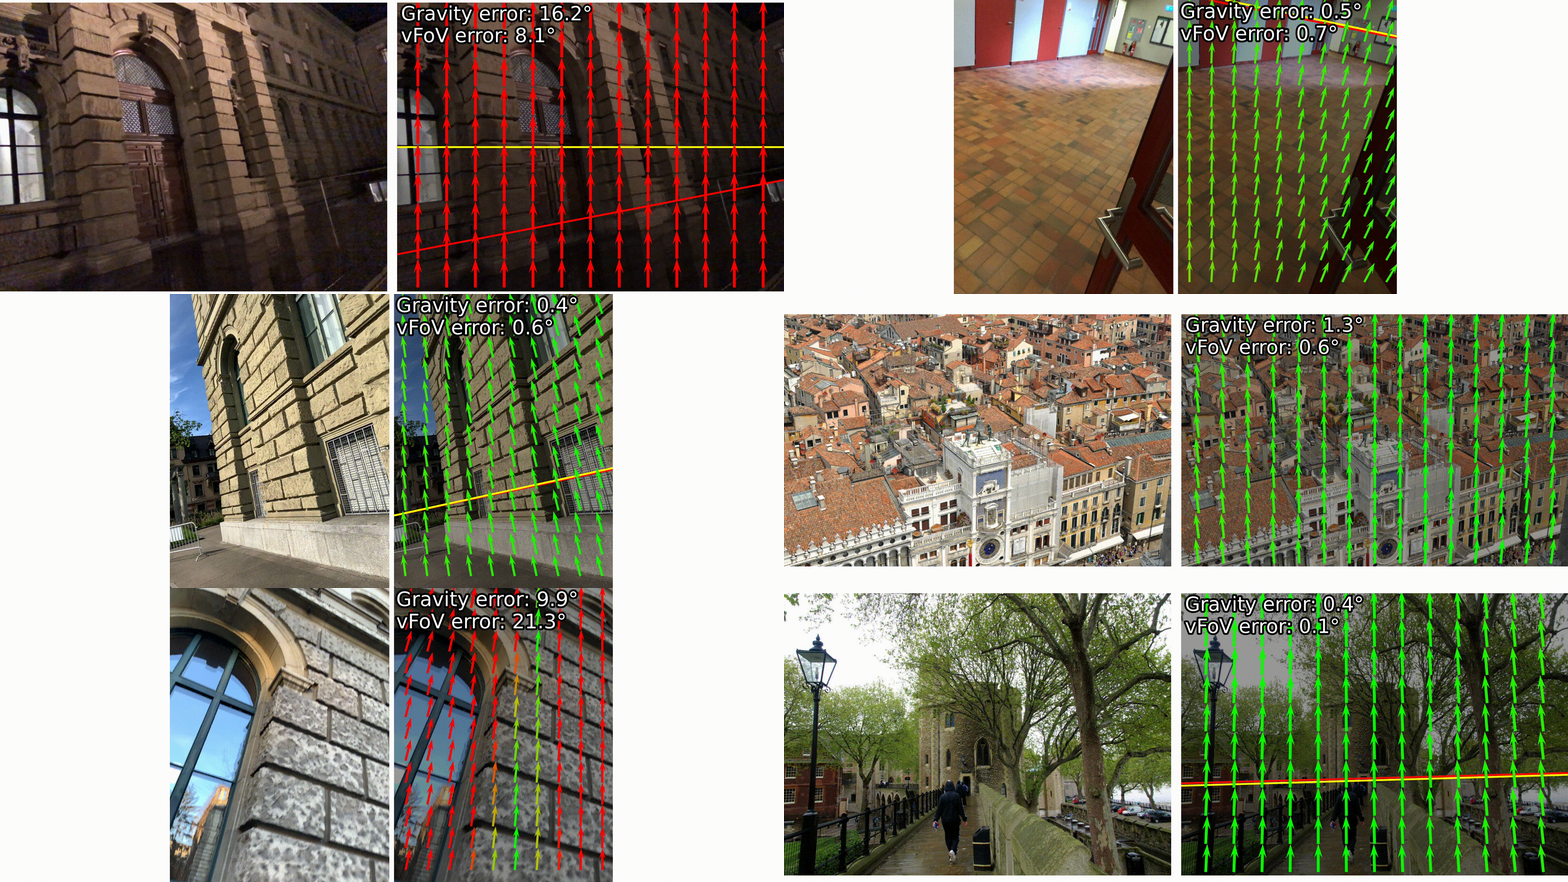
GeoCalib accurately estimates the camera intrinsics and gravity direction from a single image
by combining geometric optimization with deep learning.
GeoCalib is an algorithm for single-image calibration: it estimates the camera intrinsics and gravity direction from a single image only. By combining geometric optimization with deep learning, GeoCalib provides a more flexible and accurate calibration compared to previous approaches. This repository hosts the inference, evaluation, and training code for GeoCalib and instructions to download our training set OpenPano.
Setup and demo


We provide a small inference package geocalib that requires only minimal dependencies and Python >= 3.9. First clone the repository and install the dependencies:
git clone https://github.com/cvg/GeoCalib.git && cd GeoCalib
python -m pip install -e .
# OR
python -m pip install -e "git+https://github.com/cvg/GeoCalib#egg=geocalib"
Here is a minimal usage example:
import torch
from geocalib import GeoCalib

device = "cuda" if torch.cuda.is_available() else "cpu"
model = GeoCalib().to(device)

# load image as tensor in range [0, 1] with shape [C, H, W]
image = model.load_image("path/to/image.jpg").to(device)
result = model.calibrate(image)

print("camera:", result["camera"])
print("gravity:", result["gravity"])
Check out our demo notebook for a full working example.
[Interactive demo for your webcam - click to expand]
Run the following command:python -m geocalib.interactive_demo --camera_id 0
The demo will open a window showing the camera feed and the calibration results. If --camera_id is not provided, the demo will ask for the IP address of a droidcam camera.
Controls:
Toggle the different features using the following keys:
h: Show the estimated horizon lineu: Show the estimated up-vectorsl: Show the estimated latitude heatmapc: Show the confidence heatmap for the up-vectors and latitudesd: Show undistorted image, will overwrite the other featuresg: Shows a virtual grid of pointsb: Shows a virtual box objectChange the camera model using the following keys:
1: Pinhole -> Simple and fast2: Simple Radial -> For small distortions3: Simple Divisional -> For large distortionsPress
qto quit the demo.
[Load GeoCalib with torch hub - click to expand]
model = torch.hub.load("cvg/GeoCalib", "GeoCalib", trust_repo=True)
Camera models
GeoCalib currently supports the following camera models via the camera_model parameter:
pinhole(default) models only the focal lengthsfxandfybut no lens distortion.simple_radialmodels weak distortions with a single polynomial distortion parameterk1.radialmodels stronger distortions with polynomial distortion parametersk1,k2(thanks to RuibinMa #25).simple_divisionalmodels strong fisheye distortions with a single distortion parameterk1, as proposed by Fitzgibbon in Simultaneous linear estimation of multiple view geometry and lens distortion (CVPR 2001).
The default model is optimized for pinhole images. To handle lens distortion, use the following:
model = GeoCalib(weights="distorted")  # default is "pinhole"
result = model.calibrate(image, camera_model="simple_radial")  # or pinhole, simple_divisional
The principal point is assumed to be at the center of the image and is not optimized. Additional models can be implemented by extending the Camera object.
Partial calibration
When either the intrinsics or the gravity are already known, they can be provided as follows:
# known intrinsics:
result = model.calibrate(image, priors={"focal": focal_length_tensor})

# known gravity:
result = model.calibrate(image, priors={"gravity": gravity_direction_tensor})
Multi-image calibration
To calibrate multiple images captured by the same camera, pass a list of images to GeoCalib:
# batch is a list of tensors, each with shape [C, H, W]
result = model.calibrate(batch, shared_intrinsics=True)
Rigid multi-camera rigs
If several cameras are rigidly mounted (known relative rotations), GeoCalib can estimate a single shared gravity direction for the whole rig:
# camera_R_rig[i]: rotation from the rig frame to camera i.
result = model.calibrate(batch, camera_R_rig=camera_R_rig)  # add shared_intrinsics=True if the cameras are identical
Evaluation
The full evaluation and training code is provided in the single-image calibration library siclib, which can be installed as:
python -m pip install -e siclib
Running the evaluation commands will write the results to outputs/results/.
LaMAR
Running the evaluation commands will download the dataset to data/lamar2k which will take around 400 MB of disk space.
[Evaluate GeoCalib]
To evaluate GeoCalib trained on the OpenPano dataset, run:
python -m siclib.eval.lamar2k --conf geocalib-pinhole --tag geocalib --overwrite
[Evaluate DeepCalib]
To evaluate DeepCalib trained on the OpenPano dataset, run:
python -m siclib.eval.lamar2k --conf deepcalib --tag deepcalib --overwrite
[Evaluate Perspective Fields]
To evaluate Perspective Fields, first setup the files following the instructions in the ParamNet-siclib repository. Then run:
python -m siclib.eval.lamar2k --conf perspective-cities data.preprocessing.resize_backend="PIL" --overwrite
To evaluate the model trained on our OpenPano dataset, run:
python -m siclib.eval.lamar2k --conf perspective-openpano --overwrite
[Evaluate UVP]
To evaluate UVP, install the VP-Estimation-with-Prior-Gravity under third_party/VP-Estimation-with-Prior-Gravity. Then run:
python -m siclib.eval.lamar2k --conf uvp --tag uvp --overwrite data.preprocessing.edge_divisible_by=null
[Evaluate your own model]
If you have trained your own model, you can evaluate it by running:
python -m siclib.eval.lamar2k --checkpoint <experiment name> --tag <eval name> --overwrite
[Results]
Here are the results for the Area Under the Curve (AUC) for the roll, pitch and field of view (FoV) errors at 1/5/10 degrees for the different methods:
| Approach | Roll | Pitch | FoV |
|---|---|---|---|
| DeepCalib | 44.1 / 73.9 / 84.8 | 10.8 / 28.3 / 49.8 | 00.7 / 13.0 / 24.0 |
| ParamNet | 38.7 / 69.4 / 82.8 | 19.0 / 44.7 / 65.7 | 01.8 / 06.2 / 13.2 |
| ParamNet (OpenPano) | 51.7 / 77.0 / 86.0 | 27.0 / 52.7 / 70.2 | 02.8 / 06.8 / 14.3 |
| UVP | 72.7 / 81.8 / 85.7 | 42.3 / 59.9 / 69.4 | 15.6 / 30.6 / 43.5 |
| GeoCalib | 86.4 / 92.5 / 95.0 | 55.0 / 76.9 / 86.2 | 19.1 / 41.5 / 60.0 |
MegaDepth
Running the evaluation commands will download the dataset to data/megadepth2k or data/memegadepth2k-radial which will take around 2.1 GB and 1.47 GB of disk space respectively.
[Evaluate GeoCalib]
To evaluate GeoCalib trained on the OpenPano dataset, run:
python -m siclib.eval.megadepth2k --conf geocalib-pinhole --tag geocalib --overwrite
To run the eval on the radial distorted images, run:
python -m siclib.eval.megadepth2k_radial --conf geocalib-pinhole --tag geocalib --overwrite model.camera_model=simple_radial
[Evaluate DeepCalib]
To evaluate DeepCalib trained on the OpenPano dataset, run:
python -m siclib.eval.megadepth2k --conf deepcalib --tag deepcalib --overwrite
[Evaluate Perspective Fields]
To evaluate Perspective Fields, first setup the files following the instructions in the ParamNet-siclib repository. Then run:
python -m siclib.eval.megadepth2k --conf perspective-cities data.preprocessing.resize_backend="PIL" --overwrite
To evaluate the model trained on our OpenPano dataset, run:
python -m siclib.eval.megadepth2k --conf perspective-openpano --overwrite
[Evaluate UVP]
To evaluate UVP, install the VP-Estimation-with-Prior-Gravity under third_party/VP-Estimation-with-Prior-Gravity. Then run:
python -m siclib.eval.megadepth2k --conf uvp --tag uvp --overwrite data.preprocessing.edge_divisible_by=null
[Evaluate your own model]
If you have trained your own model, you can evaluate it by running:
python -m siclib.eval.megadepth2k --checkpoint <experiment name> --tag <eval name> --overwrite
[Results]
Here are the results for the Area Under the Curve (AUC) for the roll, pitch and field of view (FoV) errors at 1/5/10 degrees for the different methods:
| Approach | Roll | Pitch | FoV |
|---|---|---|---|
| DeepCalib | 34.6 / 65.4 / 79.4 | 11.9 / 27.8 / 44.8 | 5.6 / 12.1 / 22.9 |
| ParamNet | 37.0 / 66.4 / 80.8 | 15.8 / 37.3 / 57.1 | 5.3 / 12.8 / 24.0 |
| ParamNet (OpenPano) | 43.4 / 70.7 / 82.2 | 15.4 / 34.5 / 53.3 | 3.2 / 10.1 / 21.3 |
| UVP | 69.2 / 81.6 / 86.9 | 21.6 / 36.2 / 47.4 | 8.2 / 18.7 / 29.8 |
| GeoCalib | 82.6 / 90.6 / 94.0 | 32.4 / 53.3 / 67.5 | 13.6 / 31.7 / 48.2 |
TartanAir
Running the evaluation commands will download the dataset to data/tartanair which will take around 1.85 GB of disk space.
[Evaluate GeoCalib]
To evaluate GeoCalib trained on the OpenPano dataset, run:
python -m siclib.eval.tartanair --conf geocalib-pinhole --tag geocalib --overwrite
[Evaluate DeepCalib]
To evaluate DeepCalib trained on the OpenPano dataset, run:
python -m siclib.eval.tartanair --conf deepcalib --tag deepcalib --overwrite
[Evaluate Perspective Fields]
To evaluate Perspective Fields, first setup the files following the instructions in the ParamNet-siclib repository. Then run:
python -m siclib.eval.tartanair --conf perspective-cities data.preprocessing.resize_backend="PIL" --overwrite
To evaluate the model trained on our OpenPano dataset, run:
python -m siclib.eval.tartanair --conf perspective-openpano --overwrite
[Evaluate UVP]
To evaluate UVP, install the VP-Estimation-with-Prior-Gravity under third_party/VP-Estimation-with-Prior-Gravity. Then run:
python -m siclib.eval.tartanair --conf uvp --tag uvp --overwrite data.preprocessing.edge_divisible_by=null
[Evaluate your own model]
If you have trained your own model, you can evaluate it by running:
python -m siclib.eval.tartanair --checkpoint <experiment name> --tag <eval name> --overwrite
[Results]
Here are the results for the Area Under the Curve (AUC) for the roll, pitch and field of view (FoV) errors at 1/5/10 degrees for the different methods:
| Approach | Roll | Pitch | FoV |
|---|---|---|---|
| DeepCalib | 24.7 / 55.4 / 71.5 | 16.3 / 38.8 / 58.5 | 01.5 / 08.8 / 27.2 |
| ParamNet | 23.3 / 51.4 / 71.0 | 19.9 / 43.8 / 62.9 | 08.5 / 22.5 / 40.8 |
| ParamNet (OpenPano) | 34.5 / 59.2 / 73.9 | 19.4 / 42.0 / 60.3 | 06.0 / 16.8 / 31.6 |
| UVP | 52.1 / 64.8 / 71.9 | 36.2 / 48.8 / 58.6 | 15.8 / 25.8 / 35.7 |
| GeoCalib | 71.3 / 83.8 / 89.8 | 38.2 / 62.9 / 76.6 | 14.1 / 30.4 / 47.6 |
Stanford2D3D
Before downloading and running the evaluation, you will need to agree to the terms of use for the Stanford2D3D dataset.
Running the evaluation commands will download the dataset to data/stanford2d3d which will take around 885 MB of disk space.
[Evaluate GeoCalib]
To evaluate GeoCalib trained on the OpenPano dataset, run:
python -m siclib.eval.stanford2d3d --conf geocalib-pinhole --tag geocalib --overwrite
[Evaluate DeepCalib]
To evaluate DeepCalib trained on the OpenPano dataset, run:
python -m siclib.eval.stanford2d3d --conf deepcalib --tag deepcalib --overwrite
[Evaluate Perspective Fields]
To evaluate Perspective Fields, first setup the files following the instructions in the ParamNet-siclib repository. Then run:
python -m siclib.eval.stanford2d3d --conf perspective-cities data.preprocessing.resize_backend="PIL" --overwrite
To evaluate the model trained on our OpenPano dataset, run:
python -m siclib.eval.stanford2d3d --conf perspective-openpano --overwrite
[Evaluate UVP]
To evaluate UVP, install the VP-Estimation-with-Prior-Gravity under third_party/VP-Estimation-with-Prior-Gravity. Then run:
python -m siclib.eval.stanford2d3d --conf uvp --tag uvp --overwrite data.preprocessing.edge_divisible_by=null
[Evaluate your own model]
If you have trained your own model, you can evaluate it by running:
python -m siclib.eval.stanford2d3d --checkpoint <experiment name> --tag <eval name> --overwrite
[Results]
Here are the results for the Area Under the Curve (AUC) for the roll, pitch and field of view (FoV) errors at 1/5/10 degrees for the different methods:
| Approach | Roll | Pitch | FoV |
|---|---|---|---|
| DeepCalib | 33.8 / 63.9 / 79.2 | 21.6 / 46.9 / 65.7 | 08.1 / 20.6 / 37.6 |
| ParamNet | 20.6 / 48.5 / 68.1 | 20.9 / 44.2 / 61.5 | 07.4 / 18.0 / 33.2 |
| ParamNet (OpenPano) | 44.6 / 73.9 / 84.8 | 29.2 / 56.7 / 73.1 | 05.8 / 14.3 / 27.8 |
| UVP | 65.3 / 74.6 / 79.1 | 51.2 / 63.0 / 69.2 | 22.2 / 39.5 / 51.3 |
| GeoCalib | 83.1 / 91.8 / 94.8 | 52.3 / 74.8 / 84.6 | 17.4 / 40.0 / 59.4 |
Evaluation options
If you want to provide priors during the evaluation, you can add one or multiple of the following flags:
python -m siclib.eval.<benchmark> --conf <config> \
    --tag <tag> \
    data.use_prior_focal=true \
    data.use_prior_gravity=true \
    data.use_prior_k1=true
[Visual inspection]
To visually inspect the results of the evaluation, you can run the following command:
python -m siclib.eval.inspect <benchmark> <one or multiple tags>
For example, to inspect the results of the evaluation of the GeoCalib model on the LaMAR dataset, you can run:
python -m siclib.eval.inspect lamar2k geocalib
OpenPano Dataset
The OpenPano dataset is a new dataset for single-image calibration which contains about 2.8k panoramas from various sources, namely HDRMAPS, PolyHaven, and the Laval Photometric Indoor HDR dataset. While this dataset is smaller than previous ones, it is publicly available and it provides a better balance between indoor and outdoor scenes.
[Downloading and preparing the dataset]
In order to assemble the training set, first download the Laval dataset following the instructions on the corresponding project page and place the panoramas in data/indoorDatasetCalibrated. Then, tonemap the HDR images using the following command:
python -m siclib.datasets.utils.tonemapping --hdr_dir data/indoorDatasetCalibrated --out_dir data/laval-tonemap
We provide a script to download the PolyHaven and HDRMAPS panos. The script will create folders data/openpano/panoramas/{split} containing the panoramas specified by the {split}_panos.txt files. To run the script, execute the following commands:
python -m siclib.datasets.utils.download_openpano --name openpano --laval_dir data/laval-tonemap
Alternatively, you can download the PolyHaven and HDRMAPS panos from here.
After downloading the panoramas, you can create the training set by running the following command:
python -m siclib.datasets.create_dataset_from_pano --config-name openpano
The dataset creation can be sped up by using multiple workers and a GPU. To do so, add the following arguments to the command:
python -m siclib.datasets.create_dataset_from_pano --config-name openpano n_workers=10 device=cuda
This will create the training set in data/openpano/openpano with about 37k images for training, 2.1k for validation, and 2.1k for testing.
[Distorted OpenPano]
To create the OpenPano dataset with radial distortion, run the following command:
python -m siclib.datasets.create_dataset_from_pano --config-name openpano_radial
Training
As for the evaluation, the training code is provided in the single-image calibration library siclib, which can be installed by:
python -m pip install -e siclib
Once the OpenPano Dataset has been downloaded and prepared, we can train GeoCalib with it:
First download the pre-trained weights for the MSCAN-B backbone:
mkdir weights
wget "https://cloud.tsinghua.edu.cn/d/c15b25a6745946618462/files/?p=%2Fmscan_b.pth&dl=1" -O weights/mscan_b.pth
Then, start the training with the following command:
python -m siclib.train geocalib-pinhole-openpano --conf geocalib --distributed
Feel free to use any other experiment name. By default, the checkpoints will be written to outputs/training/. The default batch size is 24 which requires 2x 4090 GPUs with 24GB of VRAM each. Configurations are managed by Hydra and can be overwritten from the command line.
For example, to train GeoCalib on a single GPU with a batch size of 5, run:
python -m siclib.train geocalib-pinhole-openpano \
    --conf geocalib \
    data.train_batch_size=5 # for 1x 2080 GPU
Be aware that this can impact the overall performance. You might need to adjust the learning rate and number of training steps accordingly.
If you want to log the training progress to tensorboard or wandb, you can set the train.writer option:
python -m siclib.train geocalib-pinhole-openpano \
    --conf geocalib \
    --distributed \
    train.writer=tensorboard
The model can then be evaluated using its experiment name:
python -m siclib.eval.<benchmark> --checkpoint geocalib-pinhole-openpano \
    --tag geocalib-retrained
[Training DeepCalib]
To train DeepCalib on the OpenPano dataset, run:
python -m siclib.train deepcalib-openpano --conf deepcalib --distributed
Make sure that you have generated the OpenPano Dataset with radial distortion or add
the flag data=openpano to the command to train on the pinhole images.
[Training Perspective Fields]
To train Perspective Fields, first setup the files following the instructions in the ParamNet-siclib repository. Then run:
First train the perspective network:
python -m siclib.train perspective-net --conf perspective-net --distributed
Then put the trained weights in the weights/persnet-pano-old.tar file and train the full model:
python -m siclib.train param-net --conf param-net --distributed
BibTeX citation
If you use any ideas from the paper or code from this repo, please consider citing:
@inproceedings{veicht2024geocalib,
  author    = {Alexander Veicht and
               Paul-Edouard Sarlin and
               Philipp Lindenberger and
               Marc Pollefeys},
  title     = {{GeoCalib: Single-image Calibration with Geometric Optimization}},
  booktitle = {ECCV},
  year      = {2024}
}
License
The code is provided under the Apache-2.0 License while the weights of the trained model are provided under the Creative Commons Attribution 4.0 International Public License. Thanks to the authors of the Laval Indoor HDR dataset for allowing this.
Related repositories
TensorFlow is Google's open-source, end-to-end platform for machine learning, hosted at tensorflow/tensorflow under the Apache-2.0 license. It was originally built within Google Brain's Machine Intelligence team for ML and neural network research, and today it ships stable Python and C++ APIs alongside GPU, CPU-only, and Docker install paths. The README positions it as covering both research work and shipping ML-powered applications.
Hugging Face Transformers (huggingface/transformers) is a Python library that centralizes model definitions for text, computer vision, audio, video, and multimodal machine learning, covering both inference and training. The README describes it as a pivot point compatible with training frameworks such as Axolotl, DeepSpeed, and PyTorch-Lightning, and inference engines such as vLLM, SGLang, and TGI, with more than 1M+ model checkpoints listed on the Hugging Face Hub.
PyTorch is an open-source Python package hosted at pytorch/pytorch on GitHub, built around two core capabilities: NumPy-like Tensor computation with GPU acceleration, and deep neural networks built through a tape-based autograd system. Its components include torch.nn for network layers, torch.jit for compiling models into TorchScript, and torch.multiprocessing for sharing Tensors across processes, with build support for CUDA, AMD ROCm, and Intel GPU backends documented in the README.
LLMs-from-scratch is Sebastian Raschka's GitHub companion to the Manning book Build a Large Language Model (From Scratch), ISBN 9781633437166. It walks through building, pretraining, and finetuning a GPT-style model in PyTorch across seven chapters and five appendices, plus a growing set of bonus notebooks covering newer open architectures.
Quick answers
Does cvg/GeoCalib have a project website?
No homepage URL was recorded for cvg/GeoCalib in TopGit's last sync. The README tab above frequently contains screenshots and demo links, or check the repository description on GitHub.
How active is development on cvg/GeoCalib?
The most recent commit recorded on cvg/GeoCalib was 1 month ago, based on the GitHub push timestamp. The repository has 64 forks — one of the better signals of community interest.
Is cvg/GeoCalib open source?
Yes — cvg/GeoCalib ships under the Apache-2.0 license, which makes its source code freely readable (and, depending on license terms, forkable and reusable). Source: github.com/cvg/GeoCalib.
What license does cvg/GeoCalib use?
cvg/GeoCalib is released under the Apache-2.0 license. Always verify the LICENSE file directly on GitHub for the authoritative terms — license strings can be edited out of sync with a project's actual stance.
What topics is cvg/GeoCalib associated with?
GitHub's repository topics for cvg/GeoCalib: "camera-calibration", "deep-learning", "optimization". TopGit's editorial category is AI Tools.
Where do I read more about cvg/GeoCalib?
This TopGit page is a snapshot — the READ ME tab shows the project's own README content (links stripped, images preserved). The GitHub repository at github.com/cvg/GeoCalib is the definitive source.
Read full README in the tab above.
Curious whether GeoCalib is right for you?
Let ChatGPT, Claude, or Perplexity look into it — click below and see what AI actually says about GeoCalib.