k4yt3x/wg-meshconf is a Backend project on GitHub, written primarily in Python. It has 1.0k stars. WireGuard full mesh configuration generator.
Snapshot summary built from the project's own GitHub metadata — there's no written TopGit review yet. The page will update automatically when a full review is published.
WHY NO REVIEW YET
TopGit writes full reviews for the most-starred, most-requested repositories. This page is a snapshot until then — see the READ ME tab for the original README in full.
wg-meshconf is a tool that will help you to generate peer configuration files for WireGuard mesh networks. You can easily and quickly create WireGuard mesh networks using this tool.
Installation (PyPI)
This is the recommended way to install wg-meshconf for regular users. This installation method installs the newest release version of wg-meshconf and all of the required dependencies from PyPI.
# installing the program with pip
# note that Pip for Python3 might be named "pip3" on some systems
pip install --user -U wg-meshconf

# running the program
wg-meshconf showpeers
You may now run the program by executing the wg-meshconf command.
Installation (GitHub)
Alternatively, if you would like to install the program directly from source code, you can follow the steps below. If you would like to install directly from the Git repository:
# install the HEAD (latest) commit
pip install 'wg-meshconf@git+https://github.com/k4yt3x/wg-meshconf.git'

# install from a specific tag or commit
pip install 'wg-meshconf@git+https://github.com/k4yt3x/[email protected]'
pip install 'wg-meshconf@git+https://github.com/k4yt3x/wg-meshconf.git@aa16407'
You can also clone it and install it locally.
# cloning the repository with git
git clone https://github.com/k4yt3x/wg-meshconf.git

# enter the directory
cd wg-meshconf

# install the program with Pip
# Pip and PDM will take care of dependency installation
pip install -U .
Learn by an Example
Usages are dull and boring. Let's see a real-life example of how this tool can be used. This section will demonstrate how to create a simple mesh network with four nodes using wg-meshconf.
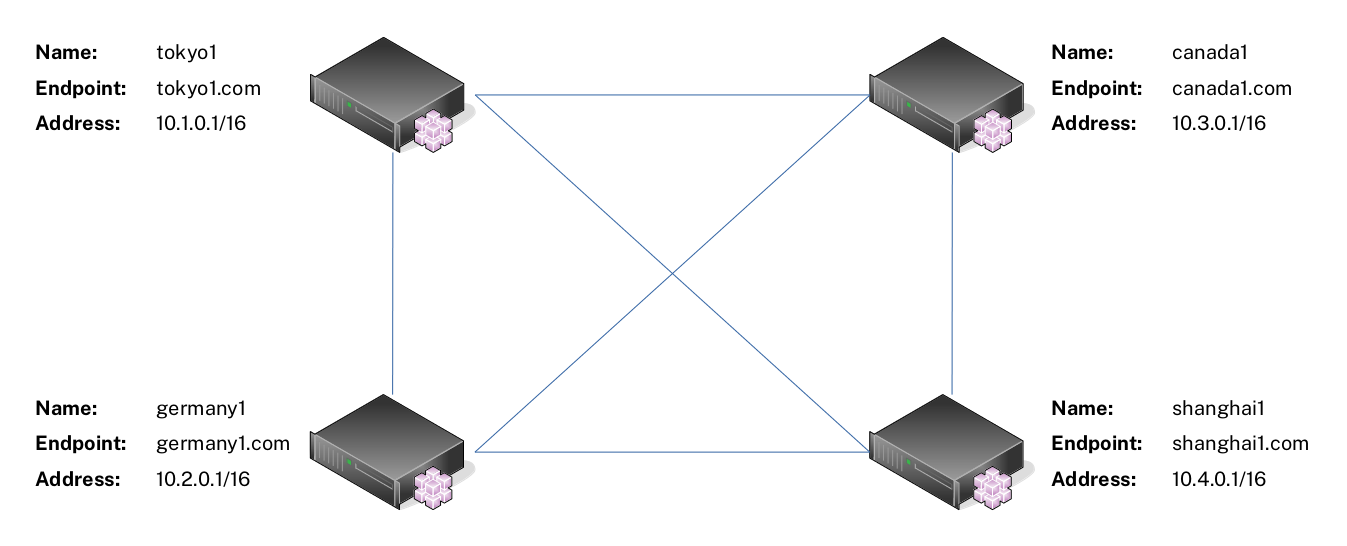
For this example, suppose you have four servers as shown below. These servers can reach each other via the Endpoint address. For instance, server tokyo1 can ping server shanghai1 with the address shanghai1.com.
Step 1: Add Basic Peer Information
You will first need to add the peers' information into the database. There are two ways to do it: via Excel and via the command line interface.
Method A: With Excel
wg-meshconf has changed its database format from JSON to CSV and added the init command since version 2.4.0. This means that it is now possible for users to directly edit the database file with Excel or other CSV-compatible editors to create/read/update/delete peer information.
(P.S. I thought about making a fancy GUI for wg-meshconf like the other tools, but then I thought, why do it the complex way when you can simply "borrow" Excel's GUI?)
Run the following command to initialize a new database file. By default, the database file is named database.csv. You can also specify the file's name via -d.
wg-meshconf init
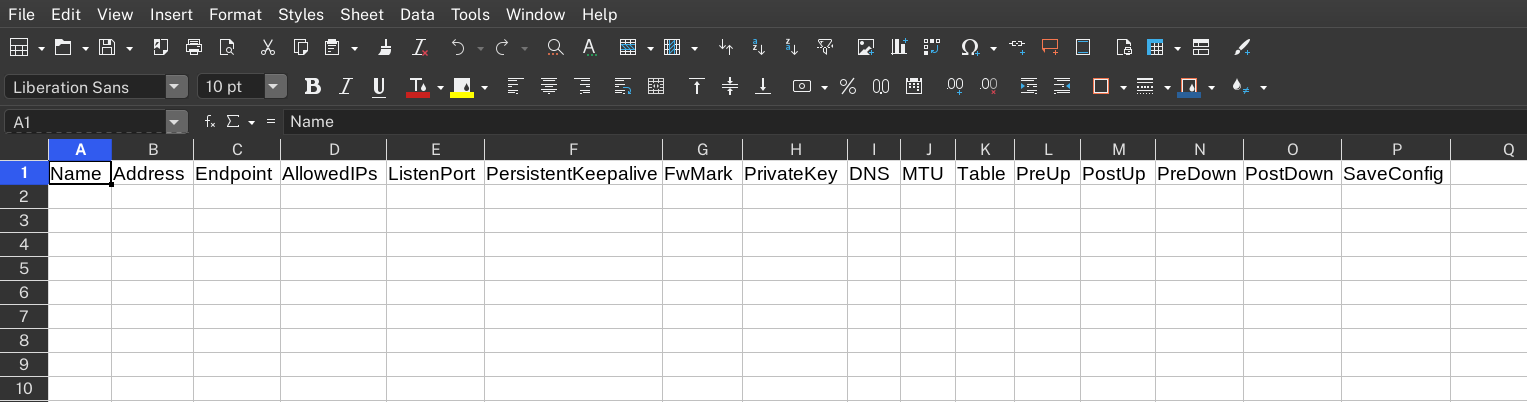
Open the database CSV file with an editor like Excel or LibreOffice Calc. You should see the following column headers.
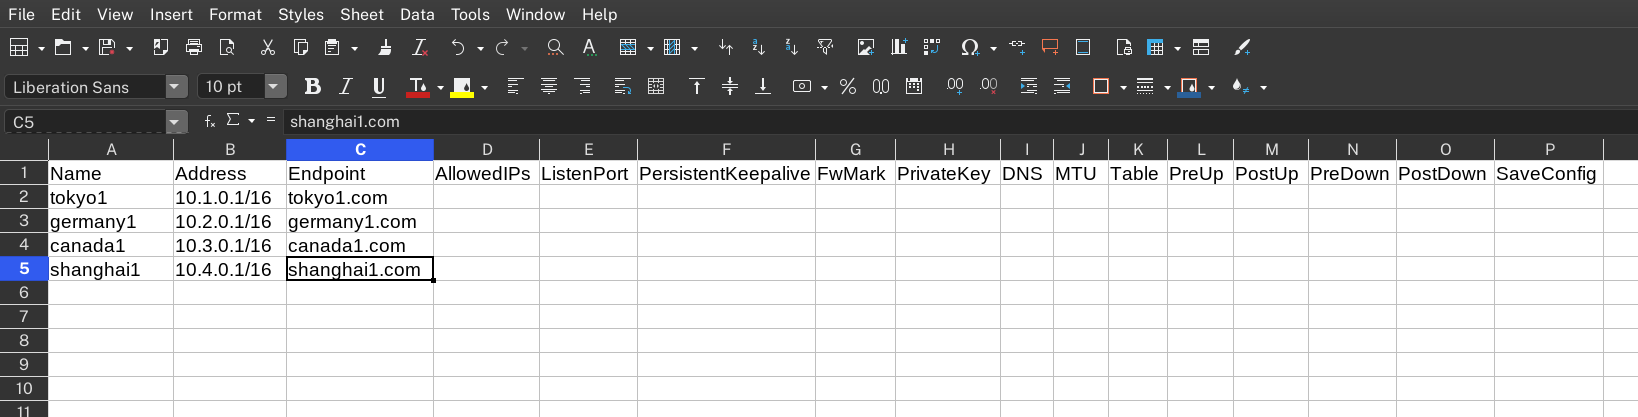
You can then fill in the peers' information. You will need to fill in at least the peers' Name, Address, and Endpoint values. These values cannot be automatically generated.
Once you're done, save the file and execute the init command again to automatically generate the rest of the needed information such as peer private keys.
wg-meshconf init
If you check the file again, you'll see the necessary fields getting automatically filed in.
Method B: With Terminal
If, for some reason, you don't want to edit the database file directly, you can also use this tool purely through its command line interface.
First we need to add all peers in the mesh network into the database. The basic syntax for adding new peers is:
wg-meshconf addpeer NAME --address IP_ADDRESS --address IP_ADDRESS_2 --endpoint ENDPOINT
New private key will be generated automatically if unspecified
ListenPort defaults to 51820 per WireGuard standard
All other values are left empty by default
There are more options which you can specify. Use the command wg-meshconf addpeer -h for more details.
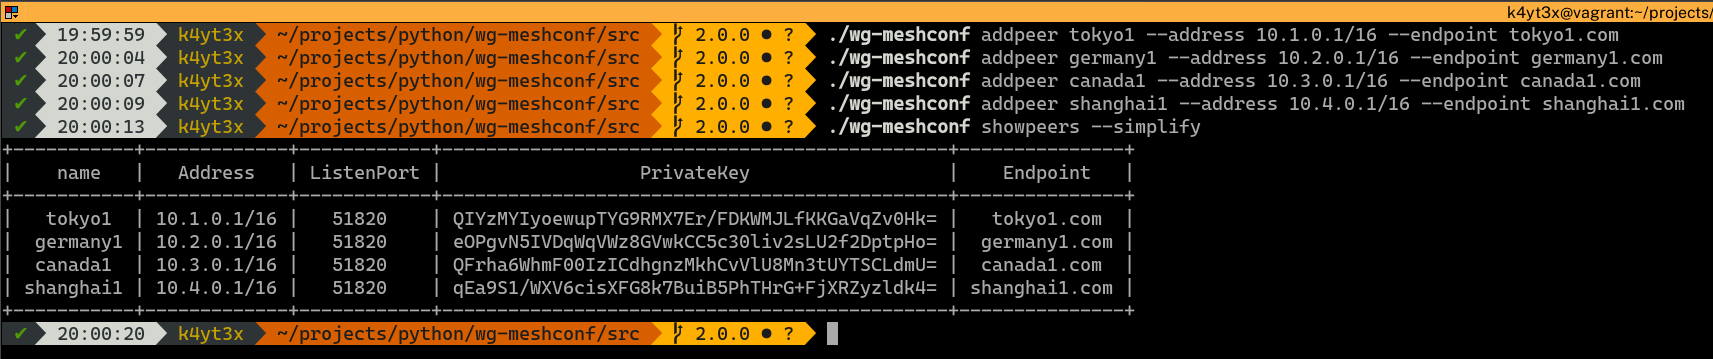
After adding all the peers into the database, you can verify that they have all been added correctly via the wg-meshconf showpeers command. The simplify switch here omits all columns with only Nones.
Step 2: Export Configuration Files
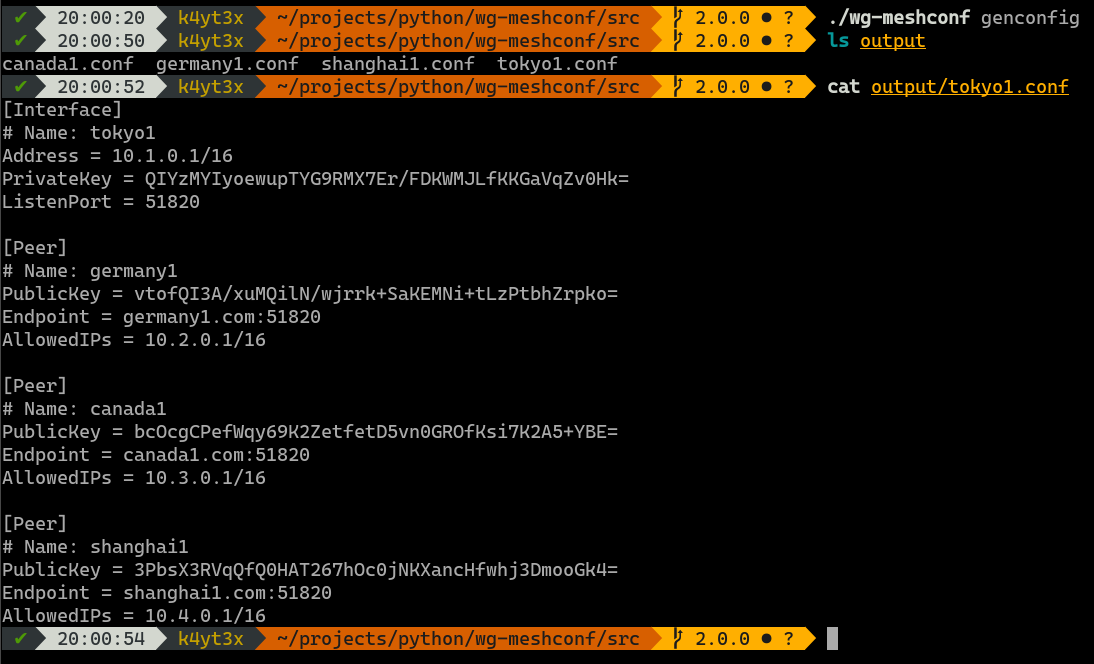
Use the genconfig command to generate configuration files for all peers. You may also export configurations for only one peer by specifying the peer's name.
The configuration files will be named after the peers' names. By default, all configuration files are exported into a subdirectory named output. You can change this by specifying output directory using the -o or the --output option.
Step 3: Copy Configuration Files to Peers
Copy each of the configuration files to the corresponding peers.
Step 4: Start WireGuard Services
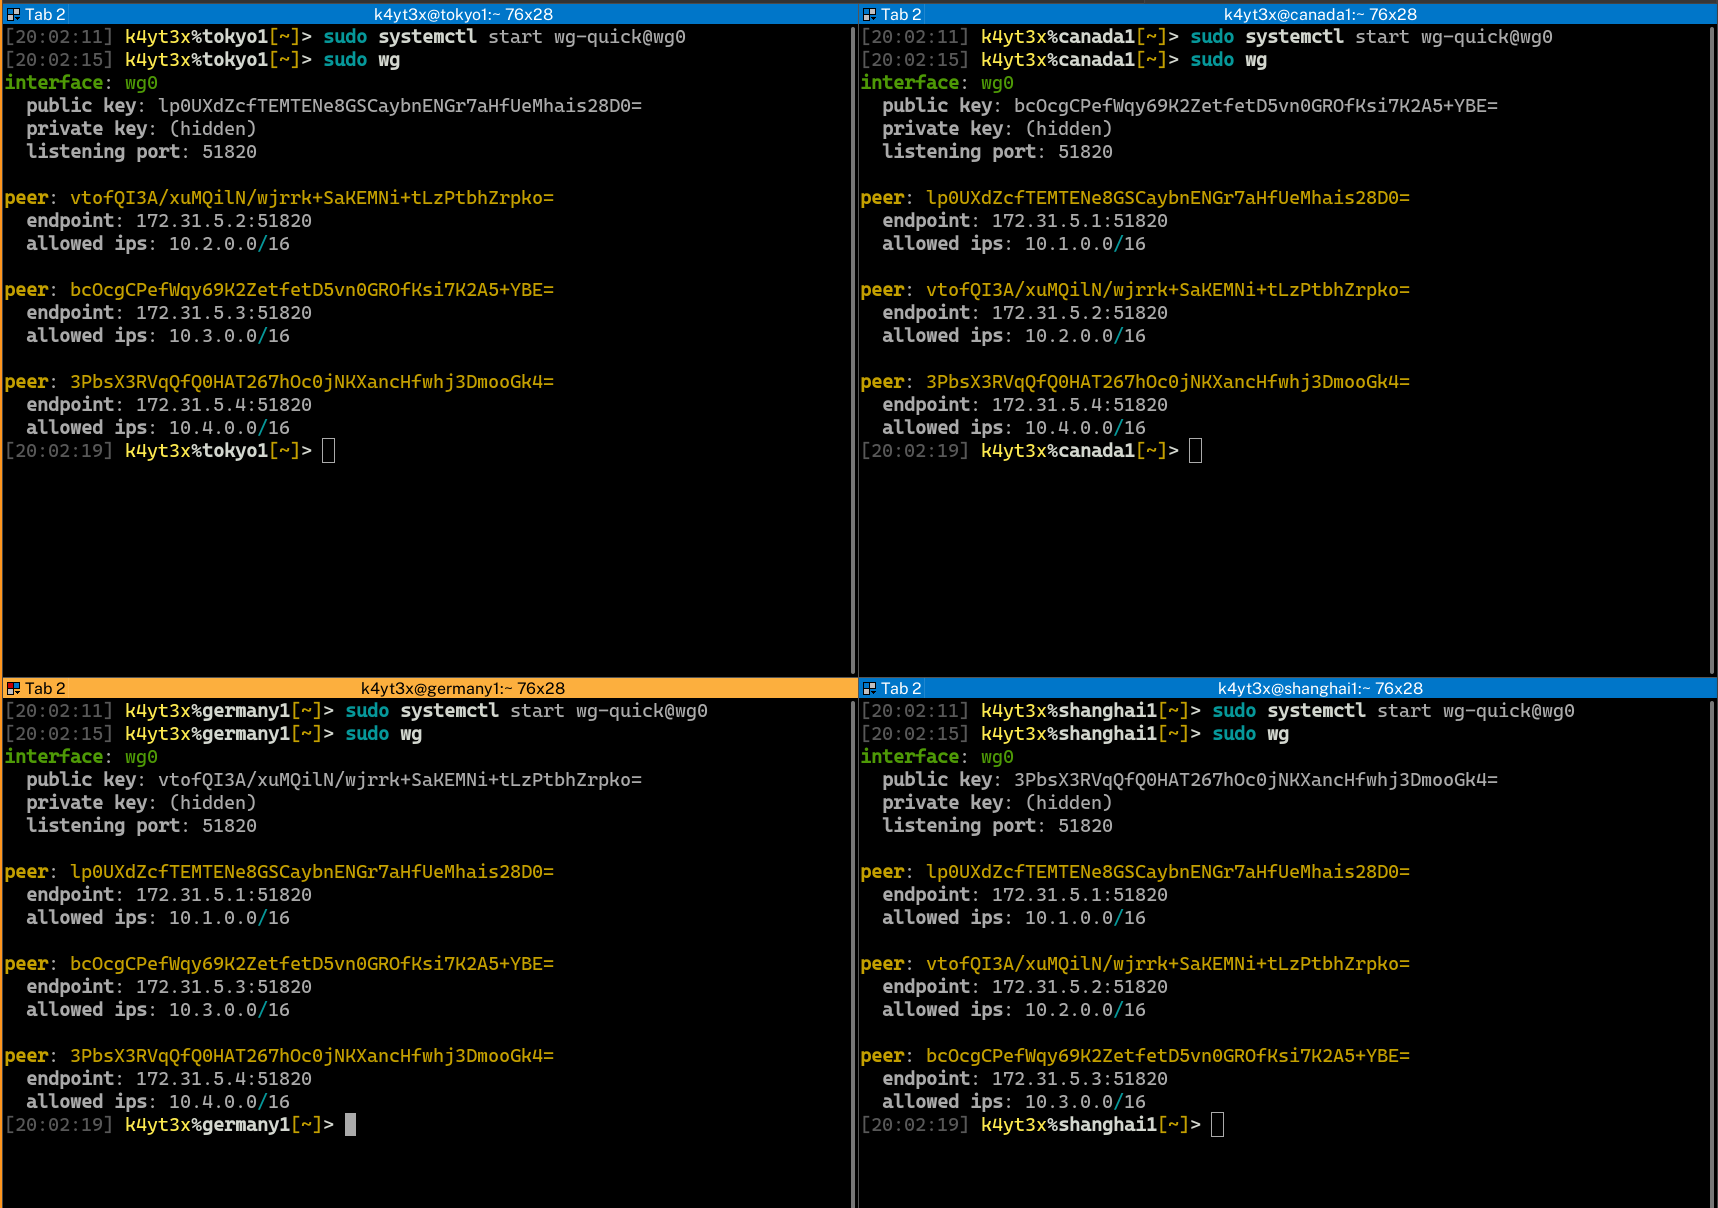
Start up the WireGuard interfaces using the wg-quick command. It is also possible to control WireGuard interfaces via WireGuard's wg-quick@ systemd service. WireGuard status can be verified via the wg command after WireGuard interfaces are set up.
Step 5: Verify Connectivity
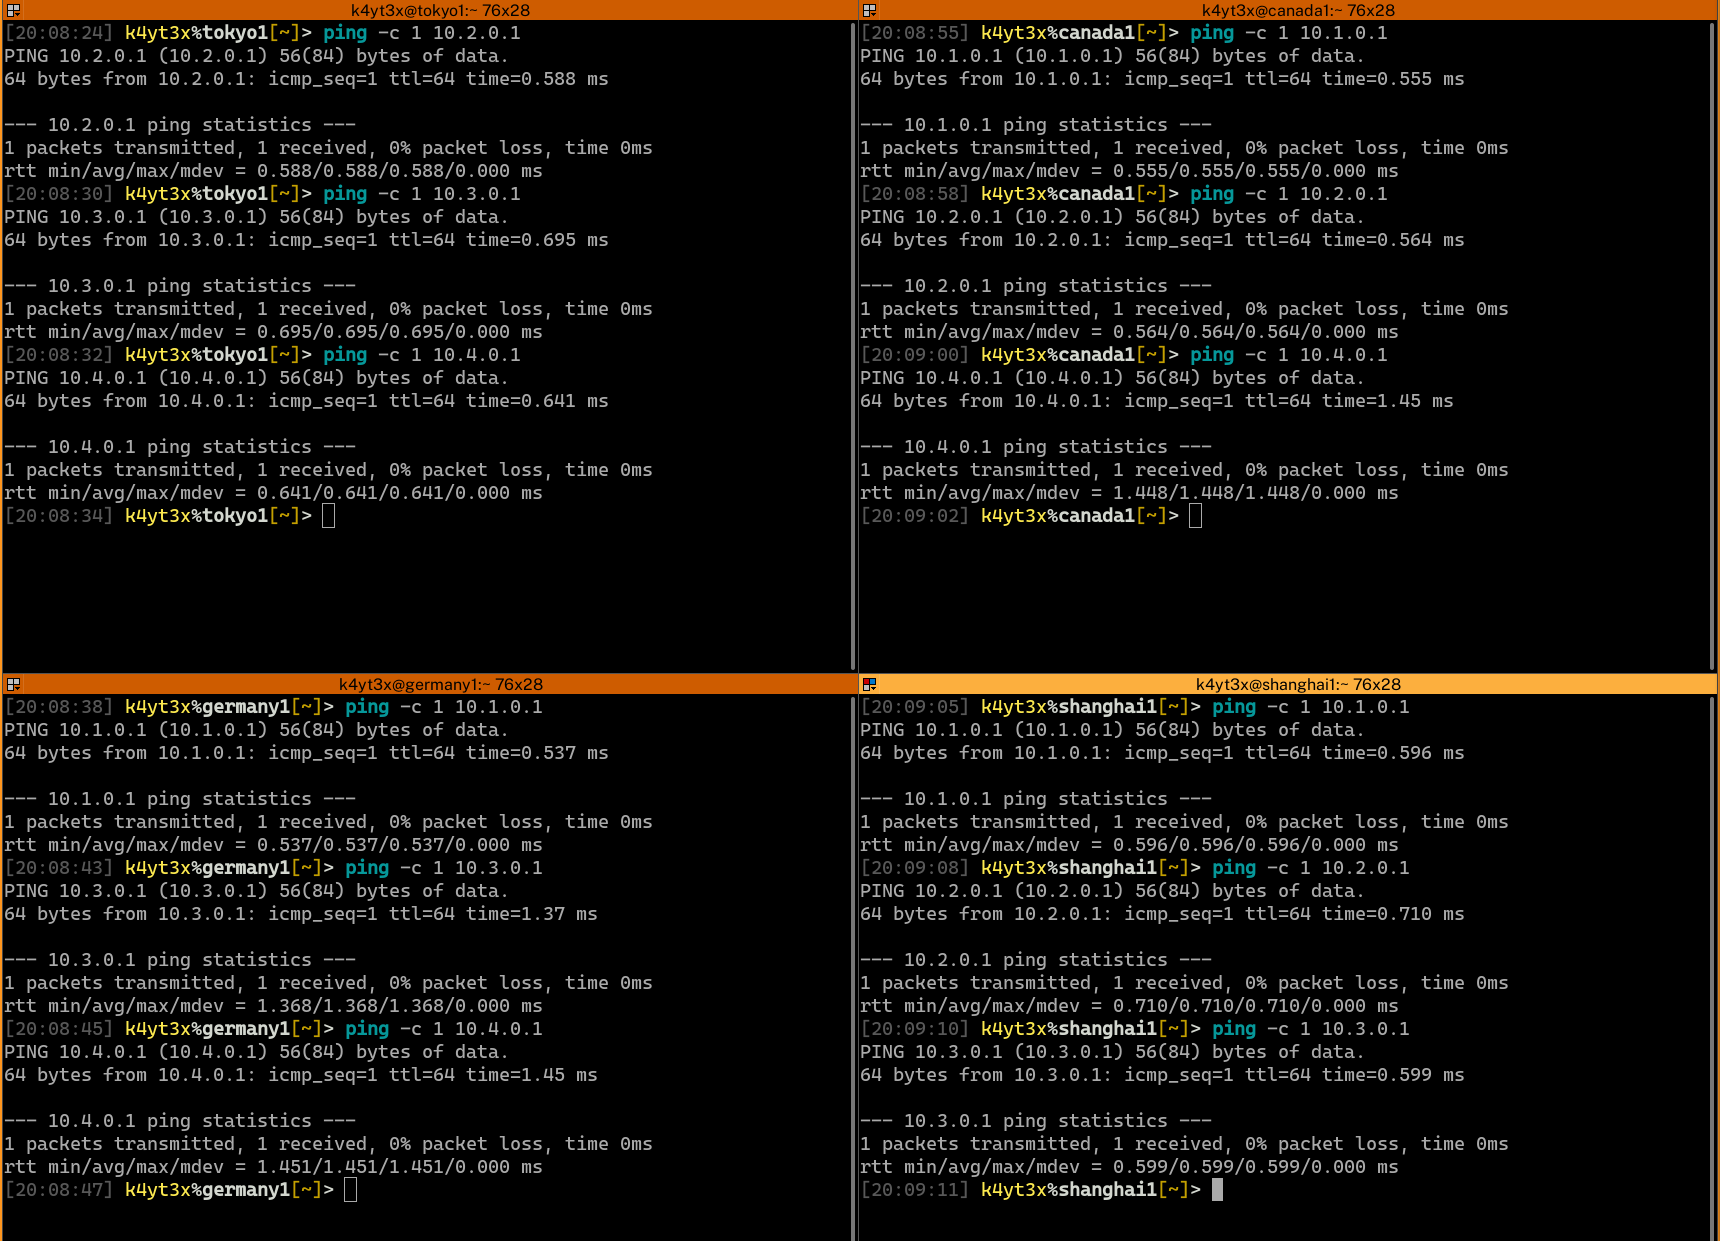
Verify that all endpoints have been configured properly and can connect to each other.
Done. Now a mesh network has been created between the four servers.
Updating Peer Information
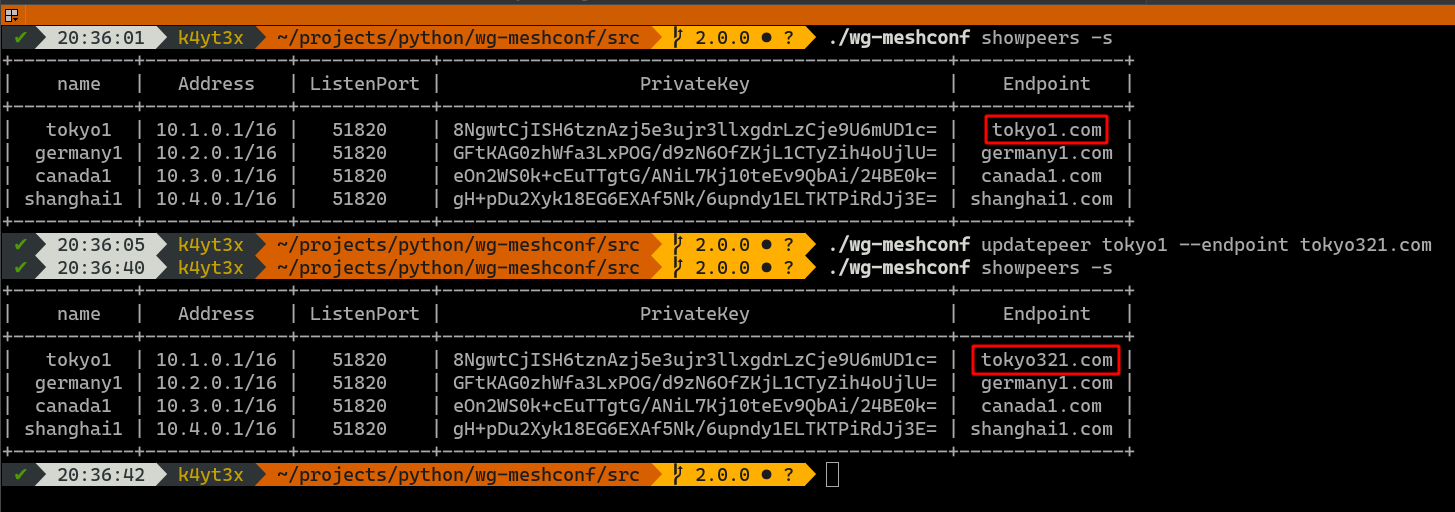
If you would like to update a peer's information, use the updatepeer command. The syntax of updatepeer is the same as that of the addpeer command. Instead of adding a new peer, this command overwrites values in existing entries.
In the example below, suppose you would like to update tokyo1's endpoint address and change it to tokyo321.com. Use the updatepeer command and specify the new endpoint to be tokyo321.com. This will overwrite tokyo1's existing Endpoint value.
Show Peer Information
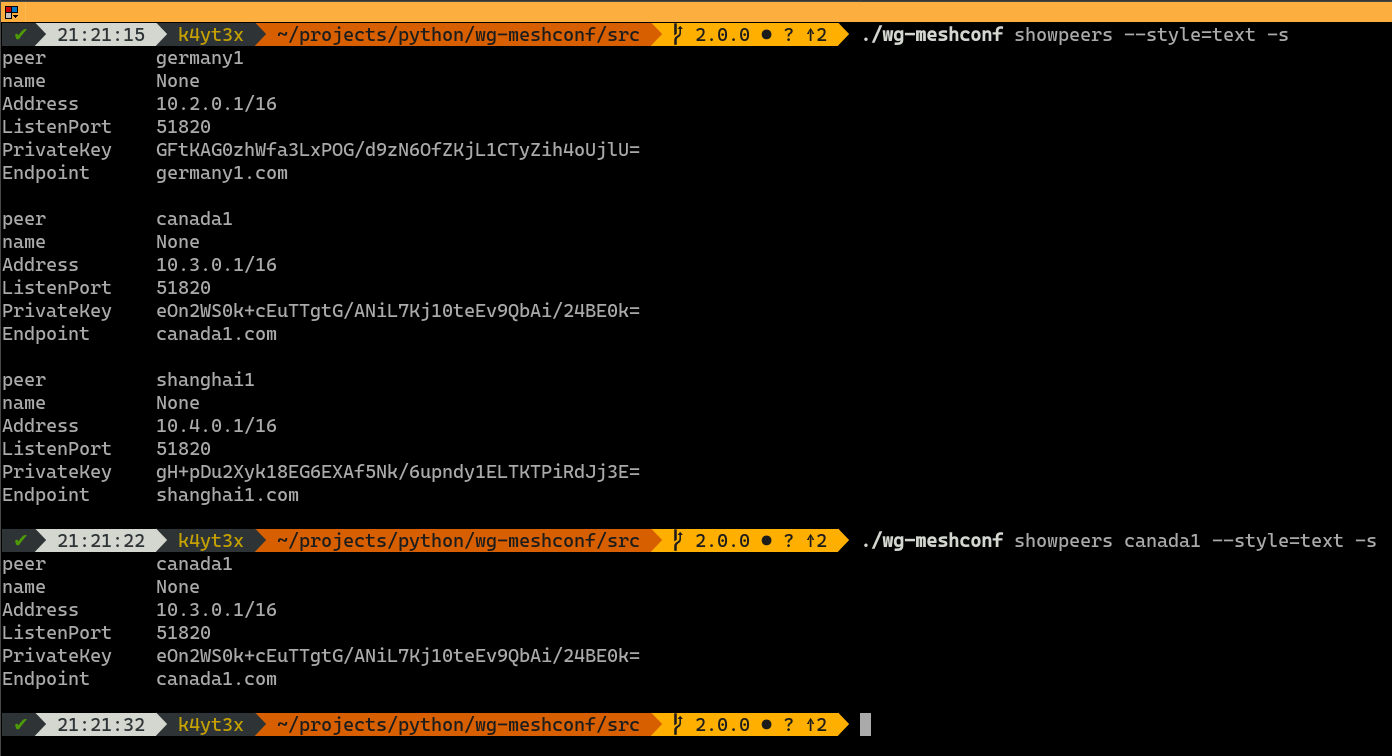
The showpeers command prints all peers' information by default.
Now that's a lot of info and a lot of unnecessary columns which only have Nones. Therefore, I added the -s/--simplify command which omits those useless columns.
You may also query information about a specific peer.
Plaintext mode has a similar usage. It's just a bit harder to read, at least for me.
Deleting Peers
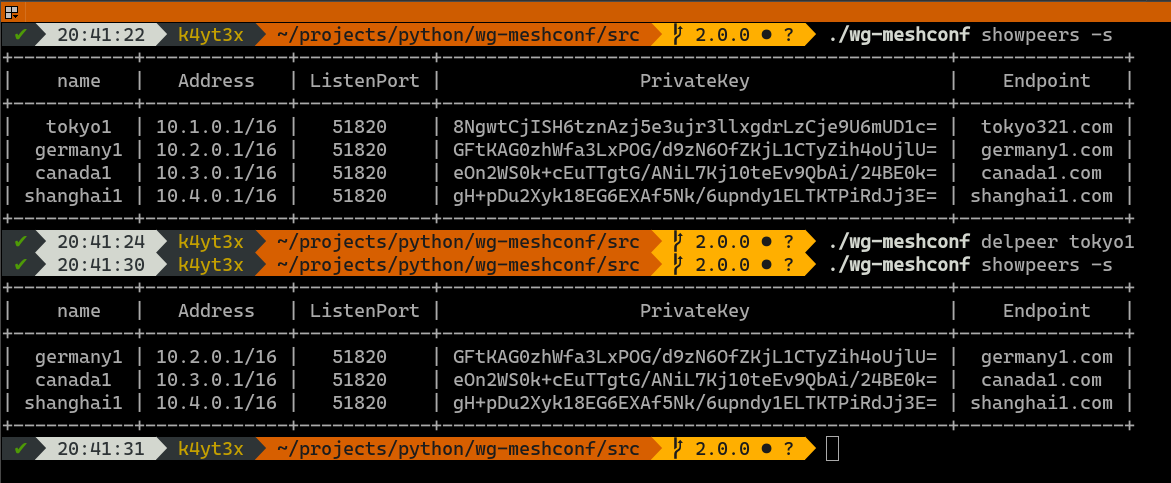
Use the delpeer command to delete peers. The syntax is delpeer PEER_NAME.
This example below shows how to delete the peer tokyo1 from the database.
Database Files
Unlike 1.x.x versions of wg-meshconf, version 2.0.0 does not require the user to save or load profiles. Instead, all add peer, update peer and delete peer operations are file operations. The changes will be saved to the database file immediately. The database file to use can be specified via the -d or the --database option. If no database file is specified, database.csv will be used.
Database files are essentially just CSV files (it was JSON before version 2.4.0). Below is an example.
You may refer to the program's help page for usages. Use the -h switch or the --help switch to print the help page.
$ wg-meshconf -h
usage: wg-meshconf [-h] [-d DATABASE] {addpeer,updatepeer,delpeer,showpeers,genconfig} ...

positional arguments:
  {addpeer,updatepeer,delpeer,showpeers,genconfig}

optional arguments:
  -h, --help            show this help message and exit
  -d DATABASE, --database DATABASE
                        path where the database file is stored (default: database.json)
Specify -h or --help after a command to see this command's usages.
$ wg-meshconf addpeer -h
usage: wg-meshconf addpeer [-h] --address ADDRESS [--endpoint ENDPOINT] [--privatekey PRIVATEKEY] [--listenport LISTENPORT] [--fwmark FWMARK] [--dns DNS] [--mtu MTU] [--table TABLE] [--preup PREUP] [--postup POSTUP] [--predown PREDOWN] [--postdown POSTDOWN] [--saveconfig] name

positional arguments:
  name                  Name used to identify this node

optional arguments:
  -h, --help            show this help message and exit
  --address ADDRESS     address of the server
  --endpoint ENDPOINT   peer's public endpoint address
  --privatekey PRIVATEKEY
                        private key of server interface
  --listenport LISTENPORT
                        port to listen on
  --fwmark FWMARK       fwmark for outgoing packets
  --dns DNS             server interface DNS servers
  --mtu MTU             server interface MTU
  --table TABLE         server routing table
  --preup PREUP         command to run before interface is up
  --postup POSTUP       command to run after interface is up
  --predown PREDOWN     command to run before interface is down
  --postdown POSTDOWN   command to run after interface is down
  --saveconfig          save server interface to config upon shutdown
License
This project is licensed under the GNU General Public License Version 3 (GNU GPL v3)
Copyright (c) 2018-2023 K4YT3X and contributors.
This project includes or dependson the following software and projects:
Project
License
Rich
MIT License
WireGuard
MIT License
cryptography
BSD License
Related Project: wg-dynamic
wg-dynamic is a tool designed officially by the WireGuard developing team. This new utility will provide a convenient way of configuring networks dynamically, where mesh network being one of the them. If you're interested, check it out at wg-dynamic@github or wg-dynamic@official repository. You might also want to read this project's idea page.
This section used to be on the top of the page, but has been moved since there has been no new commits observed in this project since 2019.
The most recent commit recorded on k4yt3x/wg-meshconf was 2.3 years ago, based on the GitHub push timestamp. The repository has 118 forks — one of the better signals of community interest.
How does k4yt3x/wg-meshconf compare to other Backend projects?
k4yt3x/wg-meshconf is tracked by TopGit in the Backend category, with 1.0k GitHub stars and written in Python. Browse the Backend topic page on TopGit to compare it against similar projects by stars and activity.
How many stars does k4yt3x/wg-meshconf have?
k4yt3x/wg-meshconf has 1.0k GitHub stars — refresh the page for the live number, or check github.com/k4yt3x/wg-meshconf. TopGit mirrors GitHub's count but does not claim minute-by-minute accuracy.
What is k4yt3x/wg-meshconf?
k4yt3x/wg-meshconf (k4yt3x/wg-meshconf) is a Python project on GitHub. From the project's own README: WireGuard full mesh configuration generator.
What language is k4yt3x/wg-meshconf written in?
k4yt3x/wg-meshconf is written primarily in Python. GitHub's language field is based on the largest share of bytes in the default branch.
What topics is k4yt3x/wg-meshconf associated with?
GitHub's repository topics for k4yt3x/wg-meshconf: "mesh-generation", "mesh-networks", "networking", "python", "wireguard". TopGit's editorial category is Backend.
Why is k4yt3x/wg-meshconf categorized under Backend?
TopGit places k4yt3x/wg-meshconf in the Backend category based on its GitHub topics and description (tagged: "mesh-generation", "mesh-networks", "networking"). Categories are assigned from real repository metadata, not editorial guesswork.
Read full README in the tab above.
Want a second opinion on wg-meshconf?
Ask an AI that can read this page — one click and you get its take on wg-meshconf.
 /wg-meshconf