appleboy/CodeGPT

appleboy/CodeGPT là một trong những repo tích hợp AI mà TopGit theo dõi, hiện có 1.5k sao, viết chủ yếu bằng Go. A CLI written in Go language that writes git commit messages or do a code review brief for you using ChatGPT AI (gpt-4.1, gpt-4o model) and automatically installs a git prepare-commit-msg hook.
Tóm tắt dựng từ metadata GitHub của chính dự án — chưa có bài review TopGit. Trang sẽ tự động cập nhật khi bài review đầy đủ được xuất bản.
TopGit viết bài đầy đủ cho repo có nhiều sao nhất và được yêu cầu nhiều nhất. Trang này là snapshot trong thời gian chờ — xem README gốc ở tab READ ME.
Snapshot
Cộng tác viên hàng đầu
Xem cộng tác viên hàng đầu
CodeGPT




A CLI tool written in Go that generates git commit messages or provides code review summaries using ChatGPT AI (gpt-5, gpt-4o, gpt-4 model). It also automatically installs a git prepare-commit-msg hook.
- 繁體中文介紹
- 繁體中文影片
English | 繁體中文 | 简体中文

Table of Contents
- CodeGPT
- Table of Contents
- Features
- Installation
- macOS
- Windows
- Install via Script or Binary
- A. Automated Install (Recommended)
- B. Manual Install (Advanced)
- Configurable Environment Variables
- From Source
- Using VSCode Devcontainer
- Configuration
- Using API Key Helper for Dynamic Credentials
- Setup API Key Helper
- Configure Refresh Interval
- Gemini-Specific API Key Helper
- How It Works
- Priority Order
- How to Customize the Default Prompt Folder
- How to Change to Azure OpenAI Service
- Support for Gemini API Service
- Configuration Options
- Example: Gemini API (default backend)
- Example: VertexAI Gemini
- Support for Anthropic API Service
- How to Change to Groq API Service
- How to Change to Ollama API Service
- How to Change to OpenRouter API Service
- Using API Key Helper for Dynamic Credentials
- Usage
- CLI Mode
- Change Commit Message Template
- Git Hook
- Install
- Uninstall
- Code Review
- Git Hook
- Testing
- Star History
- Reference

Features
- Supports Azure OpenAI Service, OpenAI API, Gemini, Anthropic, Ollama, Groq, and OpenRouter.
- Adheres to the conventional commits specification.
- Integrates with Git prepare-commit-msg Hook, see the Git Hooks documentation.
- Allows customization of generated diffs by specifying the number of context lines (default: 3).
- Enables file exclusion patterns for git diff operations.
- Translates commit messages into other languages (supports
en,zh-tw, orzh-cn). - Supports SOCKS proxy or custom network HTTP proxy.
- Generates brief code reviews.
- Supports streaming output for real-time token display.
- Allows customization of prompt templates and variables.
Installation
macOS
Install via Homebrew:
brew tap appleboy/tap
brew install codegpt
Windows
Install via Chocolatey:
choco install codegpt
Install via Script or Binary
For most systems, you can use an install script or manually download a pre-compiled binary.
A. Automated Install (Recommended)
Run the install script to automatically download and set up the latest release:
bash < <(curl -sSL https://raw.githubusercontent.com/appleboy/CodeGPT/main/install.sh)
Or download and run manually:
curl -LO https://raw.githubusercontent.com/appleboy/CodeGPT/main/install.sh
chmod +x install.sh
./install.sh
B. Manual Install (Advanced)
-
Download the latest pre-compiled binary from the release page.
-
Change permissions:
chmod 755 codegpt -
Move the binary to your system bin directory:
mv codegpt /usr/local/bin/ -
Confirm installation:
codegpt version
Configurable Environment Variables
| Variable Name | Default Value | Description |
|---|---|---|
| VERSION | latest | The CodeGPT version to install (defaults to latest release) |
| INSTALL_DIR | $HOME/.codegpt/bin | Installation directory |
| INSECURE | unset (disabled) | If set to any value, skips SSL verification. Enabled when variable is present |
Example usage:
# Install with insecure mode enabled (ignoring curl SSL verification):
INSECURE=1 ./install.sh

# Install a specific version to a custom directory:
VERSION=1.1.0 INSTALL_DIR=/opt/codegpt ./install.sh
The script will:
- Detect your OS and architecture
- Download the latest binary
- Add the binary to your PATH
From Source
Install from source code:
go install github.com/appleboy/CodeGPT/cmd/codegpt@latest
Using VSCode Devcontainer
Add the feature to your devcontainer.json:
"features": {
    "ghcr.io/kvokka/features/codegpt:1": {}
}
Configuration
First, create your OpenAI API Key. The OpenAI Platform allows you to generate a new API Key.
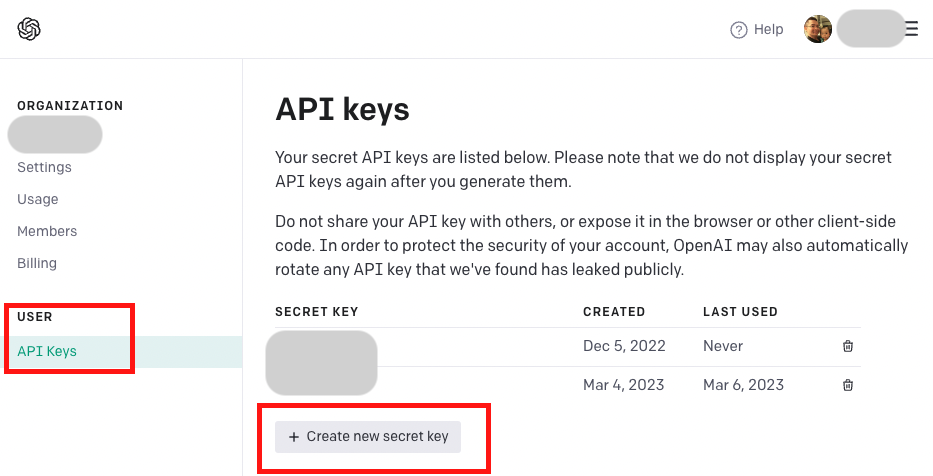
Set the environment variable OPENAI_API_KEY:
export OPENAI_API_KEY=sk-xxxxxxx
Alternatively, store your API key in a custom config file:
codegpt config set openai.api_key sk-xxxxxxx
This will create a .codegpt.yaml file in your home directory ($HOME/.config/codegpt/.codegpt.yaml). The following options are available:
| Option | Description |
|---|---|
| openai.base_url | Replace the default base URL (https://api.openai.com/v1). |
| openai.api_key | Generate API key from openai platform page. |
| openai.api_key_helper | Shell command to dynamically generate API key (e.g., from password manager or secret service). |
| openai.api_key_helper_refresh_interval | Interval in seconds to refresh credentials from api_key_helper (default: 900 seconds / 15 minutes). Set to 0 to disable caching. |
| openai.org_id | Identifier for this organization sometimes used in API requests. See organization settings. Only for openai service. |
| openai.model | Default model is gpt-4o, you can change to other custom model (Groq or OpenRouter provider). |
| openai.proxy | HTTP/HTTPS client proxy. |
| openai.socks | SOCKS client proxy. |
| openai.timeout | Default HTTP timeout is 10s (ten seconds). |
| openai.skip_verify | Default skip_verify is false, You can change it to true to ignore SSL verification. |
| openai.max_tokens | Default max tokens is 300. See reference max_tokens. |
| openai.temperature | Default temperature is 1. See reference temperature. |
| git.diff_unified | Generate diffs with <n> lines of context, default is 3. |
| git.exclude_list | Exclude file from git diff command. |
| openai.provider | Default service provider is openai, you can change to azure. |
| output.lang | Default language is en and available languages zh-tw, zh-cn, ja. |
| openai.top_p | Default top_p is 1.0. See reference top_p. |
| openai.frequency_penalty | Default frequency_penalty is 0.0. See reference frequency_penalty. |
| openai.presence_penalty | Default presence_penalty is 0.0. See reference presence_penalty. |
| openai.stream | Enable streaming output for real-time token display, default is false. |
| prompt.folder | Default prompt folder is $HOME/.config/codegpt/prompt. |
Using API Key Helper for Dynamic Credentials
Instead of storing your API key directly in the config file, you can use a shell command to dynamically retrieve it from a password manager or secret service. This is especially useful for:
- Fetching keys from password managers (1Password, Bitwarden, etc.)
- Using cloud secret services (AWS Secrets Manager, Google Secret Manager, etc.)
- Implementing token rotation and short-lived credentials
- Enhancing security by not storing keys in plain text
Setup API Key Helper
Configure a shell command to retrieve your API key:
# Using 1Password CLI
codegpt config set openai.api_key_helper "op read op://vault/openai/api_key"

# Using AWS Secrets Manager
codegpt config set openai.api_key_helper "aws secretsmanager get-secret-value --secret-id openai-key --query SecretString --output text"

# Using Google Cloud Secret Manager
codegpt config set openai.api_key_helper "gcloud secrets versions access latest --secret=openai-api-key"

# Using environment variable
codegpt config set openai.api_key_helper "echo \$MY_OPENAI_KEY"

# Custom script
codegpt config set openai.api_key_helper "/path/to/get-api-key.sh"
Configure Refresh Interval
By default, the API key is cached for 15 minutes (900 seconds) to avoid excessive calls to your secret service:
# Set refresh interval to 5 minutes
codegpt config set openai.api_key_helper_refresh_interval 300

# Set refresh interval to 30 minutes
codegpt config set openai.api_key_helper_refresh_interval 1800

# Disable caching (fetch key every time)
codegpt config set openai.api_key_helper_refresh_interval 0
Gemini-Specific API Key Helper
For Gemini provider, you can set a separate helper:
codegpt config set gemini.api_key_helper "gcloud secrets versions access latest --secret=gemini-key"
codegpt config set gemini.api_key_helper_refresh_interval 600
How It Works
- First execution: CodeGPT runs your helper command and caches the API key in
~/.config/codegpt/.cache/with restrictive permissions (0600) - Subsequent executions: Within the refresh interval, CodeGPT uses the cached key
- After expiration: CodeGPT automatically re-runs the helper command and updates the cache
- Security: Cache files are stored with owner-only read/write permissions
Priority Order
When multiple API key sources are configured, CodeGPT uses this priority:
openai.api_key_helper(if configured)openai.api_key(static config)OPENAI_API_KEYenvironment variable
How to Customize the Default Prompt Folder
The default prompt folder is located at $HOME/.config/codegpt/prompt. You can change this to another directory by executing:
codegpt config set prompt.folder /path/to/your/prompt
To load the prompt files from the custom folder, run:
codegpt prompt --load
Upon execution, you will see messages similar to the following:
save code_review_file_diff.tmpl to /Users/xxxxx/.config/codegpt/prompt/code_review_file_diff.tmpl
save summarize_file_diff.tmpl to /Users/xxxxx/.config/codegpt/prompt/summarize_file_diff.tmpl
save summarize_title.tmpl to /Users/xxxxx/.config/codegpt/prompt/summarize_title.tmpl
save conventional_commit.tmpl to /Users/xxxxx/.config/codegpt/prompt/conventional_commit.tmpl
- code_review_file_diff.tmpl
- summarize_file_diff.tmpl
- summarize_title.tmpl
- conventional_commit.tmpl
How to Change to Azure OpenAI Service
Get the API key, Endpoint, and Model deployments list from the Azure Resource Management Portal on the left menu.
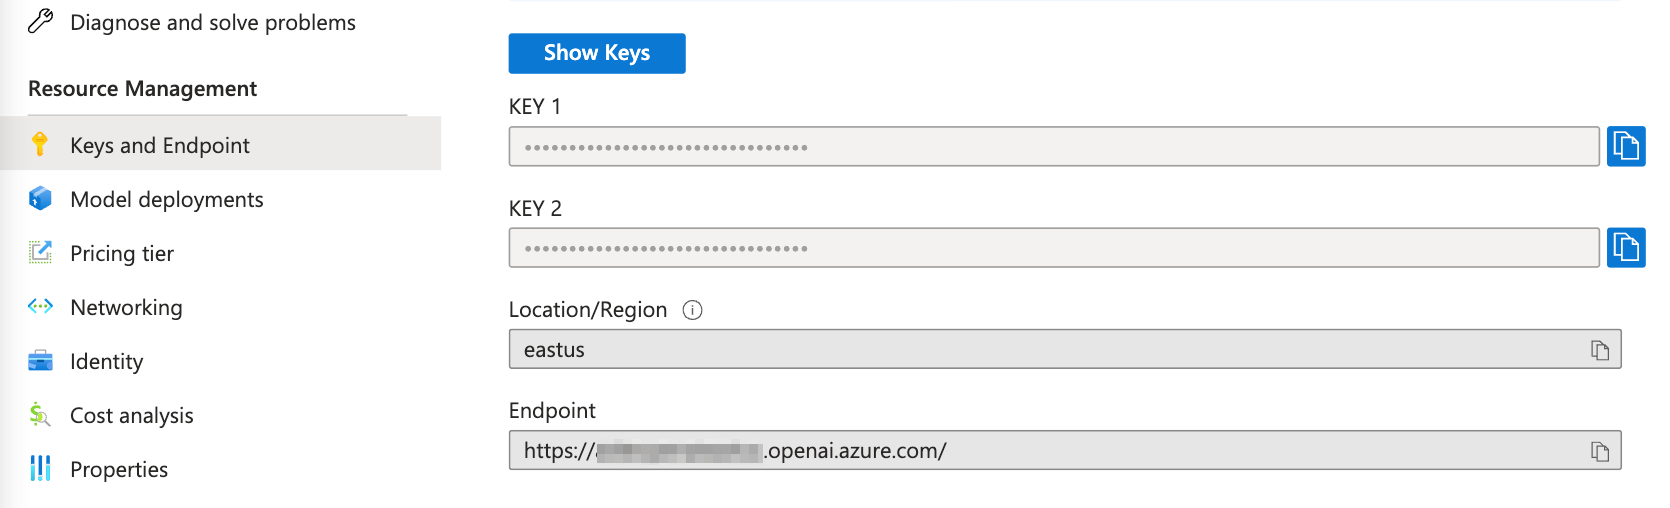
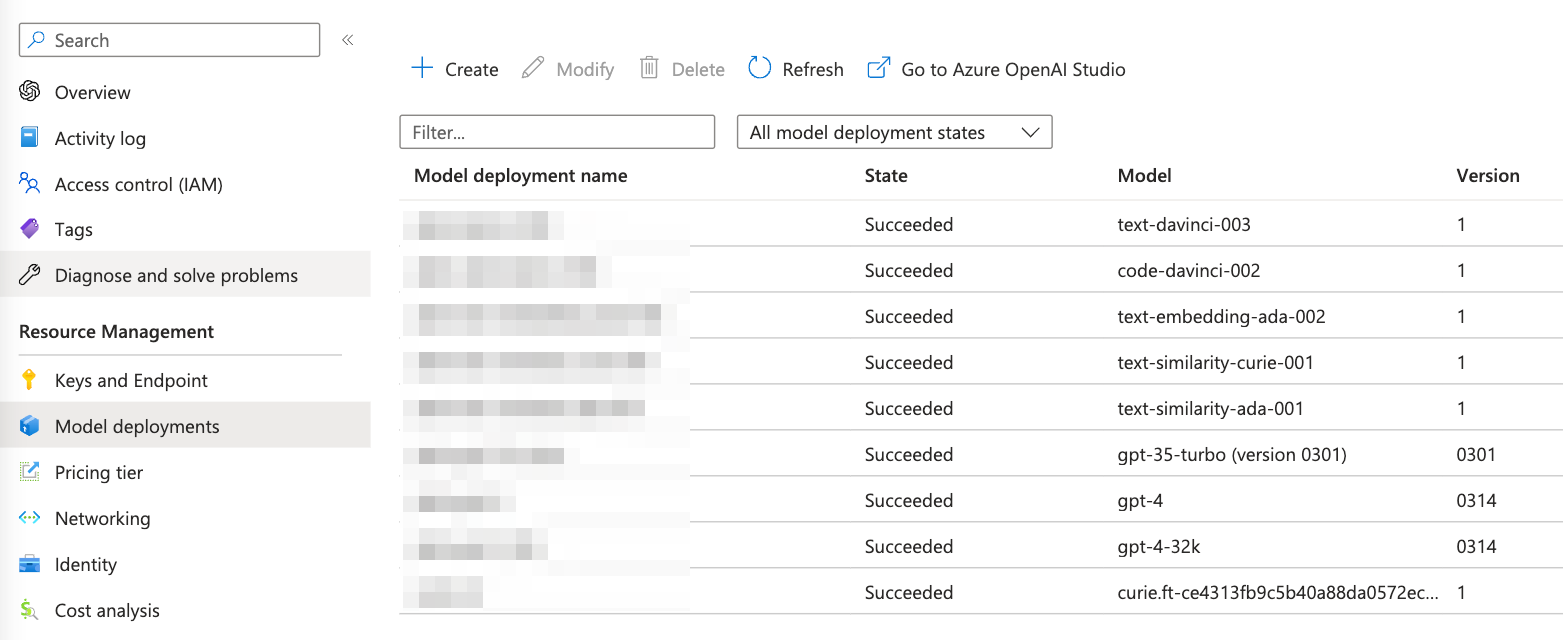
Update your config file:
codegpt config set openai.provider azure
codegpt config set openai.base_url https://xxxxxxxxx.openai.azure.com/
codegpt config set openai.api_key xxxxxxxxxxxxxxxx
codegpt config set openai.model xxxxx-gpt-4o
Support for Gemini API Service
You can use the Gemini API or VertexAI Gemini service. See the Gemini API documentation and VertexAI documentation.
Update the following parameters in your config file.
- Please create an API key from the Gemini API page (for BackendGeminiAPI) or from VertexAI API Key (for BackendVertexAI).
Configuration Options
| Option | Description | Example Value | Required | Default |
|---|---|---|---|---|
| openai.provider | Set to gemini to use Gemini provider | gemini | Yes | |
| gemini.api_key | API key for Gemini or VertexAI | xxxxxxx | Yes | |
| gemini.model | Model name (see Gemini models) | gemini-2.0-flash | Yes | |
| gemini.backend | Gemini backend: BackendGeminiAPI (default, for Gemini API) or BackendVertexAI (for VertexAI) | BackendGeminiAPI | No | BackendGeminiAPI |
| gemini.project_id | VertexAI project ID (required if using BackendVertexAI) | my-gcp-project | Cond. | |
| gemini.location | VertexAI location (required if using BackendVertexAI) | us-central1 | Cond. |
Example: Gemini API (default backend)
codegpt config set openai.provider gemini
codegpt config set openai.model gemini-2.0-flash
codegpt config set gemini.api_key xxxxxxx
# gemini.backend defaults to BackendGeminiAPI, so you can omit it
Example: VertexAI Gemini
codegpt config set openai.provider gemini
codegpt config set openai.model gemini-2.0-flash
codegpt config set gemini.backend BackendVertexAI
codegpt config set gemini.project_id my-gcp-project
codegpt config set gemini.location us-central1
flowchart TD
    User([User])
    subgraph CodeGPT
      GeminiClient([Gemini Provider])
    end
    subgraph Google
      GeminiAPI([Gemini API])
      VertexAI([VertexAI Gemini])
    end

    User -->|Completion / GetSummaryPrefix| GeminiClient

    GeminiClient -- BackendGeminiAPI --> GeminiAPI
    GeminiAPI -- Response (text, usage) --> GeminiClient

    GeminiClient -- BackendVertexAI --> VertexAI
    VertexAI -- Response (text, usage) --> GeminiClient

    GeminiClient --> User
Support for Anthropic API Service
Build with the Anthropic API, you can see the Anthropic API documentation. Update the provider and api_key in your config file. Please create an API key from the Anthropic API page.
codegpt config set openai.provider anthropic
codegpt config set openai.api_key xxxxxxx
codegpt config set openai.model claude-3-5-sonnet-20241022
See the model list from the Anthropic API documentation.
How to Change to Groq API Service
Get the API key from the Groq API Service by visiting the Groq API Service. Update the base_url and api_key in your config file.
codegpt config set openai.provider openai
codegpt config set openai.base_url https://api.groq.com/openai/v1
codegpt config set openai.api_key gsk_xxxxxxxxxxxxxx
codegpt config set openai.model llama3-8b-8192
GroqCloud currently supports the following models:
- Production Models
- Preview Models
How to Change to Ollama API Service
We can use the Llama3 model from the Ollama API Service; please visit the Ollama API Models documentation. Update the base_url in your config file.
# pull llama3 8b model
ollama pull llama3
ollama cp llama3 gpt-4o
Try to use the Ollama API Service:
curl http://localhost:11434/v1/chat/completions \
  -H "Content-Type: application/json" \
  -d '{
    "model": "gpt-4o",
    "messages": [
      {
        "role": "user",
        "content": "Hello!"
      }
    ]
  }'
Update the base_url in your config file. You don't need to set the api_key in the config file.
codegpt config set openai.base_url http://localhost:11434/v1
How to Change to OpenRouter API Service
You can see the supported models list, model usage can be paid by users, developers, or both, and may shift in availability. You can also fetch models, prices, and limits via API.
The following example uses the free model name: meta-llama/llama-3-8b-instruct:free
codegpt config set openai.provider openai
codegpt config set openai.base_url https://openrouter.ai/api/v1
codegpt config set openai.api_key sk-or-v1-xxxxxxxxxxxxxxxx
codegpt config set openai.model google/gemini-3-flash-preview
To include your app in openrouter.ai rankings and show it in rankings on openrouter.ai, you can set the openai.headers in your config file:
codegpt config set openai.headers "HTTP-Referer=https://github.com/appleboy/CodeGPT X-Title=CodeGPT"
- HTTP-Referer: Optional, for including your app in openrouter.ai rankings.
- X-Title: Optional, for showing in rankings on openrouter.ai.
Usage
There are two methods for generating a commit message using the codegpt command: CLI mode and Git Hook.
CLI Mode
You can call codegpt directly to generate a commit message for your staged changes:
git add <files...>
codegpt commit --preview
The commit message is shown below:
Summarize the commit message using the gpt-4o model
We are trying to summarize a git diff
We are trying to summarize a title for the pull request
================Commit Summary====================

feat(cmd): Add preview flag and remove disableCommit flag in commit command and template file.

- Add a `preview` flag to the `commit` command
- Remove the `disableCommit` flag from the `prepare-commit-msg` template file

==================================================
Write the commit message to .git/COMMIT_EDITMSG file
Or translate all git commit messages into a different language (Traditional Chinese, Simplified Chinese, or Japanese):
codegpt commit --lang zh-tw --preview
Consider the following outcome:
Summarize the commit message using the gpt-4o model
We are trying to summarize a git diff
We are trying to summarize a title for the pull request
We are trying to translate a git commit message to Traditional Chinese language
================Commit Summary====================

功能:重構 codegpt commit 命令標記

- 將「codegpt commit」命令新增「預覽」標記
- 從「codegpt commit」命令中移除「--disableCommit」標記

==================================================
Write the commit message to .git/COMMIT_EDITMSG file
You can replace the tip of the current branch by creating a new commit. Just use the --amend flag:
codegpt commit --amend
Enable streaming output to see tokens as they arrive in real-time, rather than waiting for the full response:
codegpt commit --stream
Or enable it globally via config:
codegpt config set openai.stream true
The --stream flag also works with the review command:
codegpt review --stream
Agent Skill Integration
CodeGPT provides agent skills such as /commit-message that generate conventional commit messages from your staged changes. In Claude Code, simply type /commit-message to analyze your staged diff and produce a well-formatted commit message with the appropriate prefix, scope, and summary.
The skill definitions are maintained in a separate repository: appleboy/skills.
Change Commit Message Template
The default commit message template is as follows. The summarize_prefix variable outputs the conventional commit prefix with scope in prefix(scope) format (e.g., feat(cmd), fix(git), docs(readme)):
{{ .summarize_prefix }}: {{ .summarize_title }}

{{ .summarize_message }}
Change the format with a template string using the --template_string parameter:
codegpt commit --preview --template_string \
  "[{{ .summarize_prefix }}]: {{ .summarize_title }}"
Change the format with a template file using the --template_file parameter:
codegpt commit --preview --template_file your_file_path
Add a custom variable to the git commit message template:
{{ .summarize_prefix }}: {{ .summarize_title }}

{{ .summarize_message }}

{{ if .JIRA_URL }}{{ .JIRA_URL }}{{ end }}
Add a custom variable to the git commit message template using the --template_vars parameter:
codegpt commit --preview --template_file your_file_path --template_vars \
  JIRA_URL=https://jira.example.com/ABC-123
Load a custom variable from a file using the --template_vars_file parameter:
codegpt commit --preview --template_file your_file_path --template_vars_file your_file_path
See the template_vars_file format as follows:
JIRA_URL=https://jira.example.com/ABC-123
Git Hook
You can also use the prepare-commit-msg hook to integrate codegpt with Git. This allows you to use Git normally and edit the commit message before committing.
Install
To install the hook in the Git repository:
codegpt hook install
Uninstall
To remove the hook from the Git repository:
codegpt hook uninstall
Stage your files and commit after installation:
git add <files...>
git commit
codegpt will generate the commit message for you and pass it back to Git. Git will open it with the configured editor for you to review/edit it. Then, to commit, save and close the editor!
$ git commit
Summarize the commit message using the gpt-4o model
We are trying to summarize a git diff
We are trying to summarize a title for the pull request
================Commit Summary====================

Improve user experience and documentation for OpenAI tools

- Add download links for pre-compiled binaries
- Include instructions for setting up OpenAI API key
- Add a CLI mode for generating commit messages
- Provide references for OpenAI Chat completions and ChatGPT/Whisper APIs

==================================================
Write the commit message to .git/COMMIT_EDITMSG file
[main 6a9e879] Improve user experience and documentation for OpenAI tools
 1 file changed, 56 insertions(+)
Code Review
You can use codegpt to generate a code review message for your staged changes:
codegpt review
Or translate all code review messages into a different language (Traditional Chinese, Simplified Chinese, or Japanese):
codegpt review --lang zh-tw
See the following result:
Code review your changes using gpt-4o model
We are trying to review code changes
PromptTokens: 1021, CompletionTokens: 200, TotalTokens: 1221
We are trying to translate core review to Traditional Chinese language
PromptTokens: 287, CompletionTokens: 199, TotalTokens: 486
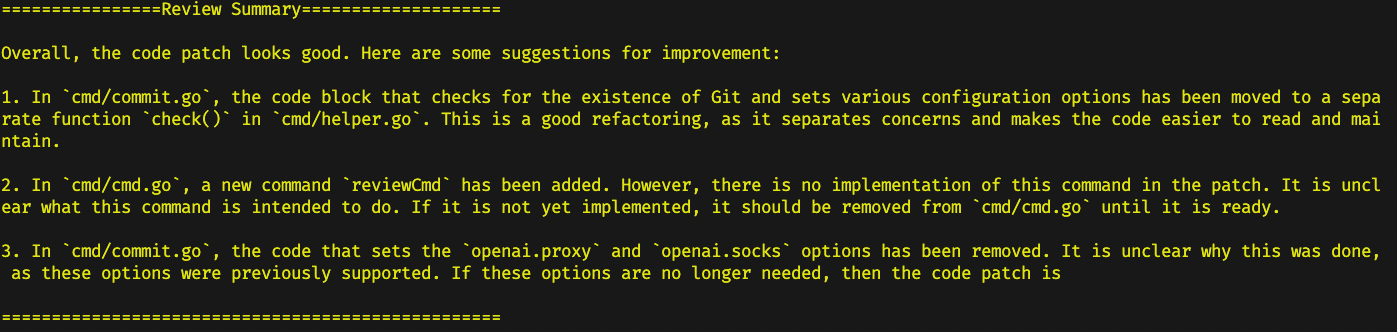
================Review Summary====================

總體而言,此程式碼修補似乎在增加 Review 指令的功能,允許指定輸出語言並在必要時進行翻譯。以下是需要考慮的潛在問題:

- 輸出語言沒有進行輸入驗證。如果指定了無效的語言代碼,程式可能會崩潰或產生意外結果。
- 此使用的翻譯 API 未指定,因此不清楚是否存在任何安全漏洞。
- 無法處理翻譯 API 調用的錯誤。如果翻譯服

==================================================
Example php code review:
<?php
if( isset( $_POST[ 'Submit' ]  ) ) {
  // Get input
  $target = $_REQUEST[ 'ip' ];
  // Determine OS and execute the ping command.
  if( stristr( php_uname( 's' ), 'Windows NT' ) ) {
    // Windows
    $cmd = shell_exec( 'ping  ' . $target );
  }
  else {
    // *nix
    $cmd = shell_exec( 'ping  -c 4 ' . $target );
  }
  // Feedback for the end user
  $html .= "<pre>{$cmd}</pre>";
}
?>
code review result:
================Review Summary====================

Code review:

1. Security: The code is vulnerable to command injection attacks as the user input is directly used in the shell_exec() function. An attacker can potentially execute malicious commands on the server by injecting them into the 'ip' parameter.
2. Error handling: There is no error handling in the code. If the ping command fails, the error message is not displayed to the user.
3. Input validation: There is no input validation for the 'ip' parameter. It should be validated to ensure that it is a valid IP address or domain name.
4. Cross-platform issues: The code assumes that the server is either running Windows or *nix operating systems. It may not work correctly on other platforms.

Suggestions for improvement:

1. Use escapeshellarg() function to sanitize the user input before passing it to shell_exec() function to prevent command injection.
2. Implement error handling to display error messages to the user if the ping command fails.
3. Use a regular expression to validate the 'ip' parameter to ensure that it is a valid IP address or domain name.
4. Use a more robust method to determine the operating system, such as the PHP_OS constant, which can detect a wider range of operating systems.

==================================================
Testing
Run the following command to test the code:
make test
Star History
Reference
- OpenAI Chat completions documentation.
- Introducing ChatGPT and Whisper APIs
Repo liên quan
prompts.chat is an open-source library of prompts written for AI chat assistants, first released in December 2022 under the name Awesome ChatGPT Prompts. The GitHub project has since grown and now distributes prompts through a website, a CSV file, a Markdown file, and a Hugging Face dataset, alongside a self-hosting option, a CLI, an MCP server, and a Claude Code plugin.
prompts.chat is the largest open-source prompt library for AI, formerly called Awesome ChatGPT Prompts. It hosts curated prompts in CSV and Markdown, available as a public website, Hugging Face dataset, or self-hosted instance. The project supports multiple LLM providers including ChatGPT, Claude, Gemini, Llama, and Mistral. Self-hosting uses a Next.js setup wizard that configures authentication via GitHub, Google, or Azure AD, with PostgreSQL as the recommended database. CLI access, an MCP server, and a Claude Code plugin extend its reach into developer workflows. The codebase is MIT-licensed while prompt data falls under CC0. Its 166k GitHub stars make it an AI resource on the platform with 166k GitHub stars, and it has been cited by Harvard, Columbia, and Forbes.
LangChain is a Python framework (MIT-licensed) for assembling LLM-powered apps and agents from standard components: model wrappers, prompts, retrieval, tools, and chain/graph orchestration handed off to LangGraph. It's for developers gluing together model providers and data sources, not for a single prompt-response call.
Microsoft's introductory course on building generative AI applications walks you through 21 structured lessons created by Microsoft Cloud Advocates. The curriculum alternates between conceptual 'Learn' lessons and hands-on 'Build' lessons, progressing from LLM fundamentals through advanced topics like RAG, AI agents, and fine-tuning. Each lesson includes a written explanation, video introduction, and working code samples in both Python and TypeScript. Basic Python or TypeScript knowledge is expected. The course supports Azure OpenAI, OpenAI API, Microsoft Foundry Models, and Foundry Local for fully offline execution. With over 50 language translations maintained via automated GitHub Actions, it's accessible to a global developer audience. MIT licensed with an active Discord community and developer forum for peer support.
Trả lời nhanh
appleboy/CodeGPT có bao nhiêu sao?
appleboy/CodeGPT có 1.5k sao GitHub — tải lại trang để xem số mới nhất, hoặc xem trực tiếp github.com/appleboy/CodeGPT. TopGit phản chiếu số sao của GitHub nhưng không cam kết đến từng phút.
appleboy/CodeGPT có những chủ đề gì?
GitHub topics của appleboy/CodeGPT: "chatgpt", "chatgpt-api", "git", "git-hook", "golang", "openai", "openai-api". TopGit xếp repo vào nhóm AI Tools.
appleboy/CodeGPT còn đang phát triển không?
Commit gần nhất trên appleboy/CodeGPT là 1 tháng trước (theo timestamp GitHub). Repo có 132 fork — một chỉ báo về mức độ quan tâm của cộng đồng.
appleboy/CodeGPT viết bằng ngôn ngữ gì?
appleboy/CodeGPT chủ yếu viết bằng Go. Trường "language" của GitHub dựa trên phần lớn byte ở nhánh mặc định.
Cùng nhóm AI Tools còn repo nào?
appleboy/CodeGPT thuộc nhóm AI Tools trên TopGit, cùng 7 topic GitHub. Trang Trending và Topics liệt kê các repo cùng số sao và cùng ngôn ngữ để so sánh.
Đọc thêm về appleboy/CodeGPT ở đâu?
Trang TopGit này là một snapshot — tab "Readme" hiển thị nguyên văn README của repo (đã bỏ link, giữ ảnh). Repo GitHub ở github.com/appleboy/CodeGPT là nguồn chính thức.
Vì sao appleboy/CodeGPT được xếp vào nhóm AI Tools?
TopGit xếp appleboy/CodeGPT vào nhóm AI Tools dựa trên GitHub topics và mô tả của repo (gắn thẻ: "chatgpt", "chatgpt-api", "git"). Việc phân loại dựa trên metadata thật của repo, không phải đoán theo cảm tính biên tập.
Đọc đầy đủ README ở tab phía trên.
CodeGPT có đáng để bạn bỏ thời gian?
ChatGPT, Claude và Perplexity đều đọc được trang này. Hỏi thử xem họ nghĩ gì về CodeGPT.