1.5k sao GitHub và vẫn tăng — geerlingguy/pi-webcam là dự án đa ngôn ngữ mà TopGit đang theo dõi trên nền tảng. Automation to configure a Raspberry Pi as a USB OTG webcam
Tóm tắt dựng từ metadata GitHub của chính dự án — chưa có bài review TopGit. Trang sẽ tự động cập nhật khi bài review đầy đủ được xuất bản.
VÌ SAO CHƯA CÓ REVIEW
TopGit viết bài đầy đủ cho repo có nhiều sao nhất và được yêu cầu nhiều nhất. Trang này là snapshot trong thời gian chờ — xem README gốc ở tab READ ME.
Inspired by David Hunt's blog post showing how to use a Raspberry Pi Zero with a Pi Camera as a USB Webcam, as well as justinschuldt's gist, I wanted to make my Raspberry Pi do the same thing, but automated and with all the scripts wrapped in version control, since the blog post was a little bit vague in some areas.
This Ansible playbook can be run on most Raspberry Pis to set it up as a USB webcam.
What does that mean? Well, after running the playbook:
You plug the Pi into your computer
You wait until it boots
Bingo! Webcam usable in any software (Zoom, Teams, Meet, OBS, QuickTime, etc.)
It works on Mac, Windows, and all the flavors of Linux I've tested so far. It even works on another Raspberry Pi (I've tested it on a Pi 4 and Pi 400).
Video overview of this project
I published a video in November 2020 detailing how to set up your Pi Webcam using this project. Click the thumbnail below to view it:
Caveats
The playbook is meant to run on a brand new installation of Raspbian that has not had any configuration changes via raspi-config or any other tools, though it should work correctly with an existing installation.
Note: This modifies your boot config, and as such you should not run this playbook on a microSD or other boot volume you're not ready to reformat and re-flash!
Setting up the Hardware
It doesn't matter if you set up the software or hardware first, you just need to do both to have a functional webcam.
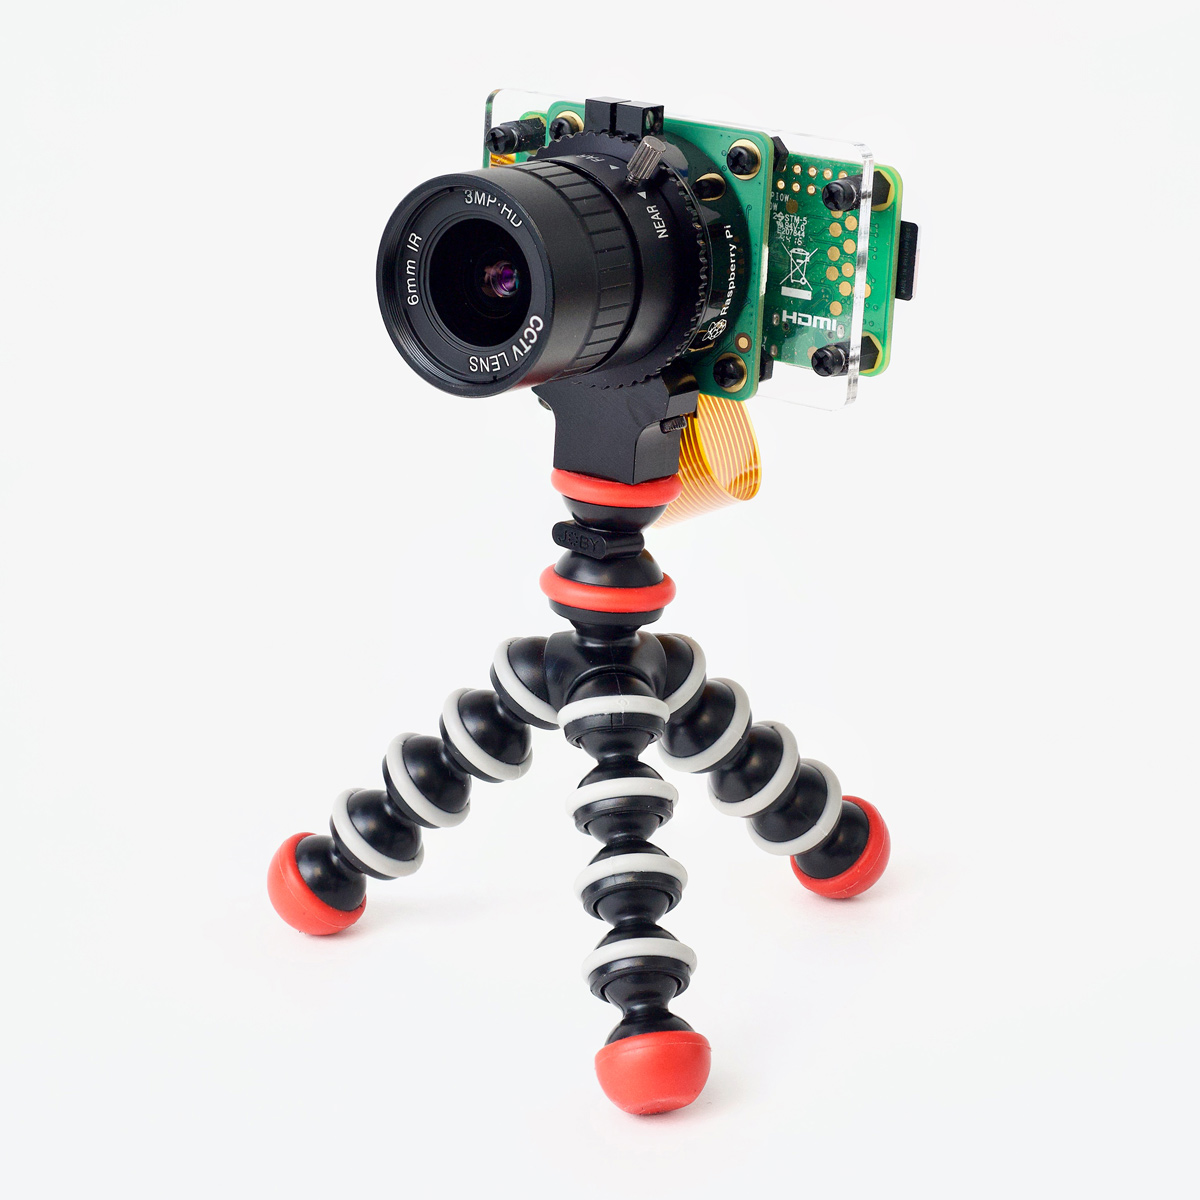
There are a number of different components you can purchase instead of these, but here's the list of what I'm using in my 'official' version that is well-tested and that I use frequently on my Mac and Windows laptops:
Raspberry Pi Zero W (can also use Zero)
Raspberry Pi High Quality Camera
Raspberry Pi Zero camera cable
6mm wide-angle lens for HQ Camera
Pi Hut Pi Zero HQ Camera mounting plate
Once you have everything, it's a matter of putting it all together.
Check out my video on YouTube for a detailed assembly and setup guide: Raspberry Pi Zero is a PRO HQ webcam for less than $100!
Mounting the webcam
The HQ Camera includes a female tripod socket, so any tripod or mounting arm will do. I've used a variety of mounts depending on the purpose, for example:
SmallRig Ballhead Clamp Mount: To mount the cam above my monitor on my monitor arm
Joby GorillaPod Magnetic Mini: Useful in a huge variety of situations
Joby GorillaPod 5K stand and ballhead: Rock solid and a little taller, but it's definitely overkill
25 inch flexible gooseneck webcam desk mount: Can mount the camera any which way using this, especially great for top-down shots
Setting up the Software
There are two ways you can run this automated setup. You can either run everything on the Raspberry Pi itself (e.g. if you plug in a keyboard, mouse, and monitor), or you can run it from another computer.
Setup on the Raspberry Pi
Pro Tip: If you want to use a Pi Zero for the webcam, and don't want to wait half an hour for it to run all this automation, you can put the flashed microSD card into a newer Pi (like the Pi 4) and do all this work there, then when it's done pull the card and pop it into a Pi Zero.
Flash the latest Raspberry Pi OS to a microSD card.
Once Raspbian is loaded on the card, insert the card in your Pi, and plug in your Pi to boot it up.
Follow the setup wizard, and if you want to easily be able to log into the Pi later, connect to a WiFi network, and also run the raspi-config tool and enable SSH.
The Raspberry Pi should ask to be restarted. Go ahead and restart now, and wait for it to boot back up.
Open the Terminal application (in the launcher or in Menu > Accessories > Terminal).
Install Ansible and Git: sudo apt update && sudo apt install -y python3-dev python3-pip libyaml-dev libffi-dev git && sudo pip3 install --no-binary pyyaml ansible (Warning: this can take a while, especially on slower Pis!).
Clone this repository to your Pi: git clone https://github.com/geerlingguy/pi-webcam.git
Go into the repository directory: cd pi-webcam
Use the local inventory file: cp inventory-local.example inventory
Run the Ansible playbook: ansible-playbook main.yml
You can shutdown the Pi at this point.
Setup from another Computer
Make sure you have Ansible installed on your computer.
Flash the latest Raspberry Pi OS a microSD card. Make sure you added an ssh file to the boot volume so SSH is enabled on first boot.
Once Raspbian is loaded on the card and you have the ssh file in the boot volume, insert the card in your Pi, and plug in your Pi to boot it up.
Make sure you can log into the Pi via SSH. Ideally, add your SSH key to the Pi using ssh-copy-id. If you don't, make sure to add the -k parameter to the ansible-playbook command later so you can enter the SSH password.
Clone or download this repository to your computer.
Use the ssh inventory file: cp inventory-ssh.example inventory
Update the IP address in inventory to match the IP address or hostname of your Raspberry Pi.
Edit the config.yml file to your liking (the defaults should be fine though).
Run the Ansible playbook:
ansible-playbook main.yml
You can shutdown the Pi at this point (log in via SSH then sudo shutdown now).
Plugging in the Camera
You could've done this earlier, but if you haven't yet, plug the camera module into the Raspberry Pi using the appropriate camera connector.
Using the Pi as a webcam
At this point, it should (assuming everything worked) be set up as a USB webcam.
All you need to do is grab a USB cable and plug the Pi into any USB port on your computer. But which port do you plug into on the Pi? Well, I have a handy little table here:
Pi Model
Which USB Port for device mode Webcam use?
Pi Zero / Pi Zero W
'USB' port (next to 'PWR IN')
Pi A/A+
'USB' port (you need a non standard Type-A to Type-A USB cable)
Pi 4
USB-C 'Power' port
Once it's plugged in, you need to wait 30 seconds or so before the Pi will be booted and fully ready, then you can open any video recording/conferencing software, go to the camera selection, and BOOM! Select the 'Pi Webcam'.
What about the other Pi models? Unfortunately, other Pi models do not have full support for Device mode, so they cannot be used as a webcam.
Powering down the Pi
If you want, and you still have WiFi enabled, or the Pi is otherwise connected to your network, you can log into it via SSH and run sudo shutdown now to power it off cleanly.
But I like living on the edge... it's not like the thing is writing a ton of data to the microSD card. When I'm finished using it as a webcam, I just unplug it. Simple as that.
If, for some strange reason, it did end up getting corrupted, I could just re-run this automation to set it up again. No big deal! I haven't had that happen yet, though.
Known issues
Well... most of the known issues have to do with the other projects this project relies on:
If you're not using a Mac, you may need to adjust the brightness setting in the uvc-gadget.c file and re-compile it manually. I'm looking into a better way to allow this to be configured.
The upstream repository providing the uvc-gadget application currently defaults to 720p resolution, which is great for most use cases. You can stream at 1080p, though the Pi Zero and older Pis may drop frames at that resolution. Follow this issue for progress making resolution more easily configurable.
The Pi 4 model B currently locks up when you try to use USB Device mode and enable the webcam for some reason. You can run the 2020-02-07 Raspbian release to work around this bug for now. Follow this issue for progress resolving this bug.
This stuff is a little bit of a complicated ball of string, so future Raspberry Pi OS and kernel updates could cause issues. I would not run this on a Raspberry Pi that is controlling a breathing machine or something like that.
Yadda, yadda, standard "if something breaks don't blame me" disclaimer. The worst thing I've done to my Pi in testing this so far is accidentally breaking off the locking connector for the camera cable. Oops.
License
MIT.
Author
I'm Jeff Geerling, and I approve of this repository.
geerlingguy/pi-webcam thuộc nhóm Image Tools trên TopGit, cùng 6 topic GitHub. Trang Trending và Topics liệt kê các repo cùng số sao và cùng ngôn ngữ để so sánh.
Đọc thêm về geerlingguy/pi-webcam ở đâu?
Trang TopGit này là một snapshot — tab "Readme" hiển thị nguyên văn README của repo (đã bỏ link, giữ ảnh). Repo GitHub ở github.com/geerlingguy/pi-webcam là nguồn chính thức.
geerlingguy/pi-webcam có phải mã nguồn mở không?
Có — geerlingguy/pi-webcam phát hành theo license MIT, nghĩa là mã nguồn mở để đọc, fork và (tùy license) tái sử dụng. Mã: github.com/geerlingguy/pi-webcam.
geerlingguy/pi-webcam có trang demo không?
Dự án có trang chủ ở https://www.youtube.com/watch?v=8fcbP7lEdzY. Tab "Readme" ở trang này thường có ảnh chụp và hướng dẫn bắt đầu nhanh.
geerlingguy/pi-webcam dùng license gì?
geerlingguy/pi-webcam phát hành theo license MIT. Nên mở file LICENSE trên GitHub để xác nhận — license metadata đôi khi lệch với thực tế dự án.
geerlingguy/pi-webcam là gì?
geerlingguy/pi-webcam (geerlingguy/pi-webcam) là dự án đa ngôn ngữ trên GitHub. Theo mô tả gốc: Automation to configure a Raspberry Pi as a USB OTG webcam
Vì sao geerlingguy/pi-webcam được xếp vào nhóm Image Tools?
TopGit xếp geerlingguy/pi-webcam vào nhóm Image Tools dựa trên GitHub topics và mô tả của repo (gắn thẻ: "camera", "hq-camera", "raspberry-pi"). Việc phân loại dựa trên metadata thật của repo, không phải đoán theo cảm tính biên tập.
Đọc đầy đủ README ở tab phía trên.
Chưa chắc pi-webcam có hợp với bạn?
Để ChatGPT, Claude hoặc Perplexity tìm hiểu giúp — bấm bên dưới và xem AI nói gì về pi-webcam.