instillai/video-resize-gpu là dự án Python với 4 sao. video resizing using GPU accelerated libraries
Tóm tắt dựng từ metadata GitHub của chính dự án — chưa có bài review TopGit. Trang sẽ tự động cập nhật khi bài review đầy đủ được xuất bản.
VÌ SAO CHƯA CÓ REVIEW
TopGit viết bài đầy đủ cho repo có nhiều sao nhất và được yêu cầu nhiều nhất. Trang này là snapshot trong thời gian chờ — xem README gốc ở tab READ ME.
Resize a Video using FFMPEG With NVIDIA GPU Acceleration on Ubuntu
This tutorial deals with video resizing using GPU accelerated libraries
supported by FFMPEG in Ubuntu 16.04. The code here belongs to "Resize a Video is Unbelievably Fast by using FFMPEG and GPU Acceleration – A Tutorial" post.
Introduction
FFmpeg is one of the most famous multimedia frameworks wich is
widely used for processing videos. In order to encode the video,
certainly a video encoder must be used. The popular
x264 is the one which is widely used however it is not
super fast! The latest NVIDIA GPUs contain a
hardware-based video encoder called NVENC which is much
faster than traditional ones. In order to be able to utilize this
gpu-accelerated encoder, FFmpeg must be installed with NVENC support.
The full documentation of FFmpeg integrated with NVIDIA can be fount at
here. documentation on NVENC can
be found
here.
Moreover The NVENC programming guide can be found
here.
In this tutorial the main goal is to show how to do resize a video with
GPU-accelerated libraries in Linux. In this tutorial we do not use the
terminal commands directly for employing the FFmpeg with NVENC support.
Instead the python interface is being used to run commands in the
terminal. This can be done using subprocess python
module. This module is employed for execution and dealing external
commands, intended to supersede the os.sys module. The
trivial method os its usage will be explained in this tutorial. Please
refer to this
documentation for
further details.
The assumption of this tutorial is that the FFmpeg is already installed
with NVENC support. The installation guide can be found in FFMPEG WITH
NVIDIA ACCELERATION ON UBUNTU
LINUX
documentation provided by NVIDIA.
Data Indicator
This tutorial is customized for processing multiple videos. The
assumption is that the full path of each video is stored in a
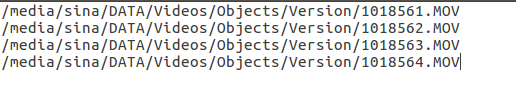
.txt file in line-by-line format. The example of the
".txt" file is as below:
Figure 1: The format of .txt file.
As a guidance if a recursive search for specific files in a directory
and its subdirectories with extension ".mov" is
desired, the following method in command line is useful and it saves the
output as a ".txt" file:
find /absolute/path/to/directory/to/be/search -type f -name "\*.mov" > /absolute/path/to/save/the/output/textfile.txt
Video Resize
From now on the assumption is that the ".txt" file is ready and
well-formatted. The python script for processing videos is as below:
Resizing a video using FFmpeg with NVENC encoder
import subprocess
import os
import sys

# Pre...
textfile_path = 'videos.txt'
output_dir_base = 'PATH/TO/OUTPUT'
# Read the text file
with open(textfile_path) as f:
    content = f.readlines()
# you may also want to remove whitespace characters like `\n` at the end of each line
files_list = [x.strip() for x in content]

# Transpose 90 degree & Clockwise
# It already save the video file using the named defined by output_name.
for file_num, file_path_input in enumerate(files_list, start=1):
    # Get the file name without extension
    file_name = os.path.basename(file_path_input)
    ID = file_name.split('_')[1]
    raw_file_name = os.path.basename(file_name).split('.')[0]
    file_dir_input = os.path.dirname(file_path_input)
    file_dir_output = output_dir_base + '/' + ID
    if not os.path.exists(file_dir_output):
        os.makedirs(file_dir_output)
    file_path_output = file_dir_output + '/' + raw_file_name + '.mkv'
    print('processing file: %s' % file_path_input)

    subprocess.call(
        ['ffmpeg', '-y', '-i', file_path_input, '-filter_complex',
        'nvresize=1:s=540x960:readback=0[out0]', '-map', '[out0]',
         '-acodec', 'copy', '-r', '30', '-vcodec', 'nvenc', '-b:v', '3M', file_path_output])
print('file %s saved' % file_path_output)
I - Overall Code Description {#Overall Code Description }
The videos.txt file is saved in the absolute path.
Lines 8-12 of the code reads the ".txt" file and stores each line as
an item of a list called files_list. The loop starts
at line 16 process each file with the
subprocess.call command. In each loop the folder of the
input file is found and the output file will be stored in the same
directory but with different naming convention which is explained by the
comments in the code. Each , in the subprocess.call command in the python is correspondent
to an empty space in the terminal. As an example the
correspondent shell command is as below:
The command executed by FFmpeg needs to be described. Each of the
elements started by - are calling specific operations
and the command follows by them execute the desired operation. For
example -vcodec indicator will specify the codec to
be used by FFmpeg and nvenc which follows by that point to the
codec. More details can be found at FFmpeg Filters
Documentation. The following
Table, summarize the indicators:
Table 1
Attribute
Description
Argument
Description
-i
input argument
file_path_input
path to the input file
-filter_complex
Multiple resize option
nvresize=1:s=540x960
custom size of 540x960
-acodec
Set the audio codec
copy
get the audio stream as is
-vcodec
Set the video codec
nvenc
Nvidia GPU accelerated library
-r
video frame rate
30
output rate is 30 f/s
-b:v
set the video bitrate
3M
Set to 3M
-acodec
set the audio codec
copy
only copied & no encoding
The -vf is the main command which its full documentation is available at here and it has the filter options.
Code Execution
In order to run the python file we go to the terminal and execute the
following:
python /absolute/path/to/python/file
As a consideration, if we are working on any specific virtual
environment it has to be activated at first.
Working in Bash Shell
A similar approach can be employed in the terminal too. Running commands
in Terminal can be much faster than Python. So it is useful to have and
idea of how to do it. Consider the following commands:
for i in \*\*/\*.mov; do
> base=\${i%.mov};
> ffmpeg -y -i file\_path\_input -filter\_complex
> nvresize=1:s=540x960:readback=0\[out0\] -map \[out0\] -acodec copy
    -r 30 -vcodec nvenc -b:v 3M base=\${i%.mkv};
> done
By the assumption that the globstar is enabled(in order
to make sure about that, the command of shopt -s globstar can be executed in the terminal.), the above
command find all the files with the ".mov" extension in the current
directory recursively and after desired processing save them in place
with the ".mkv" extension. The advantage of globstar is that it is
recursive and robust in cases that there is white space in a file or
directory name. The command can be altered arbitrary to read the files
from a text file and do the processing.
Summary
This tutorial demonstrated how to process a video and specifically
resizing that using FFmpeg and Nvidia GPU accelerated library called
NVENC. The advantage of using python interface is to easily parse
the .txt file and looping through all files. Moreover it enables the
user with options which are more complex to be directly employed in the
terminal environment.
Trang TopGit này là một snapshot — tab "Readme" hiển thị nguyên văn README của repo (đã bỏ link, giữ ảnh). Repo GitHub ở github.com/instillai/video-resize-gpu là nguồn chính thức.
instillai/video-resize-gpu có bao nhiêu sao?
instillai/video-resize-gpu có 4 sao GitHub — tải lại trang để xem số mới nhất, hoặc xem trực tiếp github.com/instillai/video-resize-gpu. TopGit phản chiếu số sao của GitHub nhưng không cam kết đến từng phút.
instillai/video-resize-gpu có phải mã nguồn mở không?
TopGit chưa ghi nhận license cho instillai/video-resize-gpu. Phần lớn repo public trên GitHub là mã nguồn mở, nhưng điều khoản khác nhau từng repo — mở file LICENSE để xác nhận.
instillai/video-resize-gpu có tag gì không?
Bản đồng bộ chưa ghi nhận topic GitHub nào cho instillai/video-resize-gpu. GitHub topics hiển thị ở thanh bên phải trang repo — đó là nơi đáng kiểm tra nhất.
instillai/video-resize-gpu có trang demo không?
Dự án có trang chủ ở https://machinelearningmindset.com/resize-a-video-is-unbelievably-fast-by-using-ffmpeg-and-gpu-acceleration-a-tutorial/. Tab "Readme" ở trang này thường có ảnh chụp và hướng dẫn bắt đầu nhanh.
instillai/video-resize-gpu còn đang phát triển không?
Commit gần nhất trên instillai/video-resize-gpu là 7.5 năm trước (theo timestamp GitHub). Repo có 0 fork — một chỉ báo về mức độ quan tâm của cộng đồng.
Đọc đầy đủ README ở tab phía trên.
Chưa chắc video-resize-gpu có hợp với bạn?
Để ChatGPT, Claude hoặc Perplexity tìm hiểu giúp — bấm bên dưới và xem AI nói gì về video-resize-gpu.
 /video-resize-gpu