jcjohnson/densecap là dự án mã nguồn mở trên GitHub, viết chủ yếu bằng Jupyter Notebook, với 1.6k sao. Dense image captioning in Torch
Tóm tắt dựng từ metadata GitHub của chính dự án — chưa có bài review TopGit. Trang sẽ tự động cập nhật khi bài review đầy đủ được xuất bản.
VÌ SAO CHƯA CÓ REVIEW
TopGit viết bài đầy đủ cho repo có nhiều sao nhất và được yêu cầu nhiều nhất. Trang này là snapshot trong thời gian chờ — xem README gốc ở tab READ ME.
DenseCap: Fully Convolutional Localization Networks for Dense Captioning,
Justin Johnson*,
Andrej Karpathy*,
Li Fei-Fei,
(* equal contribution)
Presented at CVPR 2016 (oral)
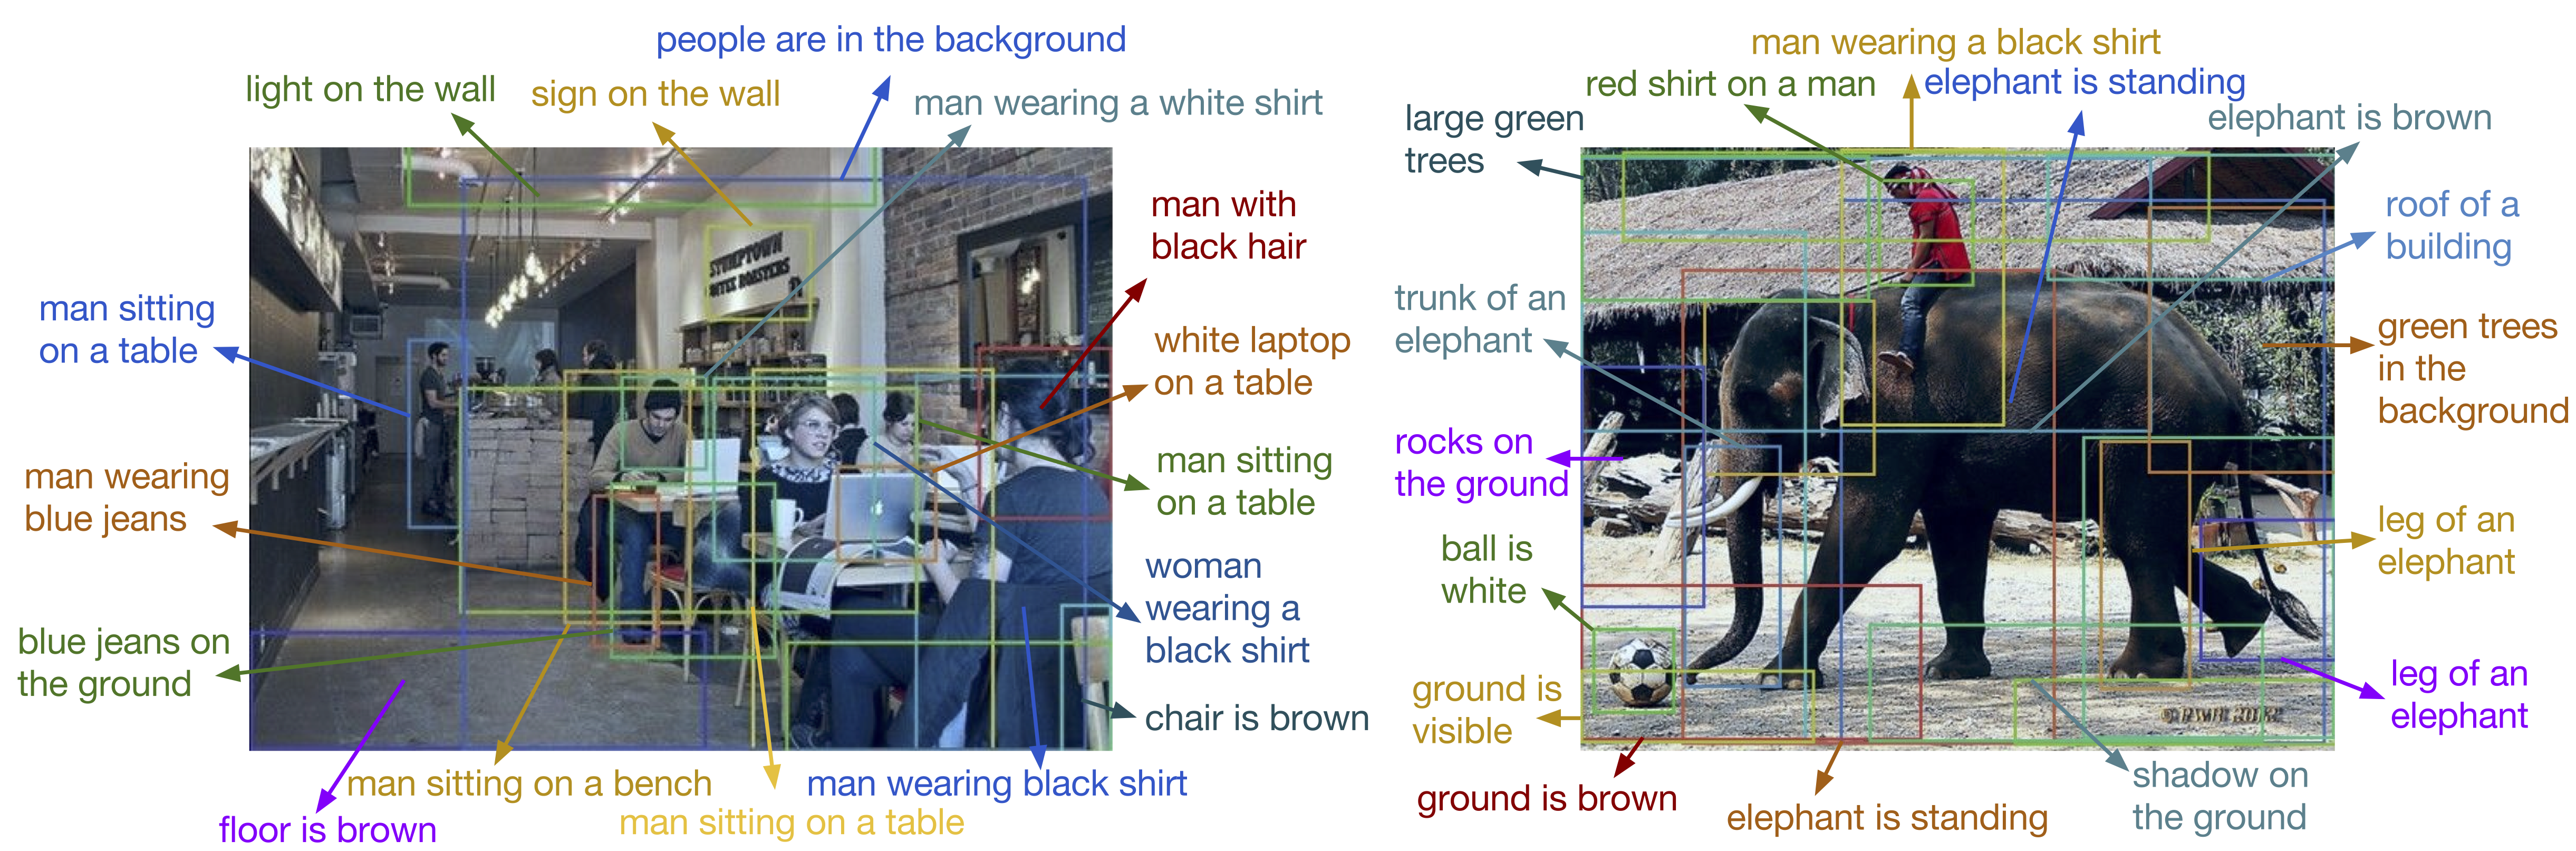
The paper addresses the problem of dense captioning, where a computer detects objects in images and describes them in natural language. Here are a few example outputs:
The model is a deep convolutional neural network trained in an end-to-end fashion on the Visual Genome dataset.
We provide:
A pretrained model
Code to run the model on new images, on either CPU or GPU
Code to run a live demo with a webcam
Evaluation code for dense captioning
Instructions for training the model
If you find this code useful in your research, please cite:
@inproceedings{densecap,
  title={DenseCap: Fully Convolutional Localization Networks for Dense Captioning},
  author={Johnson, Justin and Karpathy, Andrej and Fei-Fei, Li},
  booktitle={Proceedings of the IEEE Conference on Computer Vision and
             Pattern Recognition},
  year={2016}
}
Installation
DenseCap is implemented in Torch, and depends on the following packages: torch/torch7, torch/nn, torch/nngraph, torch/image, lua-cjson, qassemoquab/stnbhwd, jcjohnson/torch-rnn
After installing torch, you can install / update these dependencies by running the following:
If have an NVIDIA GPU and want to accelerate the model with CUDA, you'll also need to install
torch/cutorch and torch/cunn;
you can install / update these by running:
If you want to use NVIDIA's cuDNN library, you'll need to register for the CUDA Developer Program (it's free)
and download the library from NVIDIA's website; you'll also need to install
the cuDNN bindings for Torch by running
luarocks install cudnn
Pretrained model
You can download a pretrained DenseCap model by running the following script:
sh scripts/download_pretrained_model.sh
This will download a zipped version of the model (about 1.1 GB) to data/models/densecap/densecap-pretrained-vgg16.t7.zip, unpack
it to data/models/densecap/densecap-pretrained-vgg16.t7 (about 1.2 GB) and then delete the zipped version.
This is not the exact model that was used in the paper, but is has comparable performance; using 1000 region proposals per image,
it achieves a mAP of 5.70 on the test set which is slightly better than the mAP of 5.39 that we report in the paper.
Running on new images
To run the model on new images, use the script run_model.lua. To run the pretrained model on the provided elephant.jpg image,
use the following command:
th run_model.lua -input_image imgs/elephant.jpg
By default this will run in GPU mode; to run in CPU only mode, simply add the flag -gpu -1.
This command will write results into the folder vis/data. We have provided a web-based visualizer to view these
results; to use it, change to the vis directory and start a local HTTP server:
cd vis
python -m SimpleHTTPServer 8181
Then point your web browser to http://localhost:8181/view_results.html.
If you have an entire directory of images on which you want to run the model, use the -input_dir flag instead:
This run the model on all files in the folder /path/to/my/image/folder/ whose filename does not start with ..
The web-based visualizer is the prefered way to view results, but if you don't want to use it then you can instead
render an image with the detection boxes and captions "baked in"; add the flag -output_dir to specify a directory
where output images should be written:
The run_model.lua script has several other flags; you can find details here.
Training
To train a new DenseCap model, you will following the following steps:
Download the raw images and region descriptions from the Visual Genome website
Use the script preprocess.py to generate a single HDF5 file containing the entire dataset
(details here)
Use the script train.lua to train the model (details here)
Use the script evaluate_model.lua to evaluate a trained model on the validation or test data
(details here)
For more instructions on training see INSTALL.md in doc folder.
Evaluation
In the paper we propose a metric for automatically evaluating dense captioning results.
Our metric depends on METEOR, and
our evaluation code requires both Java and Python 2.7. The following script will download
and unpack the METEOR jarfile:
sh scripts/setup_eval.sh
The evaluation code is not required to simply run a trained model on images; you can
find more details about the evaluation code here.
Webcam demos
If you have a powerful GPU, then the DenseCap model is fast enough to run in real-time. We provide two
demos to allow you to run DenseCap on frames from a webcam.
Single-machine demo
If you have a single machine with both a webcam and a powerful GPU, then you can
use this demo to run DenseCap in real time at up to 10 frames per second. This demo depends on a few extra
Lua packages:
clementfarabet/lua---camera
torch/qtlua
You can install / update these dependencies by running the following:
luarocks install camera
luarocks install qtlua
You can start the demo by running the following:
qlua webcam/single_machine_demo.lua
Client / server demo
If you have a machine with a powerful GPU and another machine with a webcam, then
this demo allows you use the GPU machine as a server and the webcam machine as a client; frames will be
streamed from the client to to the server, the model will run on the server, and predictions will be shipped
back to the client for viewing. This allows you to run DenseCap on a laptop, but with network and filesystem
overhead you will typically only achieve 1 to 2 frames per second.
The server is written in Flask; on the server machine run the following to install dependencies:
cd webcam
virtualenv .env
source .env/bin/activate
pip install -r requirements.txt
cd ..
For technical reasons, the server needs to serve content over SSL; it expects to find SSL key
files and certificate files in webcam/ssl/server.key and webcam/ssl/server.crt respectively.
You can generate a self-signed SSL certificate by running the following:
mkdir webcam/ssl

# Step 1: Generate a private key
openssl genrsa -des3 -out webcam/ssl/server.key 1024
# Enter a password

# Step 2: Generate a certificate signing request
openssl req -new -key webcam/ssl/server.key -out webcam/ssl/server.csr
# Enter the password from above and leave all other fields blank

# Step 3: Strip the password from the keyfile
cp webcam/ssl/server.key webcam/ssl/server.key.org
openssl rsa -in webcam/ssl/server.key.org -out webcam/ssl/server.key

# Step 4: Generate self-signed certificate
openssl x509 -req -days 365 -in webcam/ssl/server.csr -signkey webcam/ssl/server.key -out webcam/ssl/server.crt
# Enter the password from above
You can now run the following two commands to start the server; both will run forever:
th webcam/daemon.lua
python webcam/server.py
On the client, point a web browser at the following page:
but you should replace SERVER_URL with the actual URL of the server.
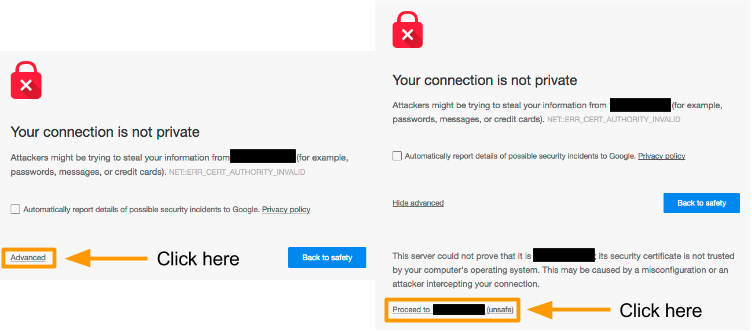
Note: If the server is using a self-signed SSL certificate, you may need to manually
tell your browser that the certificate is safe by pointing your client's web browser directly
at the server URL; you will get a message that the site is unsafe; for example on Chrome
you will see the following:
Afterward you should see a message telling you that the DenseCap server is running, and
the web client should work after refreshing.
Trang TopGit này là một snapshot — tab "Readme" hiển thị nguyên văn README của repo (đã bỏ link, giữ ảnh). Repo GitHub ở github.com/jcjohnson/densecap là nguồn chính thức.
jcjohnson/densecap có bao nhiêu sao?
jcjohnson/densecap có 1.6k sao GitHub — tải lại trang để xem số mới nhất, hoặc xem trực tiếp github.com/jcjohnson/densecap. TopGit phản chiếu số sao của GitHub nhưng không cam kết đến từng phút.
jcjohnson/densecap có phải mã nguồn mở không?
Có — jcjohnson/densecap phát hành theo license MIT, nghĩa là mã nguồn mở để đọc, fork và (tùy license) tái sử dụng. Mã: github.com/jcjohnson/densecap.
jcjohnson/densecap có website riêng không?
TopGit chưa ghi nhận URL trang chủ cho jcjohnson/densecap. Phần README ở tab phía trên thường có link demo, hoặc xem mô tả GitHub của repo.
jcjohnson/densecap là gì?
jcjohnson/densecap (jcjohnson/densecap) là dự án Jupyter Notebook trên GitHub. Theo mô tả gốc: Dense image captioning in Torch
Đọc đầy đủ README ở tab phía trên.
Chưa chắc densecap có hợp với bạn?
Để ChatGPT, Claude hoặc Perplexity tìm hiểu giúp — bấm bên dưới và xem AI nói gì về densecap.

 /densecap