
knqyf263/pet

knqyf263/pet là dự án Go với 5.4k sao trong nhóm Backend. Simple command-line snippet manager
Tóm tắt dựng từ metadata GitHub của chính dự án — chưa có bài review TopGit. Trang sẽ tự động cập nhật khi bài review đầy đủ được xuất bản.
TopGit viết bài đầy đủ cho repo có nhiều sao nhất và được yêu cầu nhiều nhất. Trang này là snapshot trong thời gian chờ — xem README gốc ở tab READ ME.
Snapshot
Cộng tác viên hàng đầu
Xem cộng tác viên hàng đầu
Pet - CLI Snippet Manager



Motivation
pet is a simple command-line snippet manager (inspired by memo).
I have a hard time remembering complex command or ones that I rarely use. Moreover, it is difficult to find them in shell history.
It's time to let go of the expectation of remembering every command, and focus on productivity and finding the right commands as fast as possible. It's fun when you're 2 years in and work with 2 tools, but less so when you're a decade in and work across backend/frontend/infrastructure with tons of tools. You most probably relate to this if you're a developer.
pet is a simple tool that allows you to save, tag, search, and execute command-line snippets easily! It's now nearly 8 years old and is used by many developers around the world.
pet is written in Go, and therefore you can just grab the binary releases and drop it in your $PATH.
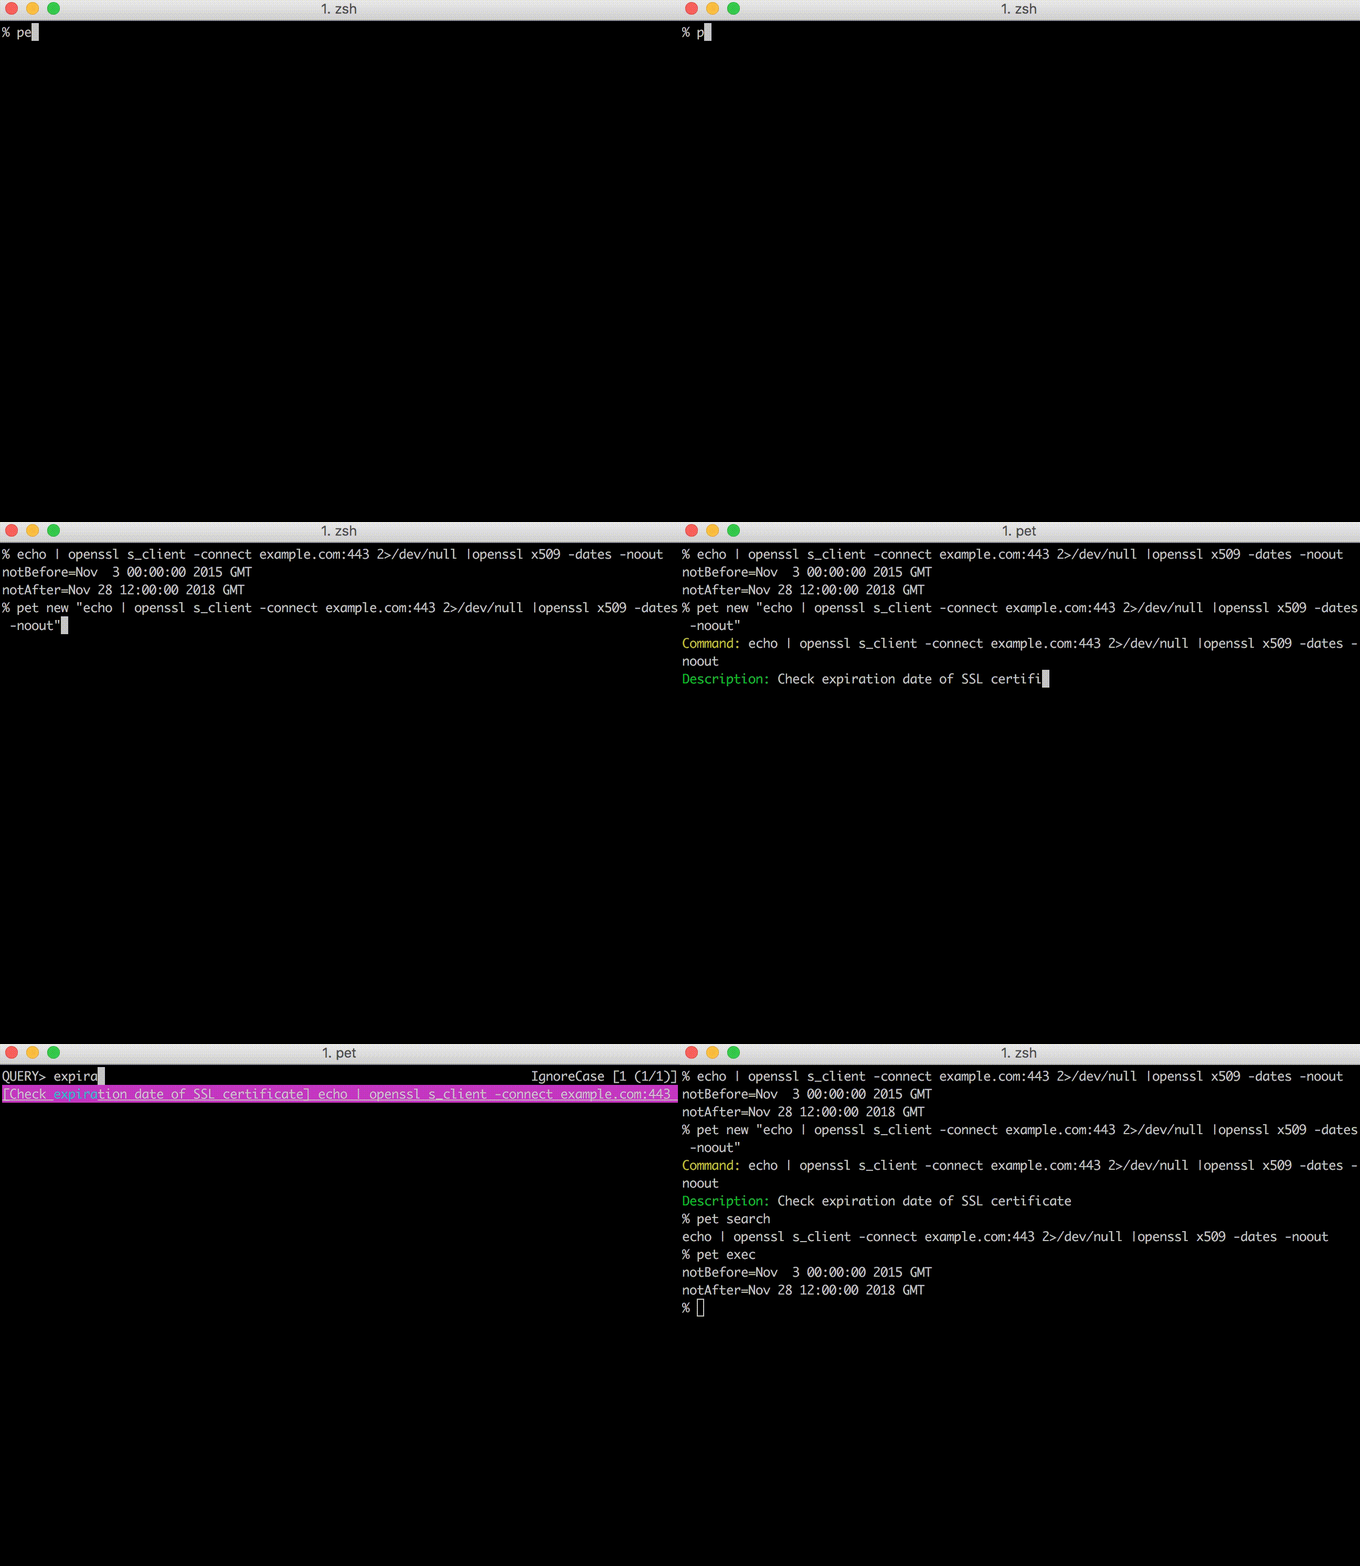
You can use variables (<param> or <param=default_value> ) in snippets.

TOC
- Main features
- Parameters
- Examples
- Register the previous command easily
- bash
- zsh
- fish
- Select snippets at the current line (like C-r) (RECOMMENDED)
- bash
- zsh
- fish
- Copy snippets to clipboard
- Register the previous command easily
- Features
- Edit snippets
- Sync snippets
- Hands-on Tutorial
- Usage
- Snippet
- Configuration
- Selector option
- Tag
- Sync
- Auto Sync
- Installation
- Binary
- macOS / Homebrew
- RedHat, CentOS
- Debian, Ubuntu
- Archlinux
- Build
- Migration
- Contribute
Main features
pet has the following features.
- Register your command snippets easily.
- Use variables (with one or several default values) in snippets.
- Search snippets interactively
- Run snippets directly.
- Edit snippets easily (config is just a TOML file).
- Sync snippets via Gist or GitLab Snippets automatically.
Creating a snippet
You can create a snippet by running pet new.
$ pet new
Command> echo Hello world!
Description> print Hello world
To see all available arguments, run pet new --help.
Multiline commands can be entered by using the multiline argument pet new --multiline
You can use also use variables in snippets, these are called parameters. More information on that in the next section.
You can also tag snippets to search for them faster. More information on that in the tag section.
Parameters
There are <n_ways> ways of entering parameters.
They can contain default values: Hello <subject=world>
defined by the equal sign.
They can even contain <content=spaces & = signs> where the default value would be <content=spaces & = signs>.
Default values just can't <end with spaces >.
They can also contain multiple default values:
Hello <subject=|_John_||_Sam_||_Jane Doe = special #chars_|>
The values in this case would be :Hello <subject=|_John_||_Sam_||_Jane Doe = special #chars_|>
Examples
Some examples are shown below.
Register the previous command easily
By adding the following config to .bashrc or .zshrc, you can easily register the previous command.
bash prev function
function prev() {
  PREV=$(echo `history | tail -n2 | head -n1` | sed 's/[0-9]* //')
  sh -c "pet new `printf %q "$PREV"`"
}
zsh prev function
cat .zshrc
function prev() {
  PREV=$(fc -lrn | head -n 1)
  sh -c "pet new `printf %q "$PREV"`"
}
fish
See below for details.
https://github.com/otms61/fish-pet

Select snippets at the current line (like C-r) (RECOMMENDED)
bash
By adding the following config to .bashrc, you can search snippets and output on the shell.
This will also allow you to execute the commands yourself, which will add them to your shell history! This is basically the only way we can manipulate shell history.
This also allows you to chain commands! Example here
You can also customize the search and list commands with options, example -t or --tags, for example to only search the subset of snippets tagged with myjob pet search -t myjob.
cat .bashrc
function pet-select() {
  BUFFER=$(pet search --query "$READLINE_LINE")
  READLINE_LINE=$BUFFER
  READLINE_POINT=${#BUFFER}
}
bind -x '"\C-x\C-r": pet-select'
zsh
cat .zshrc
function pet-select() {
  BUFFER=$(pet search --query "$LBUFFER")
  CURSOR=$#BUFFER
  zle redisplay
}
zle -N pet-select
stty -ixon
bindkey '^s' pet-select
fish
See below for details.
https://github.com/otms61/fish-pet

Expand snippet parameters inline on shell
You can expand parameters using the shell instead of the builtin TUI dialog. This allows you to edit the parameters with native shell features, like tab-completion, highlighting, etc.
bash
function pet-select() {
  BUFFER=$(pet search --raw --query "$READLINE_LINE")
  READLINE_LINE=$BUFFER
  READLINE_POINT=${#BUFFER}
}
bind -x '"\C-x\C-r": pet-select'

function _pet_move_cursor_to_next_parameter() {
  match="$(echo "$READLINE_LINE" | perl -nle 'print $& if /<.*?>/')"
  if [ -n "$match" ]; then
    default="$(echo "$match" | perl -nle 'print $& if /(?<==).*(?=>)/')"
    match_len=${#match}
    default_len=${#default}

    pre_match=${READLINE_LINE%%$match*}
    parameter_offset=${#pre_match}

    READLINE_POINT="$((${parameter_offset} + ${default_len}))"
    READLINE_LINE="${READLINE_LINE:0:$parameter_offset}${default}${READLINE_LINE:$parameter_offset+$match_len}"
  fi
}
bind -x '"\C-n": _pet_move_cursor_to_next_parameter'
zsh
function pet-select() {
  BUFFER=$(pet search --raw --query "$LBUFFER")
  CURSOR=$#BUFFER
  zle redisplay
}
zle -N pet-select
stty -ixon
bindkey '^s' pet-select

function _pet_move_cursor_to_next_parameter() {
    match="$(echo "$BUFFER" | perl -nle 'print $& if /<.*?>/')"
    if [ -n "$match" ]; then
      default="$(echo "$match" | perl -nle 'print $& if /(?<==).*(?=>)/')"
      match_len=${#match}
      default_len=${#default}
      parameter_offset=${#BUFFER%%$match*}

      CURSOR="$((${parameter_offset} + ${default_len}))"
      BUFFER="${BUFFER[1,$parameter_offset]}${default}${BUFFER[$parameter_offset+$match_len+1,-1]}"
    fi
}
zle -N _pet_move_cursor_to_next_parameter
bindkey '^n' _pet_move_cursor_to_next_parameter
Copy snippets to clipboard
By using pbcopy on macOS, you can copy snippets to clipboard.

Allow to register from history when using fzf
Just export this to your .bashrc or .zshrc file. This will show your history
as default (when using fzf) and it also binds the alt+s key combination
to allow you to search and save some previous used command command.
export FZF_CTRL_R_OPTS="
  --reverse
  --cycle
  --info=right
  --color header:italic
  --header 'alt+s (pet new)'
  --preview 'echo {}' --preview-window down:3:hidden:wrap
  --bind '?:toggle-preview'
  --bind 'alt-s:execute(pet new --tag {2..})+abort'"
Features
Edit snippets
The snippets are managed in the TOML file, so it's easy to edit.

Sync snippets
You can share snippets via Gist.

Usage
Usage:
  pet [command]

Available Commands:
  clip        Copy the selected commands
  configure   Edit config file
  edit        Edit snippet file
  exec        Run the selected commands
  help        Help about any command
  list        Show all snippets
  new         Create a new snippet
  search      Search snippets
  sync        Sync snippets
  version     Print the version number

Flags:
      --config string   config file (default is $HOME/.config/pet/config.toml)
      --debug           debug mode
  -h, --help            help for pet

Use "pet [command] --help" for more information about a command.
Snippet
Run pet edit
You can also register the output of command (but cannot search).
[[snippets]]
  command = "echo | openssl s_client -connect example.com:443 2>/dev/null |openssl x509 -dates -noout"
  description = "Show expiration date of SSL certificate"
  output = """
notBefore=Nov  3 00:00:00 2015 GMT
notAfter=Nov 28 12:00:00 2018 GMT"""
Run pet list
    Command: echo | openssl s_client -connect example.com:443 2>/dev/null |openssl x509 -dates -noout
Description: Show expiration date of SSL certificate
     Output: notBefore=Nov  3 00:00:00 2015 GMT
             notAfter=Nov 28 12:00:00 2018 GMT
------------------------------
Configuration
Run pet configure
[General]
  snippetfile = "path/to/snippet" # specify snippet directory
  editor = "vim"                  # your favorite text editor
  column = 40                     # column size for list command
  selectcmd = "fzf"               # selector command for edit command (fzf or peco)
  backend = "gist"                # specify backend service to sync snippets (gist, ghe or gitlab, default: gist)
  sortby  = "description"         # specify how snippets get sorted (recency (default), -recency, description, -description, command, -command, output, -output)
  cmd = ["sh", "-c"]              # specify the command to execute the snippet with
  color = false                   # enables output coloring with fzf, same as '--color' flag
  format = "[$description]: $command $tags" controls the format of the output when searching

[Gist]
  file_name = "pet-snippet.toml"  # specify gist file name
  access_token = ""               # your access token
  gist_id = ""                    # Gist ID
  public = false                  # public or priate
  auto_sync = false               # sync automatically when editing snippets

[GitLab]
  file_name = "pet-snippet.toml"  # specify GitLab Snippets file name
  access_token = "XXXXXXXXXXXXX"  # your access token
  id = ""                         # GitLab Snippets ID
  visibility = "private"          # public or internal or private
  auto_sync = false               # sync automatically when editing snippets
Multi directory and multi file setup
Directories must be specified as an array.
All toml files will be scraped and found snippets will be added.
Example1: single directory
[GHEGist]
  base_url = ""                   # GHE base URL
  upload_url = ""                 # GHE upload URL (often the same as the base URL)
  file_name = "pet-snippet.toml"  # specify gist file name
  access_token = ""               # your access token
  gist_id = ""                    # Gist ID
  public = false                  # public or priate
  auto_sync = false               # sync automatically when editing snippets
$ pet configure
[General]
...
  snippetdirs = ["/path/to/some/snippets/"]
...
Example2: multiple directories
$ pet configure
[General]
...
  snippetdirs = ["/path/to/some/snippets/", "/more/snippets/"]
...
If snippetfile setting is omitted, new snippets will be added in a separate file to the first directory. The generated filename is time based.
Snippet files in snippetdirs will not be added to Gist or GitLab. You've to do version control manually.
Selector option
Example1: Change layout (bottom up)
pet configure
[General]
...
  selectcmd = "fzf"
...
Example2: Enable colorized output
pet configure
[General]
...
  selectcmd = "fzf --ansi"
...
pet search --color
Tag
You can use tags (delimiter: space).
pet new -t
Command> ping 8.8.8.8
Description> ping
Tag> network google
Or edit manually.
pet edit
[[snippets]]
  description = "ping"
  command = "ping 8.8.8.8"
  tag = ["network", "google"]
  output = ""
They are displayed with snippets.
pet search
[ping]: ping 8.8.8.8 #network #google
You can exec snippet with filtering the tag
pet exec -t google

[ping]: ping 8.8.8.8 #network #google
Sync
Gist
You must obtain access token.
Go https://github.com/settings/tokens/new and create access token (only need "gist" scope).
Set that to access_token in [Gist] or use an environment variable with the name $PET_GITHUB_ACCESS_TOKEN.
After setting, you can upload snippets to Gist.
If gist_id is not set, new gist will be created.
pet sync
Gist ID: 1cedddf4e06d1170bf0c5612fb31a758
Upload success
Set Gist ID to gist_id in [Gist].
pet sync compares the local file and gist with the update date and automatically download or upload.
If the local file is older than gist, pet sync download snippets.
pet sync
Download success
If gist is older than the local file, pet sync upload snippets.
pet sync
Upload success
Note: -u option is deprecated
GHE Gist
To use Gist with GitHub Enterprise, you need to follow these steps:
- Obtain an Access Token: Visit your GitHub Enterprise settings page to create a new access token with just the "gist" scope. This is necessary to authenticate and interact with the Gist API on GitHub Enterprise.
- Set the Access Token: Assign the newly created access token to
access_tokenin the[GHEGist]section of your configuration. Alternatively, you can use an environment variable named$PET_GITHUB_ENTERPRISE_ACCESS_TOKENto manage your token securely. - Configure API Endpoints: Unlike the regular Gist config, you need to set
base_urlandupload_urlto point to your GitHub Enterprise API endpoints. For example:
[GHEGist]
base_url = "https://github-enterprise.example.com/api/v3/gists"
upload_url = "https://github-enterprise.example.com/api/v3/gists"  # Often the same as the base URL
By setting these parameters, your tool will be configured to interact with GitHub Enterprise Gist, enabling you to sync and manage your snippets just as you would with the standard GitHub Gist service.
Remember to replace https://github-enterprise.example.com with the actual URL of your GitHub Enterprise instance. This customization allows your tool to correctly connect to and use the Gist service in a GitHub Enterprise environment.
GitLab Snippets
You must obtain access token.
Go https://gitlab.com/-/profile/personal_access_tokens and create access token.
Set that to access_token in [GitLab] or use an environment variable with the name $PET_GITLAB_ACCESS_TOKEN.
You also have to configure the url under [GitLab], so pet knows which endpoint to access. You would use url = "https://gitlab.com"unless you have another instance of Gitlab.
At last, switch the backend under [General] to backend = "gitlab".
After setting, you can upload snippets to GitLab Snippets.
If id is not set, new snippet will be created.
pet sync
GitLab Snippet ID: 12345678
Upload success
Set GitLab Snippet ID to id in [GitLab].
pet sync compares the local file and gitlab with the update date and automatically download or upload.
If the local file is older than gitlab, pet sync download snippets.
pet sync
Download success
If gitlab is older than the local file, pet sync upload snippets.
pet sync
Upload success
Auto Sync
You can sync snippets automatically.
Set true to auto_sync in [Gist], [GHEGist] or [GitLab].
Then, your snippets sync automatically when pet new or pet edit.
pet edit
Getting Gist...
Updating Gist...
Upload success
Installation
You need to install selector command (fzf or peco).
homebrew install fzf automatically.
After you install Pet, it's HIGHLY recommended to install the shortcuts mentioned in the section on ZSH Prev
Binary
Go to the releases page, find the version you want, and download the zip file. Unpack the zip file, and put the binary to somewhere you want (on UNIX-y systems, /usr/local/bin or the like). Make sure it has execution bits turned on.
macOS / Homebrew
Install selector command first. You can use homebrew on macOS.
brew install pet
If you receive an error (Error: knqyf263/pet/pet 64 already installed) during brew upgrade, try the following command
brew unlink pet && brew uninstall pet
(rm -rf /usr/local/Cellar/pet/64)
brew install knqyf263/pet/pet
Fedora, RedHat, CentOS
Install selector command first. Download rpm package from the releases page
sudo rpm -ivh https://github.com/knqyf263/pet/releases/download/vx.x.x/pet_x.x.x_linux_amd64.rpm
Also available on the Terra repository (3rd party) for Fedora/Fedora-based distros
sudo dnf install pet
Debian, Ubuntu
Install selector command first. Download deb package from the releases page
wget https://github.com/knqyf263/pet/releases/download/vx.x.x/pet_x.x.x_linux_amd64.deb
dpkg -i pet_x.x.x_linux_amd64.deb
Archlinux
Install selector command first. Two packages are available in AUR. You can install the package from source:
yay -S pet-git
Or from the binary:
yay -S pet-bin
Build
Install selector command first.
mkdir -p $GOPATH/src/github.com/knqyf263
cd $GOPATH/src/github.com/knqyf263
git clone https://github.com/knqyf263/pet.git
cd pet
make install
Migration
From Keep
https://blog.saltedbrain.org/2018/12/converting-keep-to-pet-snippets.html
Contribute
- fork a repository: github.com/knqyf263/pet to github.com/you/repo
- get original code:
go get github.com/knqyf263/pet - work on original code
- add remote to your repo: git remote add myfork https://github.com/you/repo.git
- push your changes: git push myfork
- create a new Pull Request
- see GitHub and Go: forking, pull requests, and go-getting
License
MIT
Author
Teppei Fukuda
Repo liên quan
Awesome Go, maintained at avelino/awesome-go, groups Go frameworks, libraries, and software into topic categories including Actor Model, Artificial Intelligence, Audio and Music, Authentication and Authorization, Blockchain, Bot Building, and Build Automation. Every linked entry gets a short description instead of a bare URL. The repository carries an MIT license and takes new entries through pull requests reviewed against its own contribution guidelines, which makes it a common bookmark for day-to-day Go development.
golang/go is the open source repository behind The Go Programming Language, holding the compiler, runtime, and standard library source that Go's official binaries are built from. The README frames Go's purpose as building software that is simple, reliable, and efficient, credits the project to thousands of contributors, and notes that this GitHub repo mirrors the canonical Git repository at go.googlesource.com/go.
Caddy's README promises automatic HTTPS, clustering and scale. Four Hacker News users say what held up and what did not.
Moby has 72,361 stars, but first-hand accounts are scarce: old GitHub issues, new networking complaints and a 2017 Hacker News launch thread.
Trả lời nhanh
Cùng nhóm Backend còn repo nào?
knqyf263/pet thuộc nhóm Backend trên TopGit, cùng 6 topic GitHub. Trang Trending và Topics liệt kê các repo cùng số sao và cùng ngôn ngữ để so sánh.
Đọc thêm về knqyf263/pet ở đâu?
Trang TopGit này là một snapshot — tab "Readme" hiển thị nguyên văn README của repo (đã bỏ link, giữ ảnh). Repo GitHub ở github.com/knqyf263/pet là nguồn chính thức.
knqyf263/pet có bao nhiêu sao?
knqyf263/pet có 5.4k sao GitHub — tải lại trang để xem số mới nhất, hoặc xem trực tiếp github.com/knqyf263/pet. TopGit phản chiếu số sao của GitHub nhưng không cam kết đến từng phút.
knqyf263/pet có phải mã nguồn mở không?
Có — knqyf263/pet phát hành theo license MIT, nghĩa là mã nguồn mở để đọc, fork và (tùy license) tái sử dụng. Mã: github.com/knqyf263/pet.
knqyf263/pet có website riêng không?
TopGit chưa ghi nhận URL trang chủ cho knqyf263/pet. Phần README ở tab phía trên thường có link demo, hoặc xem mô tả GitHub của repo.
knqyf263/pet là gì?
knqyf263/pet (knqyf263/pet) là dự án Go trên GitHub. Theo mô tả gốc: Simple command-line snippet manager
knqyf263/pet so với các dự án Backend khác thế nào?
knqyf263/pet được TopGit xếp vào nhóm Backend, với 5.4k sao GitHub và viết bằng Go. Xem trang chủ đề Backend trên TopGit để so sánh với các dự án tương tự theo số sao và mức độ hoạt động.
Đọc đầy đủ README ở tab phía trên.
pet có đáng để bạn bỏ thời gian?
ChatGPT, Claude và Perplexity đều đọc được trang này. Hỏi thử xem họ nghĩ gì về pet.