mandiant/flare-vm được TopGit xếp vào nhóm dự án mã nguồn mở, với 8.9k sao trên GitHub, viết chủ yếu bằng PowerShell. A collection of software installations scripts for Windows systems that allows you to easily setup and maintain a reverse engineering environment on a VM.
Tóm tắt dựng từ metadata GitHub của chính dự án — chưa có bài review TopGit. Trang sẽ tự động cập nhật khi bài review đầy đủ được xuất bản.
VÌ SAO CHƯA CÓ REVIEW
TopGit viết bài đầy đủ cho repo có nhiều sao nhất và được yêu cầu nhiều nhất. Trang này là snapshot trong thời gian chờ — xem README gốc ở tab READ ME.
Welcome to FLARE-VM - a collection of software installations scripts for Windows systems that allows you to easily setup and maintain a reverse engineering environment on a virtual machine (VM). FLARE-VM was designed to solve the problem of reverse engineering tool curation and relies on two main technologies: Chocolatey and Boxstarter. Chocolatey is a Windows-based Nuget package management system, where a "package" is essentially a ZIP file containing PowerShell installation scripts that download and configure a specific tool. Boxstarter leverages Chocolatey packages to automate the installation of software and create repeatable, scripted Windows environments.
Requirements
FLARE-VM should ONLY be installed on a virtual machine.
The VM should satisfy the following requirements:
Windows ≥ 10
PowerShell ≥ 5
Disk capacity of at least 60 GB and memory of at least 2GB
Usernames without spaces or other special characters
Internet connection
Tamper Protection and any Anti-Malware solution (e.g., Windows Defender) disabled, preferably via Group Policy
Windows Updates Disabled
Installation instruction
This section documents the steps to install FLARE-VM. You may also find useful the Building a VM for Reverse Engineering and Malware Analysis! Installing the FLARE-VM video.
Pre-installation
Prepare a Windows 10+ virtual machine
Install Windows in the virtual machine, for example using the raw Windows 10 ISO from https://www.microsoft.com/en-us/software-download/windows10ISO
Ensure the requirements above are satisfied, including:
Disable Windows Updates (at least until installation is finished)
Non-GPO - Semi-Automated (User needs to toggle off Tamper Protection): https://github.com/AveYo/LeanAndMean/blob/main/ToggleDefender.ps1
Take a VM snapshot so you can always revert to a state before the FLARE-VM installation
NOTE for IDA Pro: If you are installing IDA Pro via idapro.vm, you must place your IDA Pro installer (and optionally, your license file) on the Desktop before running the FLARE-VM installer.
FLARE-VM installation
Open a PowerShell prompt as administrator
Download the installation script installer.ps1 to your Desktop:
If you receive an error saying the execution policy is overridden by a policy defined at a more specific scope, you may need to pass a scope in via Set-ExecutionPolicy Unrestricted -Scope CurrentUser -Force. To view execution policies for all scopes, execute Get-ExecutionPolicy -List
Finally, execute the installer script as follow:
.\install.ps1
To pass your password as an argument: .\install.ps1 -password <password>
To use the CLI-only mode with minimal user interaction: .\install.ps1 -password <password> -noWait -noGui
To use the CLI-only mode with minimal user interaction and a custom config file: .\install.ps1 -customConfig <config.xml> -password <password> -noWait -noGui
After installation it is recommended to switch to host-only networking mode and take a VM snapshot
Installer Parameters
Below are the CLI parameter descriptions.
PARAMETERS
    -password <String>
        Current user password to allow reboot resiliency via Boxstarter. The script prompts for the password if not provided.

    -noPassword [<SwitchParameter>]
        Switch parameter indicating a password is not needed for reboots.

    -customConfig <String>
        Path to a configuration XML file. May be a file path or URL.

    -customLayout <String>
        Path to a taskbar layout XML file. May be a file path or URL.

    -noWait [<SwitchParameter>]
        Switch parameter to skip installation message before installation begins.

    -noGui [<SwitchParameter>]
        Switch parameter to skip customization GUI.

    -noReboots [<SwitchParameter>]
        Switch parameter to prevent reboots (not recommended).

    -noChecks [<SwitchParameter>]
        Switch parameter to skip validation checks (not recommended).
Get full usage information by running Get-Help .\install.ps1 -Detailed.
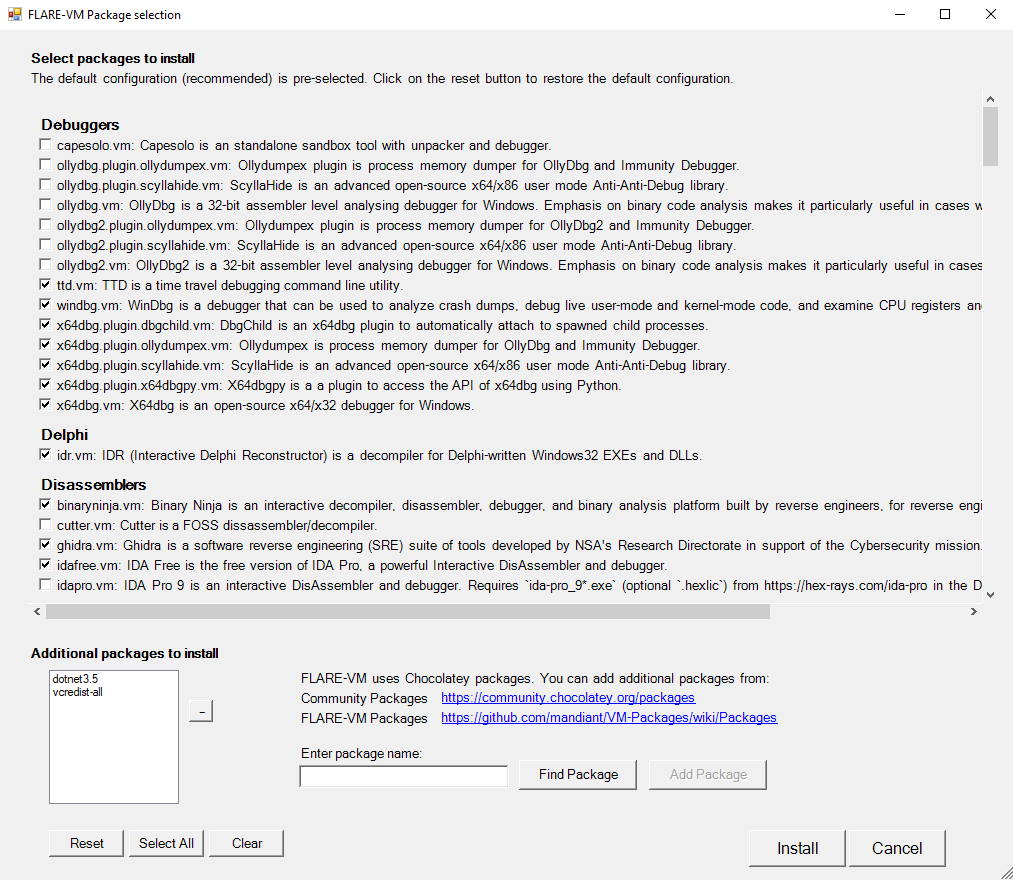
Installer GUI
The Installer GUI is display after executing the validation checks and installing Boxstarter and Chocolatey (if they are not installed already).
Using the installer GUI you may customize:
Package selection from FLARE-VM and Chocolatey community
Environment variable paths
Configuration
The installer will download config.xml from the FLARE-VM repository. This file contains the default configuration, including the list of packages to install and the environment variable paths. You may use your own configuration by specifying the CLI-argument -customConfig and providing either a local file path or URL to your config.xml file. For example:
The installer will use CustomStartLayout.xml from the FLARE-VM repository. This file contains the default taskbar layout. You may use your own configuration by specifying the CLI-argument -customLayout and providing a local file path or URL to your CustomStartLayout.xml file. For example:
Items in the .xml that are not installed will not display in the taskbar (no broken links will be pinned)
Only applications (.exe files) or shortcuts to applications can be pinned.
If you would like to pin something that isn't an application, consider creating a shortcut that points to cmd.exe or powershell with arguments supplied that will perform that actions you would like.
If you would like to make something run with admin rights, consider making a shortcut using VM-Install-Shortcut with the flag -runAsAdmin and pinning the shortcut.
Post installation steps
You can include any post installation step you like in the configuration inside the tags apps, services, path-items, registry-items, and custom-items.
For more examples, check the default configuration file: config.xml.
Contributing
Check our CONTRIBUTING guide to learn how to contribute to the project.
Troubleshooting
If your installation fails, please attempt to identify the reason for the installation error by reading through the log files listed below on your system:
%VM_COMMON_DIR%\log.txt
%PROGRAMDATA%\chocolatey\logs\chocolatey.log
%LOCALAPPDATA%\Boxstarter\boxstarter.log
Ensure you are running the latest version of the FLARE-VM installer and that your VM satisfies the requirements.
Installer Error
If the installation failed due to an issue in the installation script (e.g., install.ps1), report the bug in FLARE-VM.
Provide all the information requested to ensure we are able to help you.
Note: Rarely should install.ps1 be the reason for an installation failure. Most likely it is a specific package or set of packages that are failing (see below).
Package Error
Packages fail to install from time to time -- this is normal. The most common reasons are outlined below:
Failure or timeout from Chocolatey or MyGet to download a .nupkg file
Failure or timeout due to remote host when downloading a tool
Intrusion Detection System (IDS) or AV product (e.g., Windows Defender) prevents a tool download or removes the tool from the system
Host specific issue, for example when using an untested version
Tool fails to build due to dependencies
Old tool URL (e.g., HTTP STATUS 404)
Tool's SHA256 hash has changed from what is hardcoded in the package installation script
Reasons 1-4 are difficult for us to fix since we do not control them. If an issue related to reasons 1-4 is filed, it is unlikely we will be able to assist.
We can help with reasons 5-7 and welcome the community to contribute fixes as well!
Please report the bug in VM-Packages providing all the information requested.
Updates
Note that package updates are best effort and that updates are not being tested.
If you encounter errors, perform a fresh FLARE-VM install.
Mailing List
Subscribe to the FLARE mailing list for community announcements! Email "subscribe" to [email protected].
Legal Notice
This download configuration script is provided to assist cyber security analysts in creating handy and versatile toolboxes for malware analysis environments. It provides a convenient interface for them to obtain a useful set of analysis tools directly from their original sources. Installation and use of this script is subject to the Apache 2.0 License. You as a user of this script must review, accept and comply with the license terms of each downloaded/installed package. By proceeding with the installation, you are accepting the license terms of each package, and acknowledging that your use of each package will be subject to its respective license terms.
Trang TopGit này là một snapshot — tab "Readme" hiển thị nguyên văn README của repo (đã bỏ link, giữ ảnh). Repo GitHub ở github.com/mandiant/flare-vm là nguồn chính thức.
mandiant/flare-vm có những chủ đề gì?
GitHub topics của mandiant/flare-vm: "flare", "malware-analysis", "reverse-engineering". TopGit xếp repo vào nhóm mã nguồn mở.
mandiant/flare-vm có phải mã nguồn mở không?
Có — mandiant/flare-vm phát hành theo license Apache-2.0, nghĩa là mã nguồn mở để đọc, fork và (tùy license) tái sử dụng. Mã: github.com/mandiant/flare-vm.
mandiant/flare-vm có website riêng không?
TopGit chưa ghi nhận URL trang chủ cho mandiant/flare-vm. Phần README ở tab phía trên thường có link demo, hoặc xem mô tả GitHub của repo.
mandiant/flare-vm còn đang phát triển không?
Commit gần nhất trên mandiant/flare-vm là 1 tháng trước (theo timestamp GitHub). Repo có 1.1k fork — một chỉ báo về mức độ quan tâm của cộng đồng.
mandiant/flare-vm dùng license gì?
mandiant/flare-vm phát hành theo license Apache-2.0. Nên mở file LICENSE trên GitHub để xác nhận — license metadata đôi khi lệch với thực tế dự án.
Đọc đầy đủ README ở tab phía trên.
Vẫn đang phân vân về flare-vm?
Một cú bấm sẽ gửi câu hỏi kèm trang này cho AI — xem AI nói gì về flare-vm.
 /flare-vm