Là một công cụ AI, phillipi/pix2pix đã đạt 10.7k sao trên GitHub, ngôn ngữ Lua. Image-to-image translation with conditional adversarial nets
Tóm tắt dựng từ metadata GitHub của chính dự án — chưa có bài review TopGit. Trang sẽ tự động cập nhật khi bài review đầy đủ được xuất bản.
VÌ SAO CHƯA CÓ REVIEW
TopGit viết bài đầy đủ cho repo có nhiều sao nhất và được yêu cầu nhiều nhất. Trang này là snapshot trong thời gian chờ — xem README gốc ở tab READ ME.
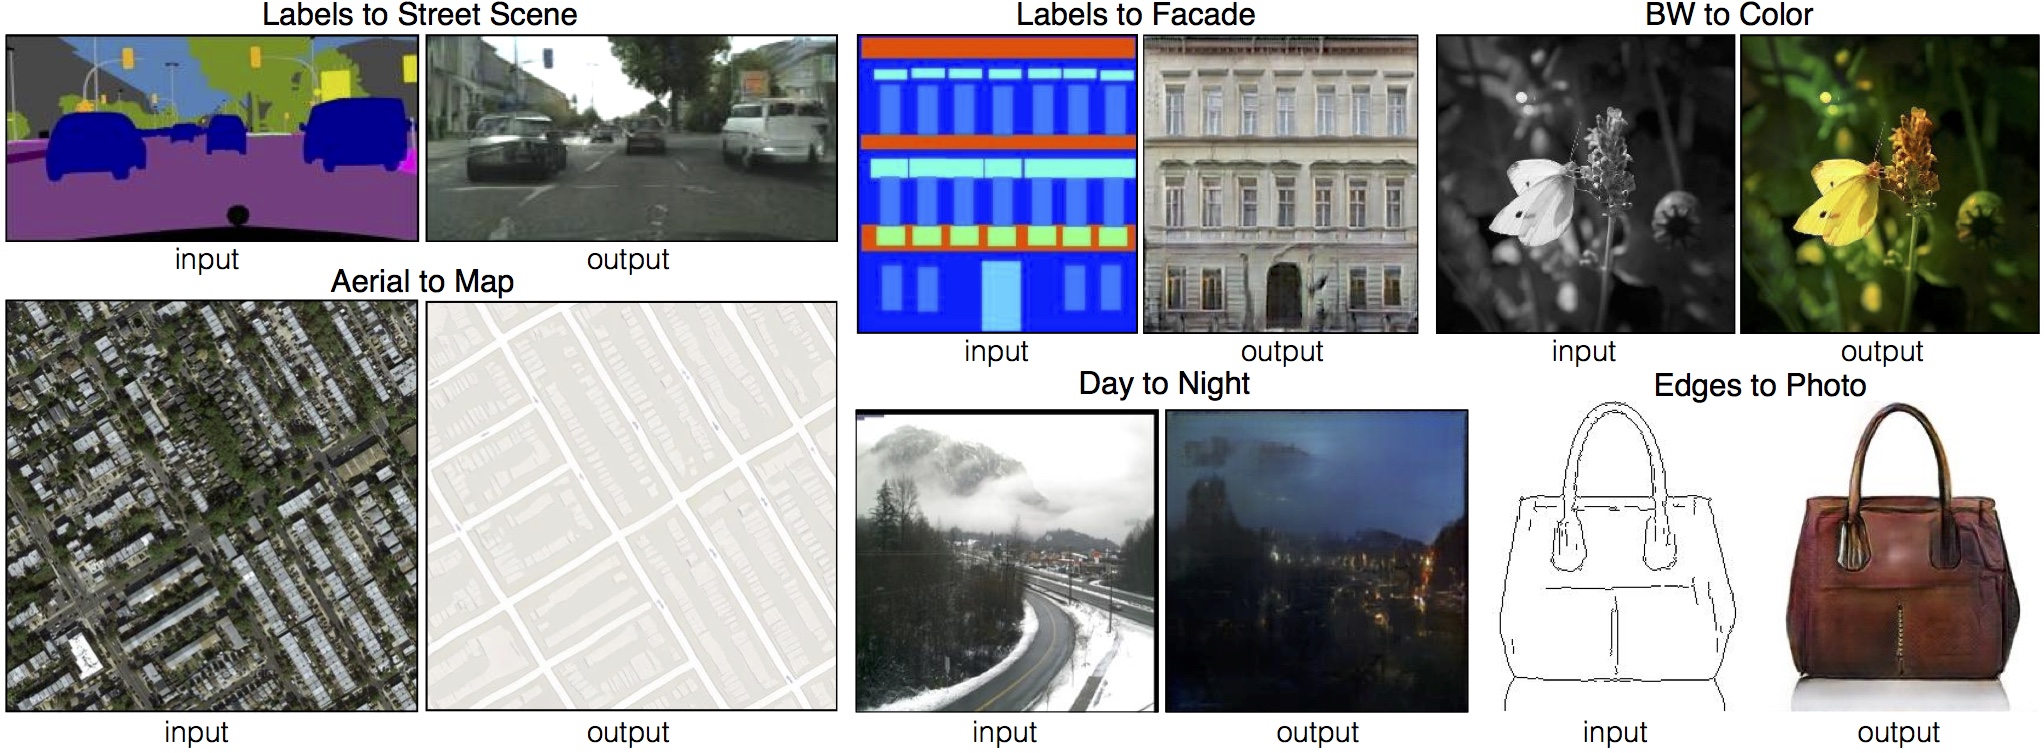
Torch implementation for learning a mapping from input images to output images, for example:
Image-to-Image Translation with Conditional Adversarial Networks
Phillip Isola, Jun-Yan Zhu, Tinghui Zhou, Alexei A. Efros
CVPR, 2017.
On some tasks, decent results can be obtained fairly quickly and on small datasets. For example, to learn to generate facades (example shown above), we trained on just 400 images for about 2 hours (on a single Pascal Titan X GPU). However, for harder problems it may be important to train on far larger datasets, and for many hours or even days.
Note: Please check out our PyTorch implementation for pix2pix and CycleGAN. The PyTorch version is under active development and can produce results comparable to or better than this Torch version.
Setup
Prerequisites
Linux or OSX
NVIDIA GPU + CUDA CuDNN (CPU mode and CUDA without CuDNN may work with minimal modification, but untested)
Getting Started
Install torch and dependencies from https://github.com/torch/distro
This will run the model named expt_name in direction AtoB on all images in /path/to/data/val.
Result images, and a webpage to view them, are saved to ./results/expt_name (can be changed by passing results_dir=your_dir in test.lua).
See opt in test.lua for additional testing options.
Datasets
Download the datasets using the following script. Some of the datasets are collected by other researchers. Please cite their papers if you use the data.
bash ./datasets/download_dataset.sh dataset_name
facades: 400 images from CMP Facades dataset. [Citation]
cityscapes: 2975 images from the Cityscapes training set. [Citation]
maps: 1096 training images scraped from Google Maps
edges2shoes: 50k training images from UT Zappos50K dataset. Edges are computed by HED edge detector + post-processing.
[Citation]
edges2handbags: 137K Amazon Handbag images from iGAN project. Edges are computed by HED edge detector + post-processing. [Citation]
night2day: around 20K natural scene images from Transient Attributes dataset [Citation]. To train a day2night pix2pix model, you need to add which_direction=BtoA.
Models
Download the pre-trained models with the following script. You need to rename the model (e.g., facades_label2image to /checkpoints/facades/latest_net_G.t7) after the download has finished.
bash ./models/download_model.sh model_name
facades_label2image (label -> facade): trained on the CMP Facades dataset.
cityscapes_label2image (label -> street scene): trained on the Cityscapes dataset.
cityscapes_image2label (street scene -> label): trained on the Cityscapes dataset.
edges2shoes (edge -> photo): trained on UT Zappos50K dataset.
edges2handbags (edge -> photo): trained on Amazon handbags images.
day2night (daytime scene -> nighttime scene): trained on around 100 webcams.
Setup Training and Test data
Generating Pairs
We provide a python script to generate training data in the form of pairs of images {A,B}, where A and B are two different depictions of the same underlying scene. For example, these might be pairs {label map, photo} or {bw image, color image}. Then we can learn to translate A to B or B to A:
Create folder /path/to/data with subfolders A and B. A and B should each have their own subfolders train, val, test, etc. In /path/to/data/A/train, put training images in style A. In /path/to/data/B/train, put the corresponding images in style B. Repeat same for other data splits (val, test, etc).
Corresponding images in a pair {A,B} must be the same size and have the same filename, e.g., /path/to/data/A/train/1.jpg is considered to correspond to /path/to/data/B/train/1.jpg.
This will combine each pair of images (A,B) into a single image file, ready for training.
Notes on Colorization
No need to run combine_A_and_B.py for colorization. Instead, you need to prepare some natural images and set preprocess=colorization in the script. The program will automatically convert each RGB image into Lab color space, and create L -> ab image pair during the training. Also set input_nc=1 and output_nc=2.
Extracting Edges
We provide python and Matlab scripts to extract coarse edges from photos. Run scripts/edges/batch_hed.py to compute HED edges. Run scripts/edges/PostprocessHED.m to simplify edges with additional post-processing steps. Check the code documentation for more details.
Evaluating Labels2Photos on Cityscapes
We provide scripts for running the evaluation of the Labels2Photos task on the Cityscapes validation set. We assume that you have installed caffe (and pycaffe) in your system. If not, see the official website for installation instructions. Once caffe is successfully installed, download the pre-trained FCN-8s semantic segmentation model (512MB) by running
bash ./scripts/eval_cityscapes/download_fcn8s.sh
Then make sure ./scripts/eval_cityscapes/ is in your system's python path. If not, run the following command to add it
Images stored under --result_dir should contain your model predictions on the Cityscapes validation split, and have the original Cityscapes naming convention (e.g., frankfurt_000001_038418_leftImg8bit.png). The script will output a text file under --output_dir containing the metric.
Further notes: Our pre-trained FCN model is not supposed to work on Cityscapes in the original resolution (1024x2048) as it was trained on 256x256 images that are then upsampled to 1024x2048 during training. The purpose of the resizing during training was to 1) keep the label maps in the original high resolution untouched and 2) avoid the need to change the standard FCN training code and the architecture for Cityscapes. During test time, you need to synthesize 256x256 results. Our test code will automatically upsample your results to 1024x2048 before feeding them to the pre-trained FCN model. The output is at 1024x2048 resolution and will be compared to 1024x2048 ground truth labels. You do not need to resize the ground truth labels. The best way to verify whether everything is correct is to reproduce the numbers for real images in the paper first. To achieve it, you need to resize the original/real Cityscapes images (not labels) to 256x256 and feed them to the evaluation code.
Display UI
Optionally, for displaying images during training and test, use the display package.
Install it with: luarocks install https://raw.githubusercontent.com/szym/display/master/display-scm-0.rockspec
Then start the server with: th -ldisplay.start
Open this URL in your browser: http://localhost:8000
By default, the server listens on localhost. Pass 0.0.0.0 to allow external connections on any interface:
th -ldisplay.start 8000 0.0.0.0
Then open http://(hostname):(port)/ in your browser to load the remote desktop.
L1 error is plotted to the display by default. Set the environment variable display_plot to a comma-separated list of values errL1, errG and errD to visualize the L1, generator, and discriminator error respectively. For example, to plot only the generator and discriminator errors to the display instead of the default L1 error, set display_plot="errG,errD".
Citation
If you use this code for your research, please cite our paper Image-to-Image Translation Using Conditional Adversarial Networks:
@article{pix2pix2017,
  title={Image-to-Image Translation with Conditional Adversarial Networks},
  author={Isola, Phillip and Zhu, Jun-Yan and Zhou, Tinghui and Efros, Alexei A},
  journal={CVPR},
  year={2017}
}
Cat Paper Collection
If you love cats, and love reading cool graphics, vision, and learning papers, please check out the Cat Paper Collection:
[Github] [Webpage]
Acknowledgments
Code borrows heavily from DCGAN. The data loader is modified from DCGAN and Context-Encoder.
phillipi/pix2pix thuộc nhóm AI Tools trên TopGit, cùng 10 topic GitHub. Trang Trending và Topics liệt kê các repo cùng số sao và cùng ngôn ngữ để so sánh.
Đọc thêm về phillipi/pix2pix ở đâu?
Trang TopGit này là một snapshot — tab "Readme" hiển thị nguyên văn README của repo (đã bỏ link, giữ ảnh). Repo GitHub ở github.com/phillipi/pix2pix là nguồn chính thức.
phillipi/pix2pix có bao nhiêu sao?
phillipi/pix2pix có 10.7k sao GitHub — tải lại trang để xem số mới nhất, hoặc xem trực tiếp github.com/phillipi/pix2pix. TopGit phản chiếu số sao của GitHub nhưng không cam kết đến từng phút.
phillipi/pix2pix có phải mã nguồn mở không?
TopGit chưa ghi nhận license cho phillipi/pix2pix. Phần lớn repo public trên GitHub là mã nguồn mở, nhưng điều khoản khác nhau từng repo — mở file LICENSE để xác nhận.
phillipi/pix2pix có trang demo không?
Dự án có trang chủ ở https://phillipi.github.io/pix2pix/. Tab "Readme" ở trang này thường có ảnh chụp và hướng dẫn bắt đầu nhanh.
phillipi/pix2pix là gì?
phillipi/pix2pix (phillipi/pix2pix) là dự án Lua trên GitHub. Theo mô tả gốc: Image-to-image translation with conditional adversarial nets
phillipi/pix2pix so với các dự án AI Tools khác thế nào?
phillipi/pix2pix được TopGit xếp vào nhóm AI Tools, với 10.7k sao GitHub và viết bằng Lua. Xem trang chủ đề AI Tools trên TopGit để so sánh với các dự án tương tự theo số sao và mức độ hoạt động.
Đọc đầy đủ README ở tab phía trên.
pix2pix có đáng để bạn bỏ thời gian?
ChatGPT, Claude và Perplexity đều đọc được trang này. Hỏi thử xem họ nghĩ gì về pix2pix.

 /pix2pix