
etsy/oculus

etsy/oculus is a Java project with 707 stars. The metric correlation component of Etsy's Kale system
Snapshot summary built from the project's own GitHub metadata — there's no written TopGit review yet. The page will update automatically when a full review is published.
TopGit writes full reviews for the most-starred, most-requested repositories. This page is a snapshot until then — see the READ ME tab for the original README in full.
Snapshot
Top contributors
Show top contributors
Oculus is an Archived Project
Oculus is no longer actively maintained. Your mileage with patches may vary.
Oculus
Oculus is the anomaly correlation component of Etsy's Kale system.
It lets you search for metrics, using your choice of comparison algorithms:

and shows you other metrics which are similar:
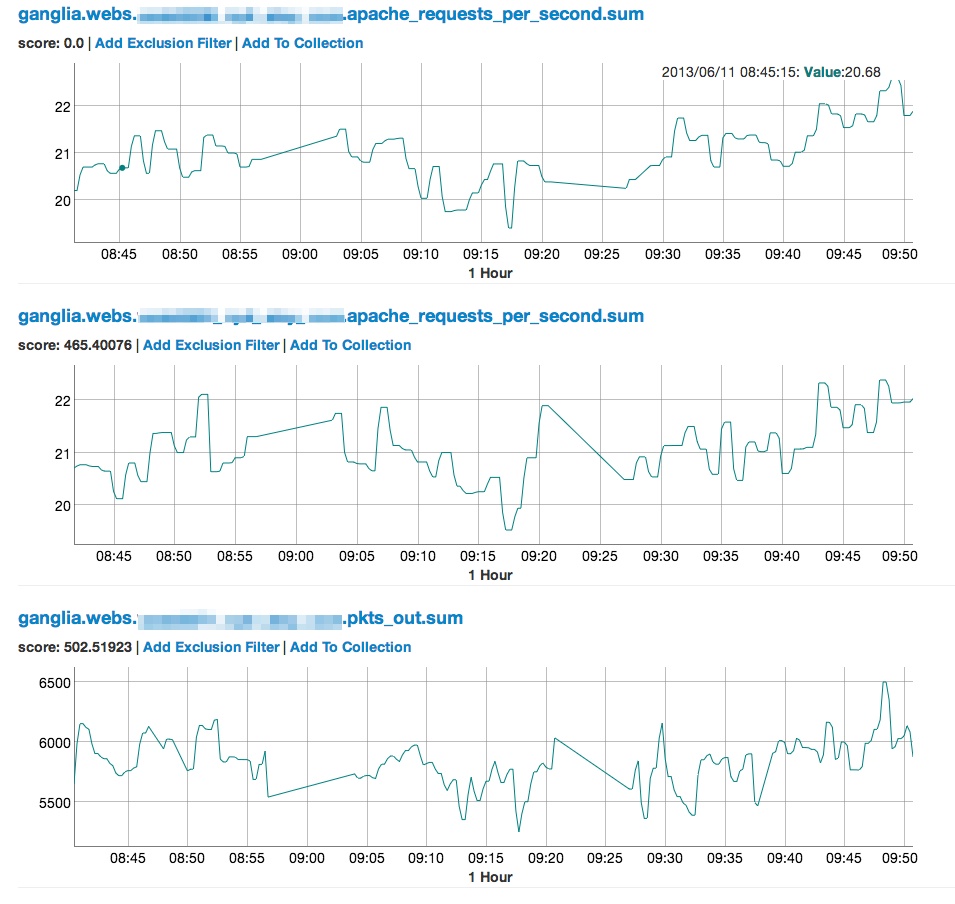
You can even save interesting metrics into a collection, complete with your own notes:

And then if Oculus finds matches in your saved collections, it'll show you this alongside your other search results:

Installation Overview
Oculus consists of the following components:
- Sinatra Web App - the Oculus front end, used to search for metric correlations
- Skyline Import Script and Cronjob - Used to import data from Skyline into Elasticsearch
- ElasticSearch Cluster - The search backend for Oculus
- Worker Box(es) - Used to process metrics from Skyline and import them into Elasticsearch
- Working Skyline install - Oculus is fed using data from Skyline's data store. Without Skyline, it won't have any data to look at.
Where recommended server specs have been mentioned in this document, they're based on Etsy's usage of Oculus which is based around 250k metrics. Adjust as necessary for your own metric volume.
It's recommended that you work through the section in this README in the following order:
- ElasticSearch 1
- Workers
- Oculus Config File
- Skyline Import Script and Cronjob
- WebApp
Following the instructions in this order should result in a working Oculus setup with all the moving parts running and functioning correctly. Please note that these instructions are geared towards installing Oculus components on separate boxes. If you're installing everything on one box, then you can ignore replicated steps such as cloning the Oculus code - this only needs to be done once.
Also provided, but not necessary to get Oculus up and running are some utility scripts, in the section headed
- Misc Utility Scripts
##ElasticSearch
For Oculus to function properly, you will ideally need at least two ElasticSearch servers in separate clusters, which Oculus will rotate through. Oculus requires the addition of custom scoring plugins, but otherwise uses ElasticSearch out of the box.
###Recommended Server Spec
- At least 8GB RAM
- Quad Core Xeon 5620 CPU or comparable
- 1GB disk space
###Installation and Plugin Build (Applies to all cluster nodes)
- Install the Java JDK (on CentOS, this is
yum install jdk) - Download and extract elasticsearch from
http://www.elasticsearch.org/download/- here we'll assume /opt/elasticsearch- Oculus has been tested with version 0.90 - it should currently not build on version 0.90 and above
- Clone the Oculus repository to somewhere on your server - here we'll assume /opt/oculus
- Run the command
mkdir elasticsearch-oculus-plugin - Copy
/opt/oculus/resources/elasticsearch-oculus-pluginto/opt/elasticsearch/elasticsearch-oculus-plugin - cd to
/opt/elasticsearch/elasticsearch-oculus-plugin - Run the following command:
rake build - If successful, this will create a file called
OculusPlugins.jar - copy
OculusPlugins.jarto/opt/elasticsearch/lib/OculusPlugins.jar
###Configuration
As noted above, the Elasticsearch servers which Oculus uses cannot be in the same cluster - Oculus needs at least two seperate servers (and clusters) to rotate between. To that end, the ElasticSearch configuration file needs to have the Cluster name and Node name manually specified. For simplicity, these instructions assume that you're going to name each cluster and node after the hostname of the server, but any name can be used.
The scoring plugins which Oculus uses for searching must also be added to the configuration file.
Change the following lines in /opt/elasticsearch/config/elasticsearch.yml, changing the cluster and nodename to match the servers you're using:
cluster.name: oculussearch01.mydomain.com
node.name: oculussearch01.mydomain.com
Add the following lines to /opt/elasticsearch/config/elasticsearch.yml, changing the cluster and nodename to match the servers you're using:
script.native:
  oculus_euclidian.type: com.etsy.oculus.tsscorers.EuclidianScriptFactory
  oculus_dtw.type: com.etsy.oculus.tsscorers.DTWScriptFactory
###Start Up ElasticSearch
Once you've installed ElasticSearch, built the Oculus scoring plugins and edited the configuration file, you can start it up by running the following command from /opt/elasticsearch
bin/elasticsearch
You can verify that Elasticsearch is up and running by visiting http://locahost:9200 on the box you installed ElasticSearch on. If all is well, you should see JSON similar to the below:
{
  "ok" : true,
  "status" : 200,
  "name" : "oculussearch01",
  "version" : {
    "number" : "0.20.5",
    "snapshot_build" : false
  },
  "tagline" : "You Know, for Search"
}
##Workers
Oculus' import and backend functions are handled by a cluster of Worker boxes running Resque (https://github.com/resque/resque). You'll need a Worker Master, running Redis (the central data store used by Resque) and some resque workers, and optionally some more Worker Slave boxes running extra Resque workers.
###Recommended Server Spec
- At least 12GB RAM
- Quad Core Xeon 5620 CPU or comparable
- 1GB disk space
###Worker Master Box
The first worker box you'll need to get up and running is the Master box running Redis.
Here's how to get it up and running:
- Install redis (on CentOS,
yum install redis) - Start up Redis (on CentOS,
service redis start) - Verify you can connect to Redis by running
redis-cli- If everything is working, you should see this prompt:
redis 127.0.0.1:6379>
- If everything is working, you should see this prompt:
- Type
exitto return back to the Shell. - Clone the Oculus repository to somewhere on your server - here we'll assume /opt/oculus
- cd into the directory where you cloned Oculus
- run the command
bundle install - Edit the file
Rakefile, changing the URL on line 66 to match the URL to your redis instance - Run the command
mkdir /var/run/oculusand make sure the user you will run your workers as can read and write to it. - Run the command
mkdir /var/log/oculusand make sure the user you will run your workers as can read and write to it. - To start the workers, from the directory where you installed Oculus run
rake resque:start_workers - Optional Steps
- You can start up a Resque web console to monitor what's going on by running
resque-webfrom the binary directory of the resque Gem (for example/usr/lib64/ruby/gems/1.9.1/gems/resque-1.23.0/bin/resque-web) - If you want to edit the number of Resque workers run on the master box, edit lines 21 and 22 of the Rakefile (changing the number '22' to whatever you like, then run
rake resque:restart_workers
- You can start up a Resque web console to monitor what's going on by running
###Worker Slave Box(es) - Optional
Once you've got your Worker Master set up and running Redis, you can also optionally set up any number of Worker Slave boxes (which just run Resque Workers) you want - we run 3 at Etsy.
- Clone the Oculus repository to somewhere on your server - here we'll assume /opt/oculus
- cd into the directory where you cloned Oculus
- run the command
bundle install - Edit the file
Rakefile, changing the URL on line 66 to match the URL to your redis instance on the Worker Master - Run the command
mkdir /var/run/oculusand make sure the user you will run your workers as can read and write to it. - Run the command
mkdir /var/log/oculusand make sure the user you will run your workers as can read and write to it. - To start the workers, from the directory where you installed Oculus, run
rake resque:start_workers - Optional Steps
- If you want to edit the number of Resque workers run on this box, edit lines 21 and 22 of the Rakefile (changing the number '22' to whatever you like, then run
rake resque:restart_workers
- If you want to edit the number of Resque workers run on this box, edit lines 21 and 22 of the Rakefile (changing the number '22' to whatever you like, then run
##Oculus Config File
Now that you've got your Elasticsearch servers all prepped and your Workers happily waiting for work, before we can start chucking data Oculus the next step is to set up the Oculus config file - config/config.yml. Here's a sample config file:
results_explain: 0
elasticsearch:
  servers:
     - "http://oculussearch01.mycompany.com:9200"
     - "http://oculussearch02.mycompany.com:9200"
  index: "metrics"
  timeout: 30
  phrase_slop: 20
  scorers:
    dtw:
      radius: 5
      scale_points: 25
    euclidian:
      scale_points: 25
skyline:
  host: "skyline.mycompany.com"
  port: 6379
  listener_port: 2015
redis:
  host: "oculusredis.mycompany.com"
  port: 6379
At this stage, all you need to do is the following:
- Add your elasticsearch servers (one per line) to the
elasticsearch->serverssection - Add the hostname and port of your Worker Master's redis instance to the
redissection - Add your Skyline host, port and listener port to the
skylinesection.
You can ignore the other settings under elasticsearch for now - Have a look at the "Help" page in Oculus once you've gotten it up and running if you want to know more about these. For now, the defaults will suffice!
You should make sure that your config file is pushed out to all of your Oculus servers.
##Skyline Import Script and Cronjob
Now that you've got your search servers all ready to populate, you'll need to set up the script that imports data from Skyline into your search indexes. This can run on any of the servers you're using to run Oculus.
- Double check that you've configured your Oculus config file correctly as specified in the above section.
- cd into the
scriptsdirectory under the directory where you cloned Oculus. - Run
./import.rb - If all is working correctly, you should see output similar to this:
 Active ES Server: http://oculussearch01.mycompany.com:9200
 Next ES Server: http://oculussearch02.mycompany.com:9200
 Recreating indexes
 Creating redis jobs...
 Getting unique metric names
 Found 250578 metric names
 187 workers working
 311 process_redis_metrics jobs left to run
 187 workers working
 309 process_redis_metrics jobs left to run
 187 workers working
 148 process_redis_metrics jobs left to run
 187 workers working
 113 process_redis_metrics jobs left to run
 187 workers working
 110 process_redis_metrics jobs left to run
 153 workers working
 0 process_redis_metrics jobs left to run
 Setting active search server to http://oculussearch02.mycompany.com:9200
 Oculus import finished in 36.634672763 seconds
- Next, create a directory for the cronjob to log into (here we've used /var/log/oculus)
- Create a cronjob as follows, changing the full path to where you cloned the Oculus code, and the cron frequency as applicable):
*/2 * * * * /opt/oculus/scripts/import.rb > /var/log/oculus/import.log 2>&1
- Your Oculus search index will now be updated from Skyline every 2 minutes.
##Web App Install
Now that we've got all of the moving parts set up and started updating our search indexes with metric data, the final step is to get the Oculus front end web app set up.
- Clone the Oculus repository to somewhere on your server - here we'll assume /opt/oculus
- cd into the directory where you cloned Oculus
- run the command
bundle install - Make sure you've got your correctly configured configuration file in the
configdirectory under your Oculus checkout - Run the command
thin start - If everything's working correctly, you should see output similar to the following:
>> Using rack adapter
>> Thin web server (v1.5.0 codename Knife)
>> Maximum connections set to 1024
>> Listening on 0.0.0.0:3000, CTRL+C to stop
- The final step is to log onto the Oculus admin console (
http://yourserver:3000/admin, username admin and password admin), then click "Reinitialize Collections." Click OK to confirm. - You're all done! Oculus should now be running at
http://yourserver:3000- you can now start searching for metrics!!
Related repositories
Master programming by recreating your favorite technologies from scratch.
A curated meta-list of curated lists organized by technology domain. The repository acts as a directory pointing to hundreds of specialized awesome lists covering programming languages, platforms, frameworks, and tooling. All content is community-contributed under the CC0 public domain dedication.
Public APIs is a community-curated GitHub repository listing free, publicly accessible APIs across a wide range of categories, with auth type, HTTPS, and CORS noted for each entry. It's a browsable reference, not a library to install.
REA is an MCP server and CLI that gives AI coding agents the ability to reverse engineer binaries, JavaScript apps, .NET assemblies, and websites. It hooks into Hopper, Ghidra, or IDA Pro for native binary work, or runs static JavaScript analysis with just Node.js. Every investigation returns an Evidence bundle that includes what was found, what was not, and the reasoning path. Setup registers REA with supported agents and walks you through connecting an analysis engine. The CLI also works standalone for terminal-first workflows.
Quick answers
How active is development on etsy/oculus?
The most recent commit recorded on etsy/oculus was 9.6 years ago, based on the GitHub push timestamp. The repository has 68 forks — one of the better signals of community interest.
Is etsy/oculus open source?
TopGit's metadata for etsy/oculus does not record a license. Most public repositories on GitHub ARE open source, but the exact terms vary — verify by opening the LICENSE file directly.
What topics is etsy/oculus associated with?
GitHub's repository topics for etsy/oculus: "non-sox". TopGit's editorial category is open-source.
Where can I see etsy/oculus in action?
The project maintains a homepage at http://codeascraft.com/2013/06/11/introducing-kale/. The README tab on this page also usually contains screenshots and a quickstart.
Where do I read more about etsy/oculus?
This TopGit page is a snapshot — the READ ME tab shows the project's own README content (links stripped, images preserved). The GitHub repository at github.com/etsy/oculus is the definitive source.
Read full README in the tab above.
Curious whether oculus is right for you?
Let ChatGPT, Claude, or Perplexity look into it — click below and see what AI actually says about oculus.